The event user list is a list of people who got a ticket for the event or were invited to it or became a legal lead after accepting the event consents. For each participant it contains the minimum set of data required to create a profile: first name, last name and email address.
A participant can independently expand their profile with additional information, m.in.: position, company, phone number, description/bio, social media links, photo, as well as invoice data. Thanks to this, during the next login (e.g. when the participant buys a ticket or takes further actions in the system), they can fill in forms faster, based on the data saved in their profile.
Depending on the event configuration, the list may also include additional data — meaning everything you collect at the cart stage through 👉Registration Forms (e.g. diet, T‑shirt size, additional questions from the organizer).
Why is it worth encouraging people to complete their profile?
The more sensibly completed profiles you have, the better networking works at the event: it’s easier to recognize people, connect them with a company/role and get in touch, for example after browsing the list in the 👉Participants module. In practice, this simply improves the quality of using the app and makes life easier for both guests and the organizer.
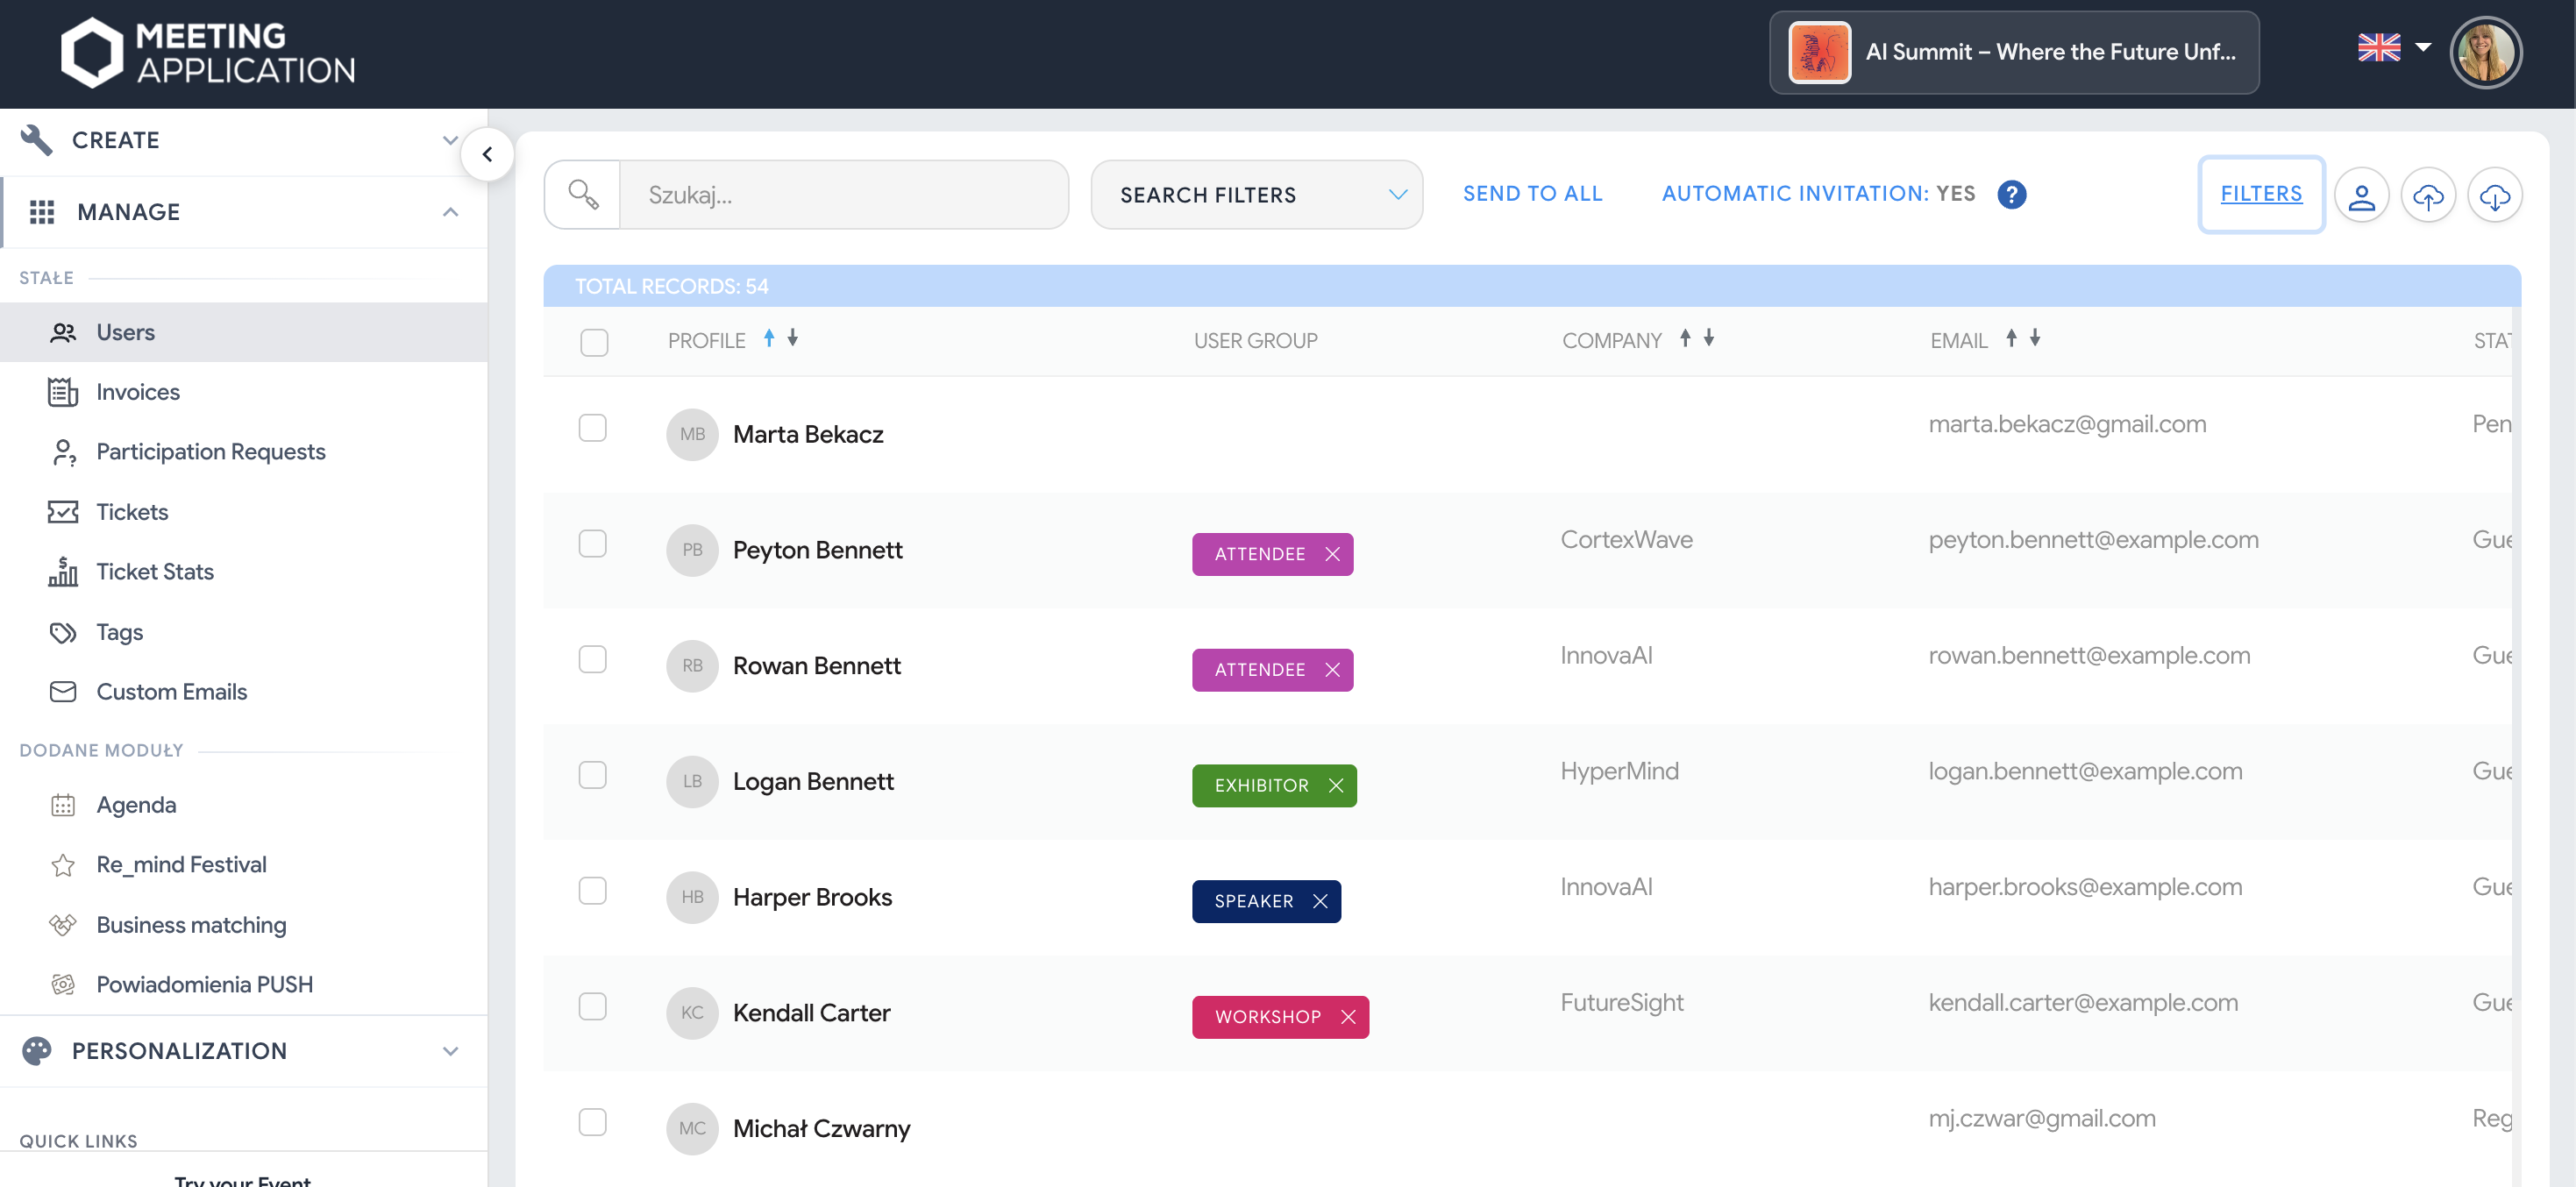
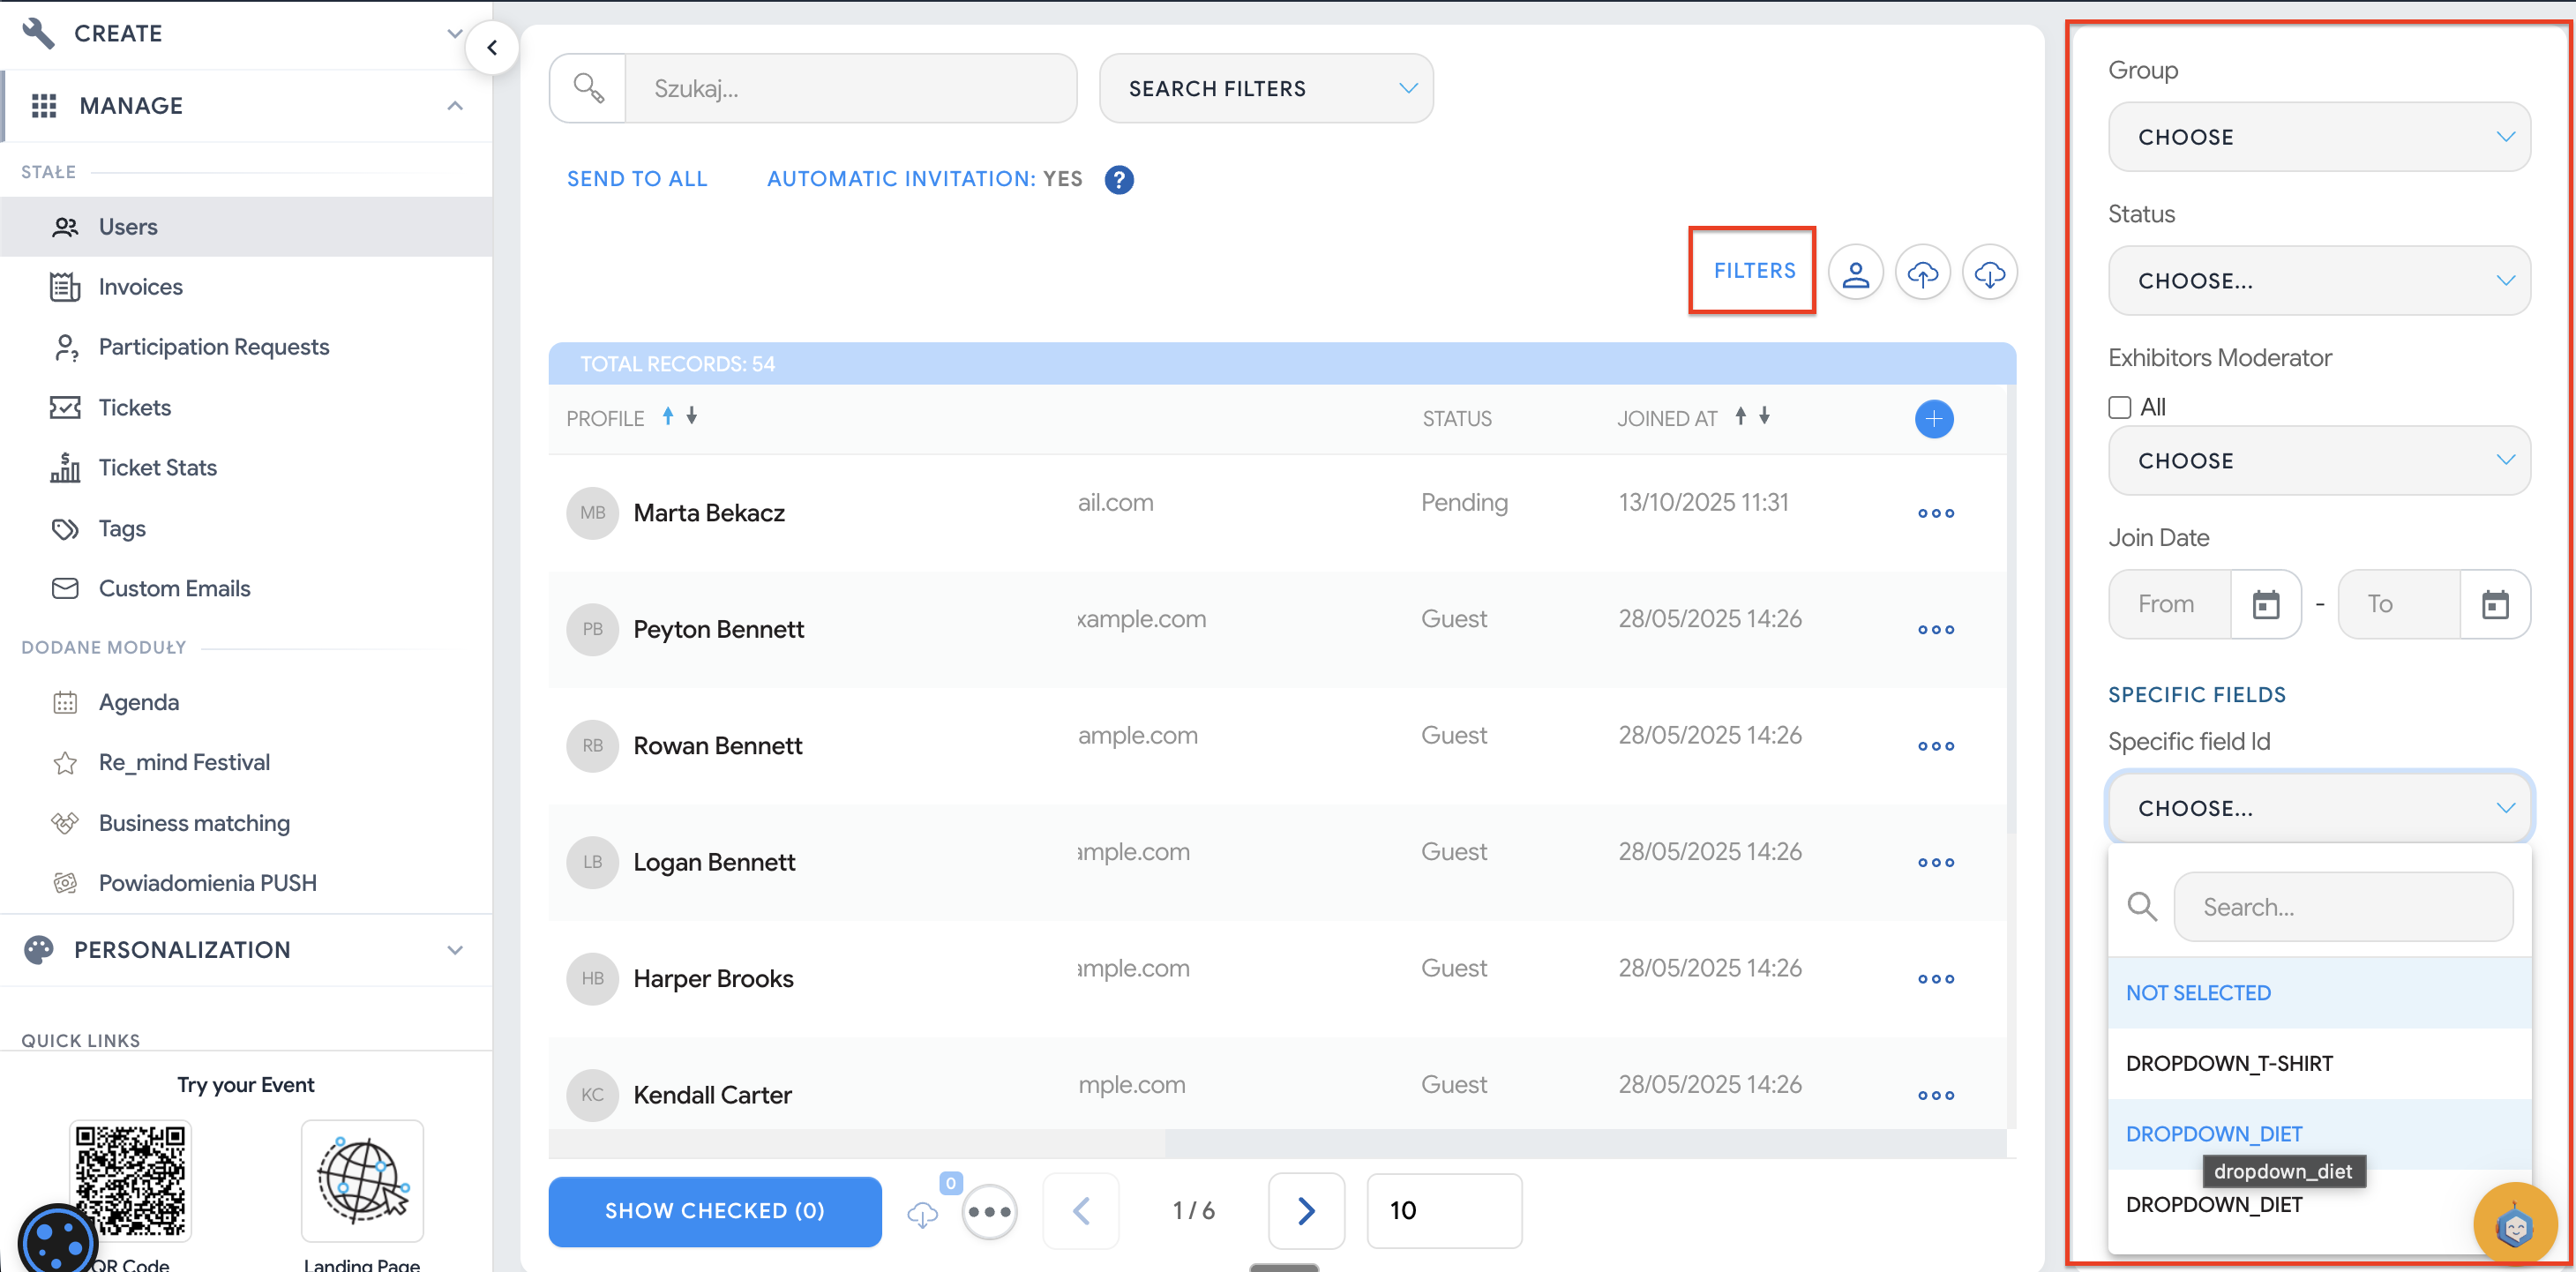
You can also filter the user list by different categories, such as: user group, their status or the date they joined the event. Click the Filters button to choose the options you’re interested in:
If you’re the event organizer and personal data administrator, you can add your participants to the event yourself using the import feature. You can learn more about importing users from the article Import użytkowników.
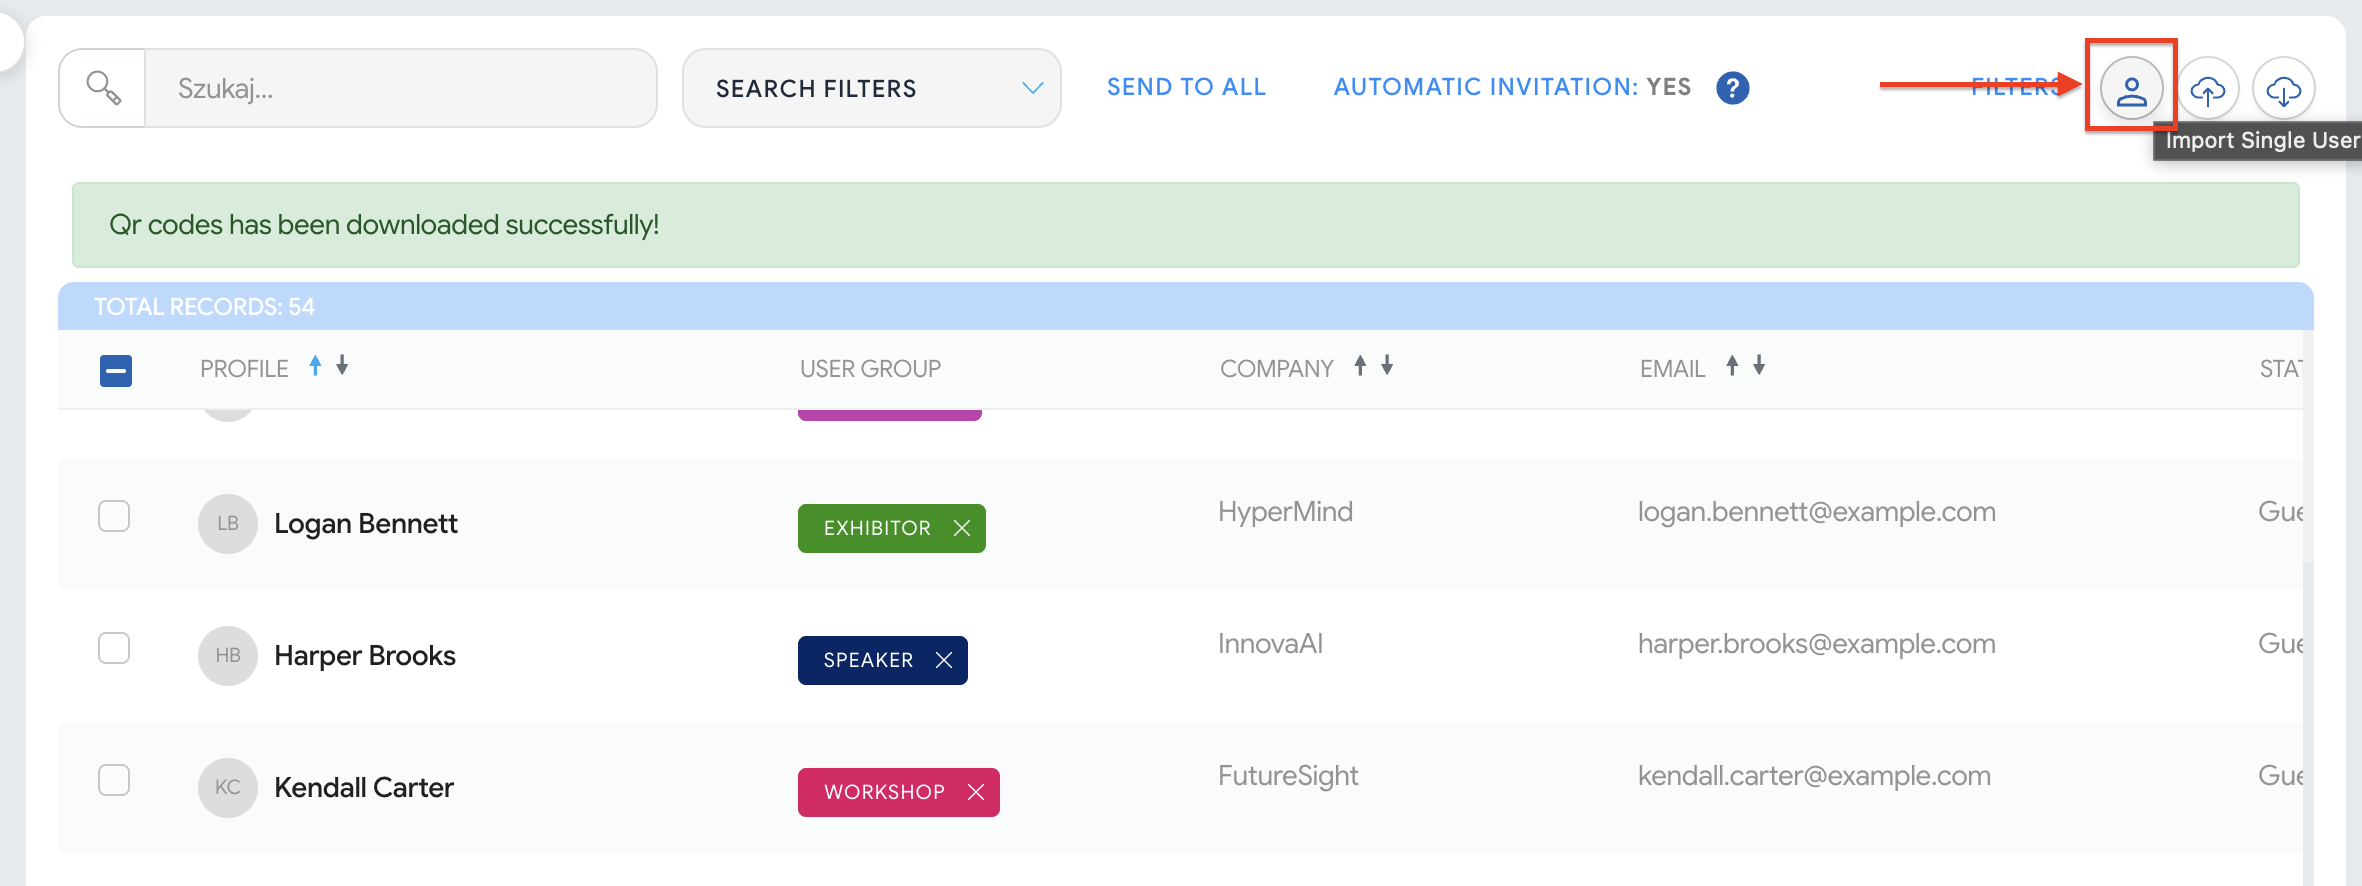
You can also add single Users, for example when registration is already closed on the event day and someone shows up late. In that case, click the person icon and then fill in the information about the person you’re adding, assigning them an entry ticket at the same time:
In the MANAGE → USERS tab you can quickly check what stage of joining the event a given person is at, whether they’ve activated their account, and what device they used to log in to the event. This information helps you tell apart people who are only in the database from those who are actually using the Landing Page or the mobile App.

Status “Lead" - means that a given email address was legally obtained as part of the event and is already in the event’s user base. Such a person can receive communication related to the event, both sent from the system and outside of it.
A user becomes a Lead, when:
they accepted the event consents while buying a ticket or registering via the cart on the website,
they accepted the consents while joining the event on the Landing Page or in the mobile App,
they were imported into the system by the organizer, who as the data controller is responsible for having a legal basis for processing the data.
In practice this means that a Lead can be, for example, a person who:
clicked on the banner “Stay up to date” on the Landing Page and shared their data in a way that complies with the event configuration,
as a logged-in user, joined the event in the Mobile App,
bought a ticket or someone bought a ticket for this person and, in this process, the event consents were accepted.
Status “Participant” – means that a person is not only in the event database, but has already gained proper access to participate according to the logic of the configured event.
For ticketed events. The status Participant is given to someone who has successfully obtained a ticket — paid or free. In this scenario, just being a lead is not enough, because the basis for taking part in the event is the actual ticket.
For non-ticketed events. The status Participant means a person who successfully joined the event in the Mobile App or on the Landing Page and gained access to its content. In this scenario there is no ticket as a condition of entry, so the transition from lead to participant is determined solely by entering the event according to the chosen access method.
You can learn more about access settings from 👉THIS ARTICLE.
Status “Left” – the person was on the list of Users in the event, but at some point clicked “leave event” in the Mobile App, in the Event info module. Such a person will no longer receive PUSH notifications from the app, but is still a valid Lead due to consents for the event given earlier and will still appear as a row in the exported consent file.
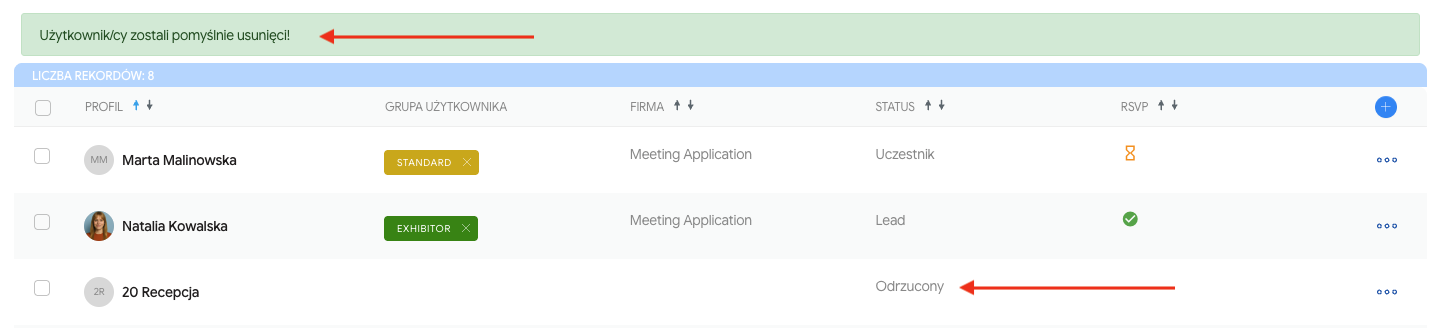
Status “Rejected” – applies to people who were already in the event as a lead or participant, but were removed by the System Administrator. Such a user still appears on the list with the new status and is included in the fee for a user, because the system has already done work for them, including in terms of communication and personal data processing.
Additional statuses for an event with whitelist access
Status “Pending” – means that a person has submitted their wish to join the event and is waiting for the Organizer’s decision.
Status “Rejected (WL)” – means a person whose request to participate was rejected even before joining the event in the mobile App or on the Landing Page.
The PLATFORM column shows which device the user used to log in to the event:
desktop – login in a browser,
iOS – login in the mobile app on an Apple device,
Android – login in the mobile app on a device with Android.
This field has big importance for support. Thanks to it you can quickly check whether the user actually logged into the event and what device they used. A lack of marking in this column means that the user hasn’t joined the event yet while being logged in on the selected device.
The ACTIVATED column lets you know whether the user already has an active account in the Meeting Application system.
✓ – the user’s account is active.
X – the account hasn’t been activated yet or the activation process hasn’t been completed.
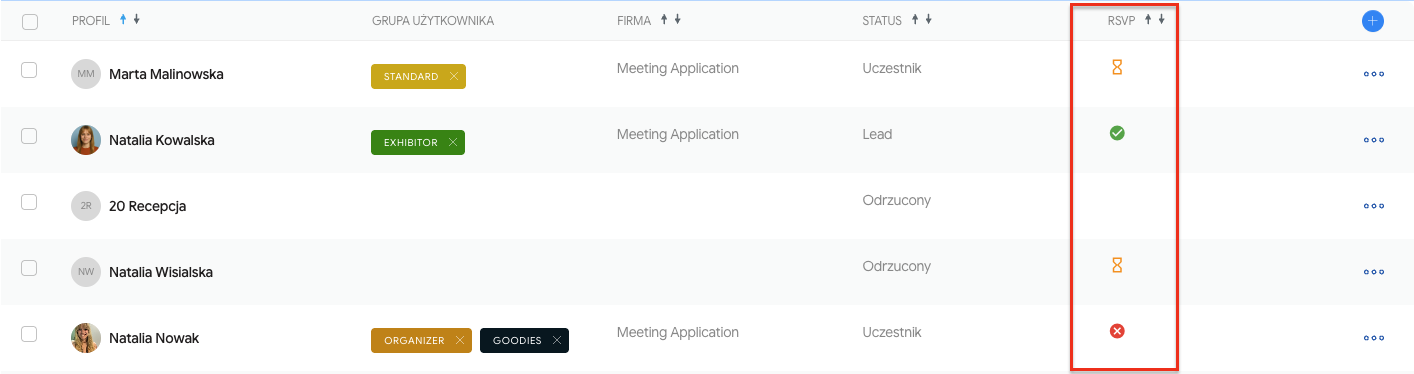
The RSVP column can show the following markers:
no icon – the RSVP invitation hasn’t been sent to the user’s email address,
hourglass – the invitation has been sent, but the user hasn’t responded yet,
green checkmark – the user has confirmed they want to join the event,
red checkmark – the user has declined to take part in the event.
Find out more about how the RSVP feature works in the article MAILE SYSTEMOWE.
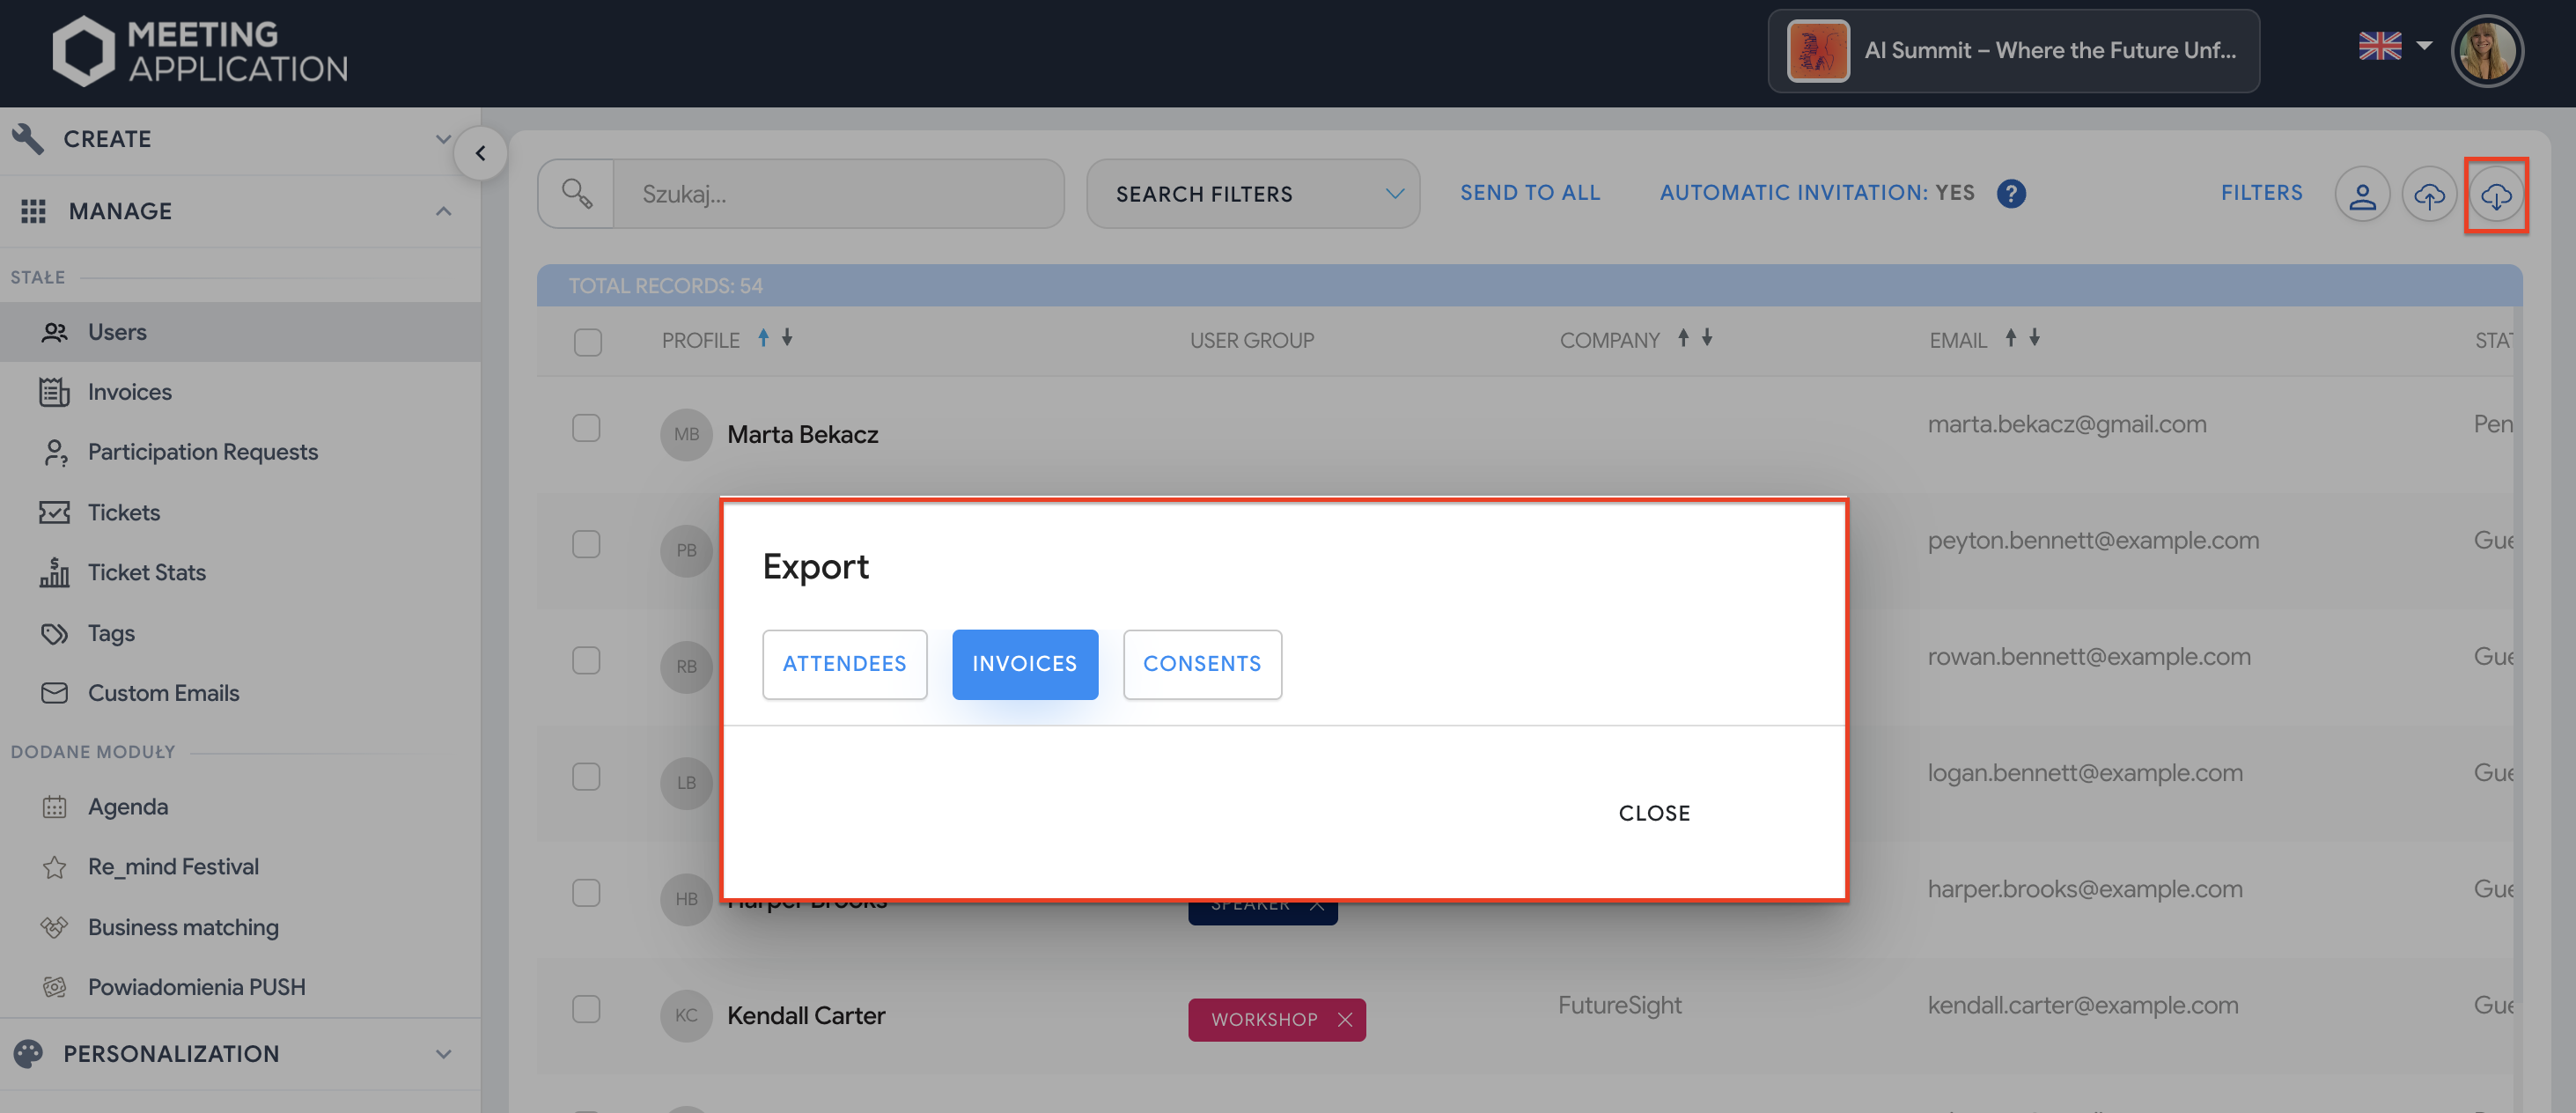
In the USERS tab you can export data collected for the event — including the list of Users, invoices and collected consents.
To export the full set of information:
Click the speech bubble with a downward arrow icon (top right corner of the table).
In the Export window, choose what you want to download:
ATTENDEES (list of Event Participants),
INVOICES (invoices),
CONSENTS (consents).
By default, this export applies to the entire database available in your event.
In the USERS tab you can download information about collected event consents. Data of users who have accepted the event consents in one of the following joining/registration scenarios:
during purchase or registration via the cart (for ticketed events) – accepting documents and consents is part of the process,
when joining the event on the Landing Page or in the mobile app – the user accepts the required consents while getting access (e.g. when logging in/joining),
when importing users by the organizer – if you add people to the system manually (import/white list), you — as the personal data controller — are responsible for having a legal basis to process their data and for making sure that consents/required documents were presented to them and accepted in a way that matches the organizer’s established process.
If you only need to export a slice (e.g. one User Group or a specific type of people), first filter the list (search/filters), select chosen Users, and then use the action bar at the bottom of the screen:
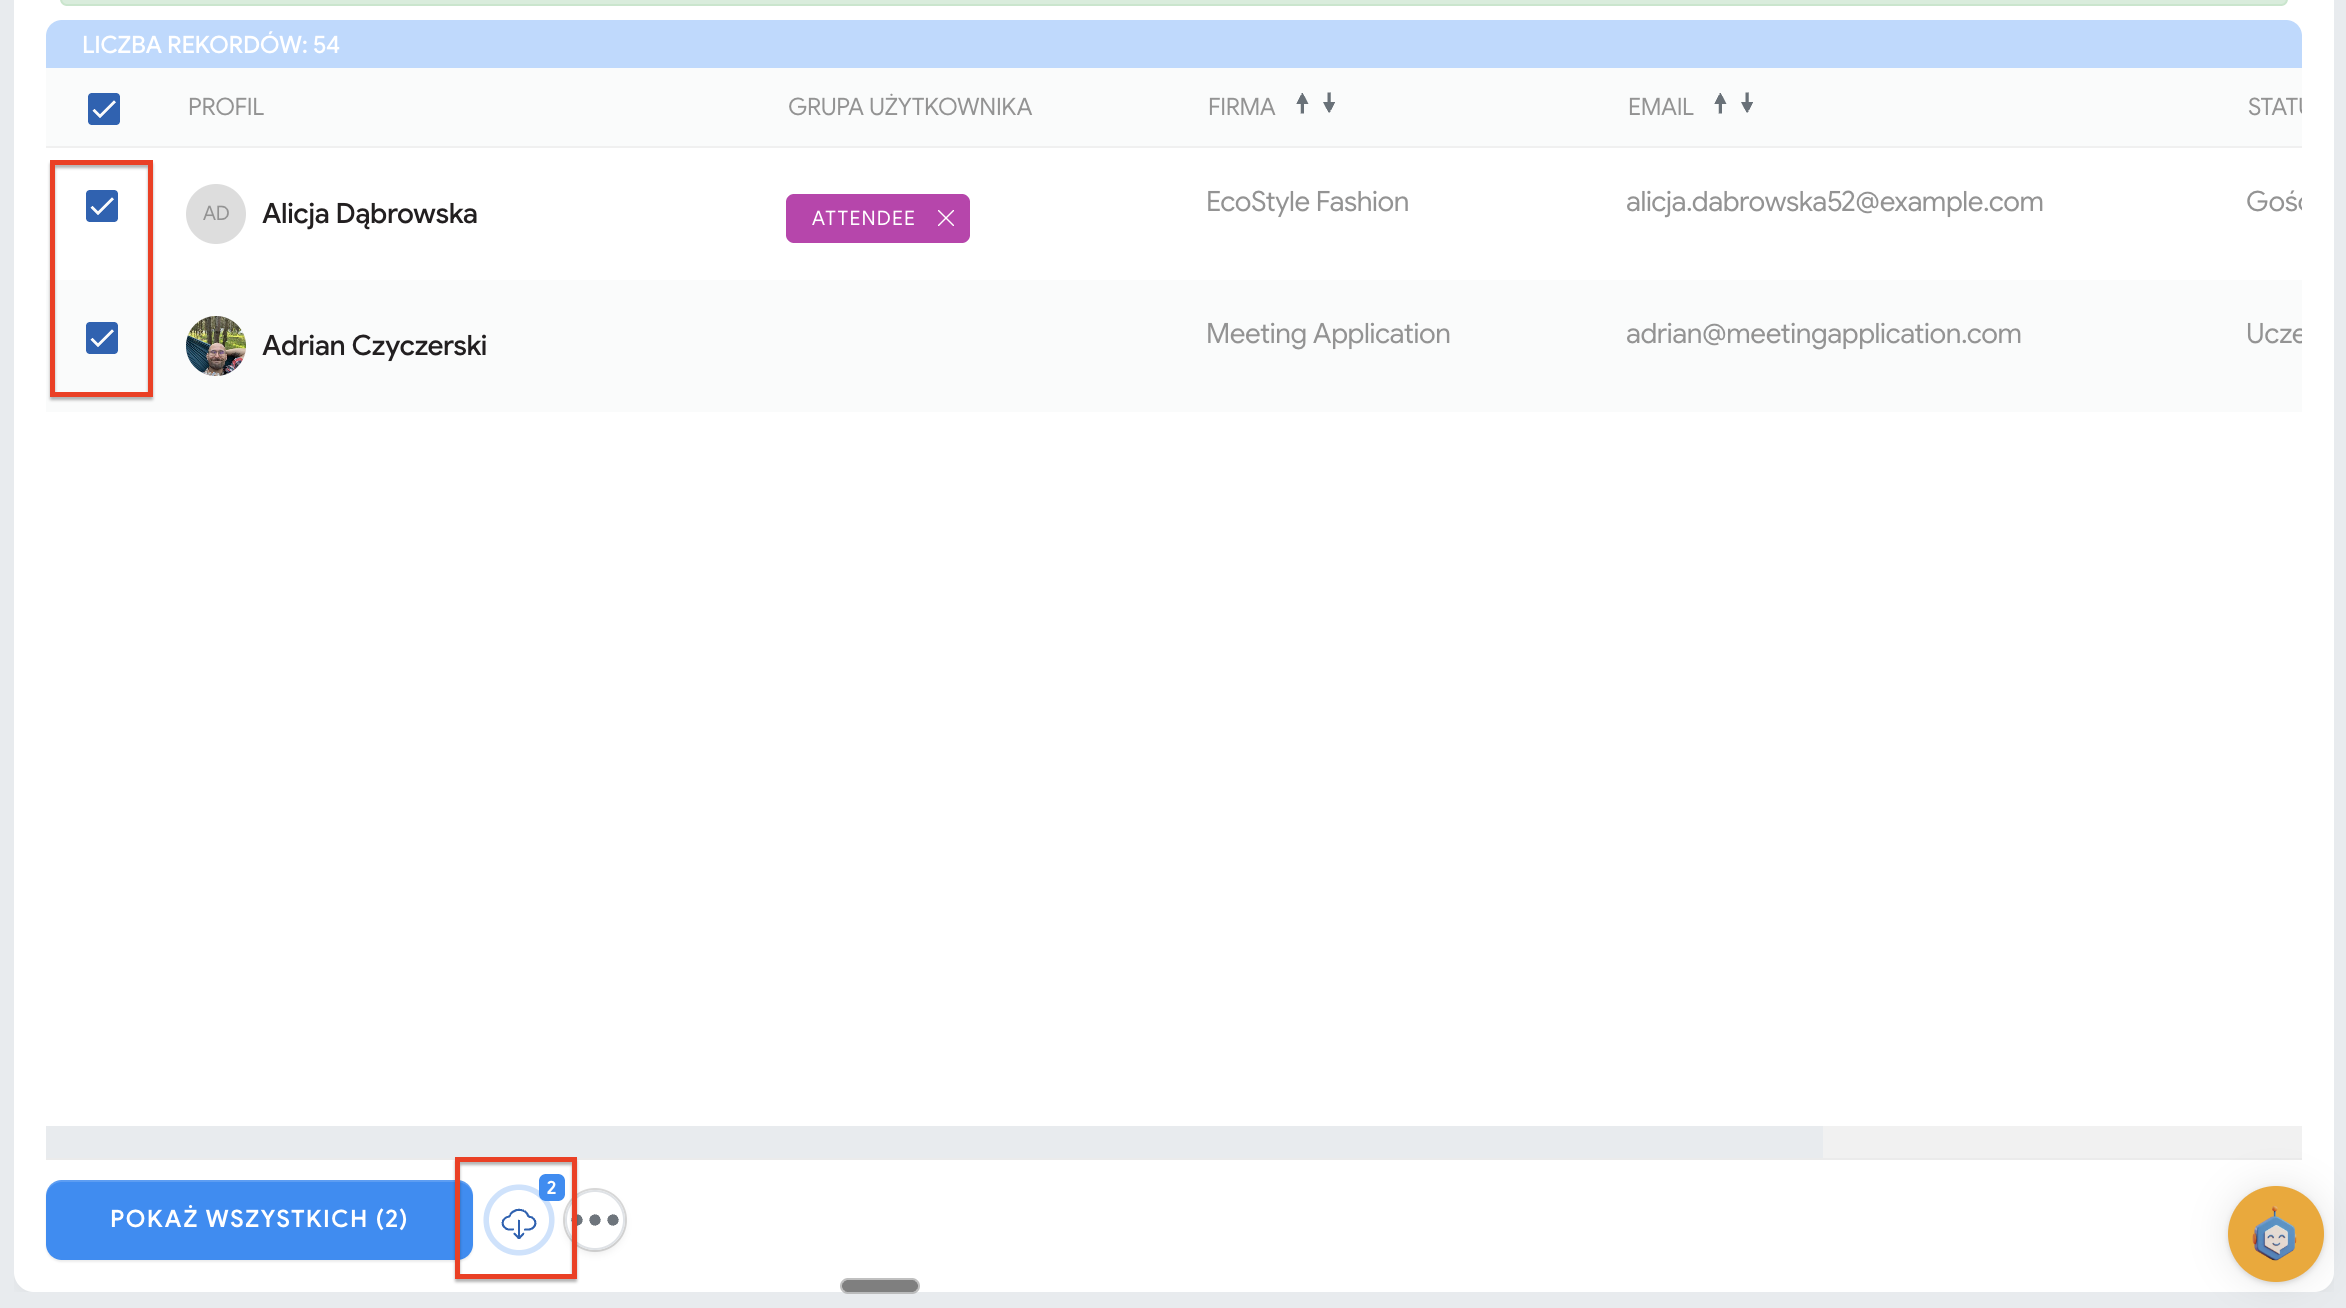
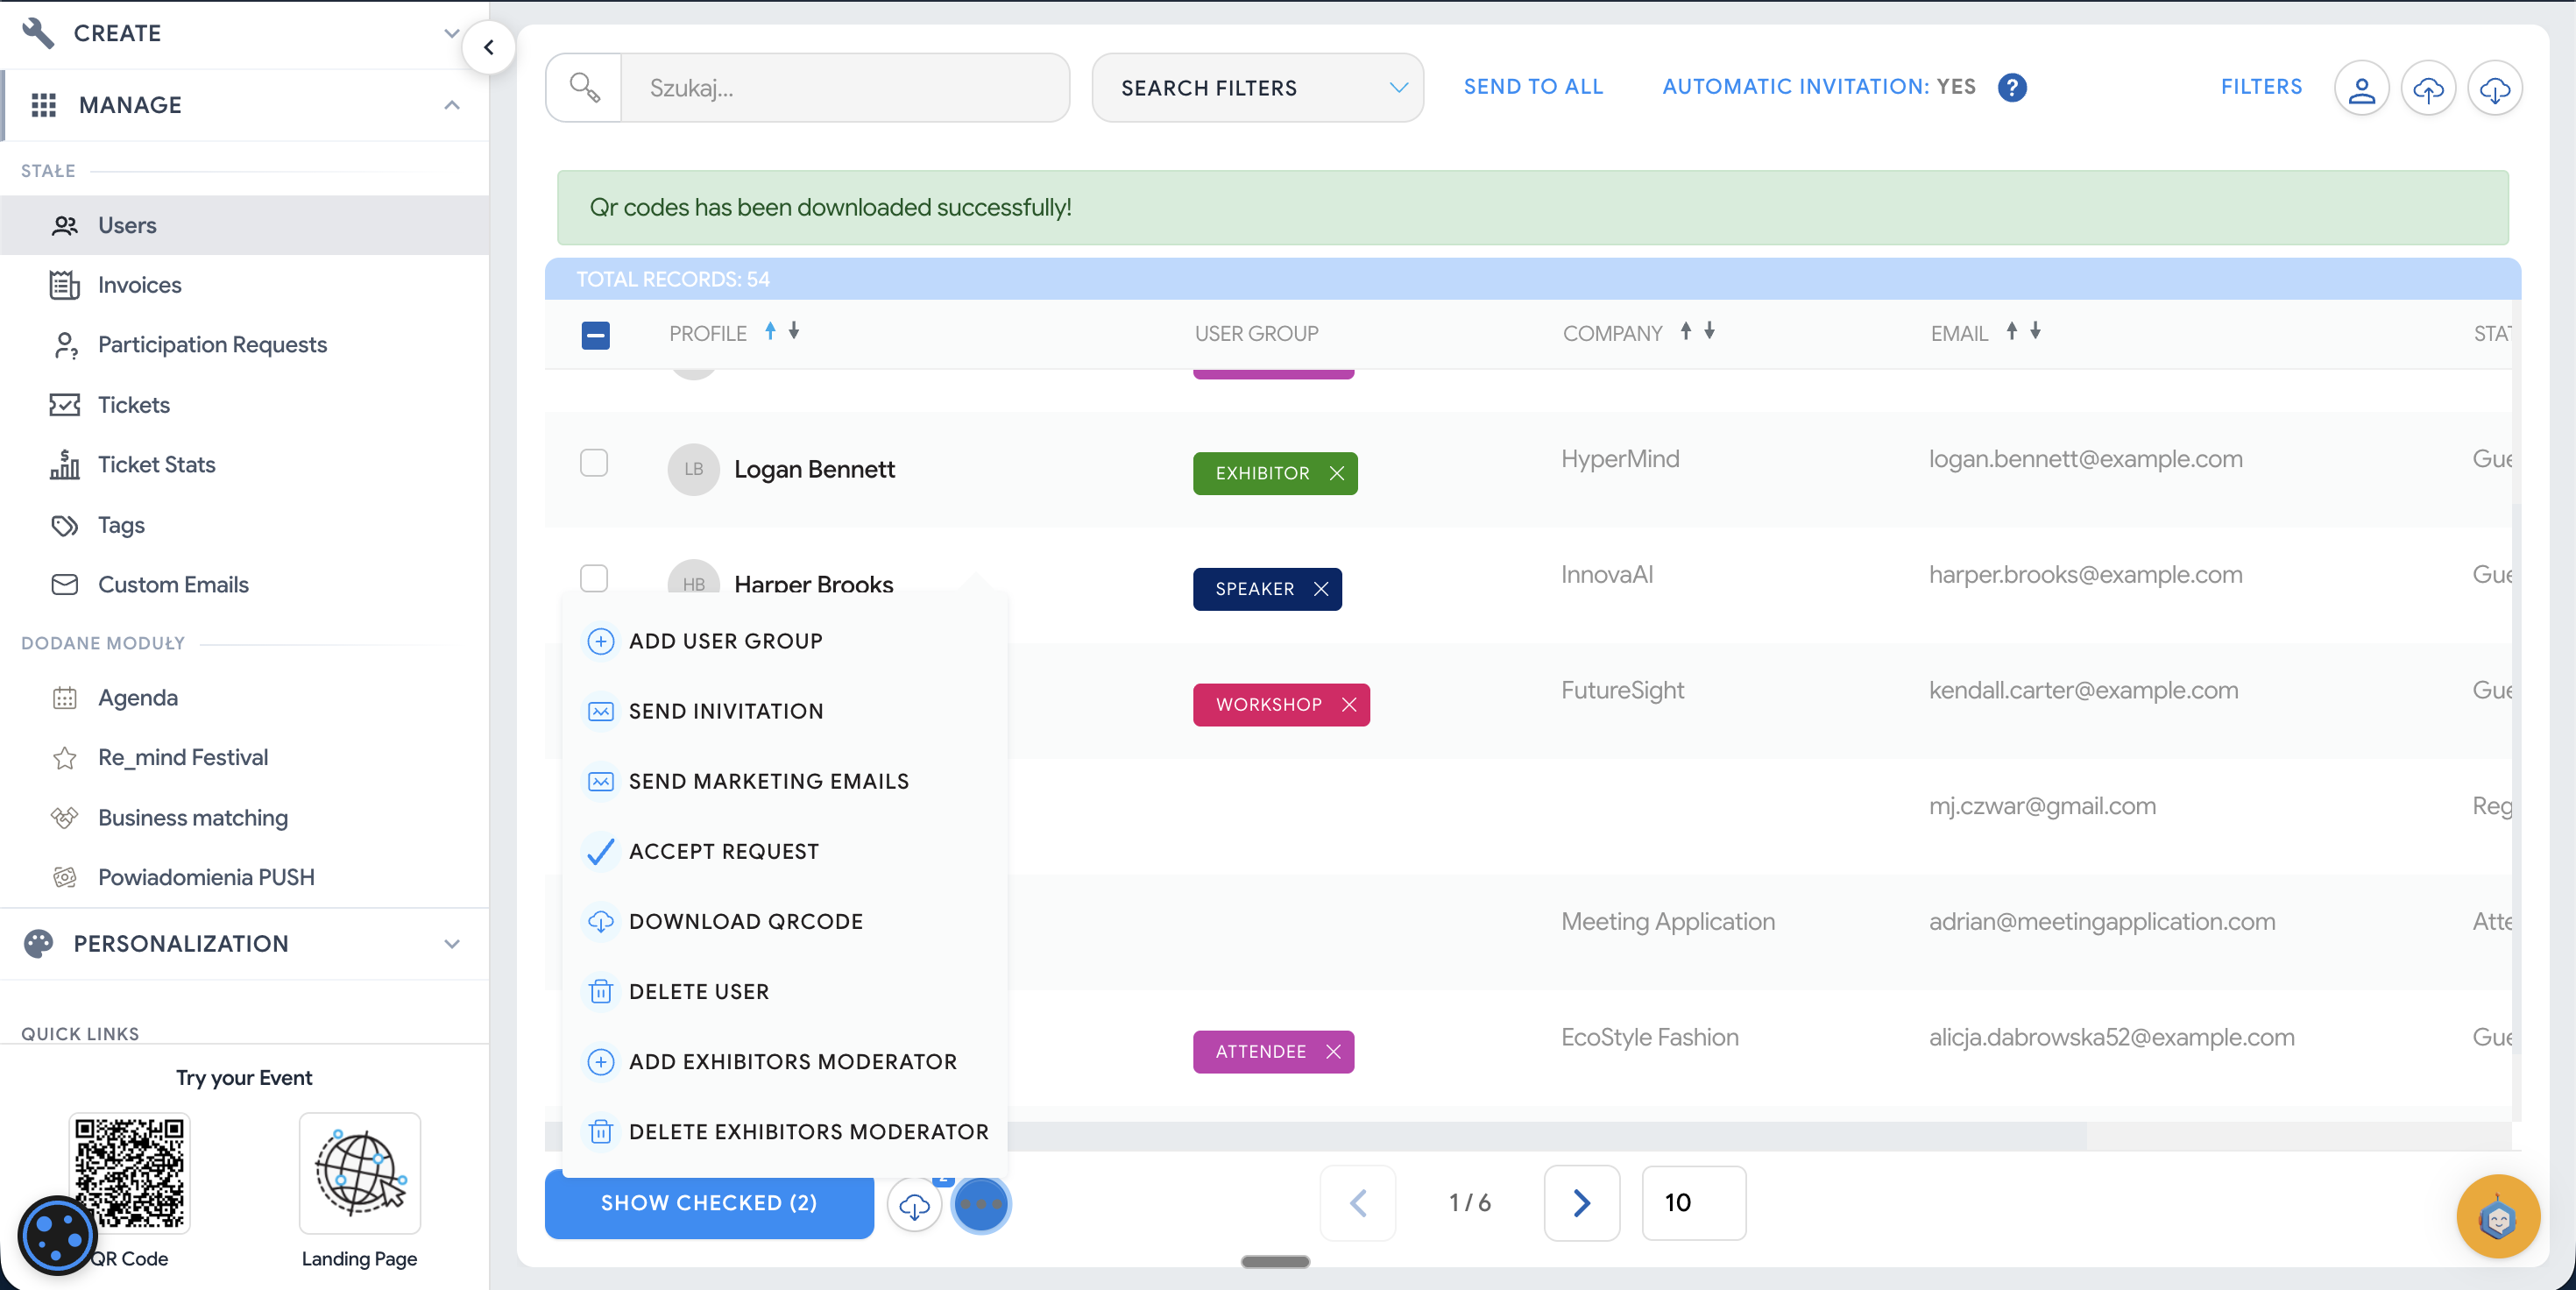
At the bottom of the page, by clicking the ellipsis, you get access to “bulk” actions — you do them once and the system takes care of it for the entire selected group.
Mass assignment to User Group - Allows you to add selected Users to a chosen user group (e.g. Speaker / Exhibitor / Attendee / Workshop).
This is crucial, because user groups control among other things, access, content visibility and communication logic.
Send invitation (Send invitation): Sends an invitation email to the selected Users.
Important: this email is treated as the “official invitation to the event”, so in practice it should be sent only once for a given event — so you don’t spam people and don’t create chaos in communication.
Send marketing email (Send marketing emails) - Used to send informational and promotional messages to the selected group (e.g. reminder about the event start, info about the agenda, encouragement to download the app, networking, sponsors etc.).
This is not an “invitation”, but marketing/organizational communication — you can use it as part of your event communication plan, after first confirming that this type of email can be enabled for your event.
Download a pack of personalized QR codes (Download QR code) - The system generates a ZIP file with individual QR codes assigned to each selected User.
Practical use: if you print badges yourself (e.g. before the event, in your own print shop), you can pre-print the QR on the badge and make it easier for Participants to exchange business cards using the app.
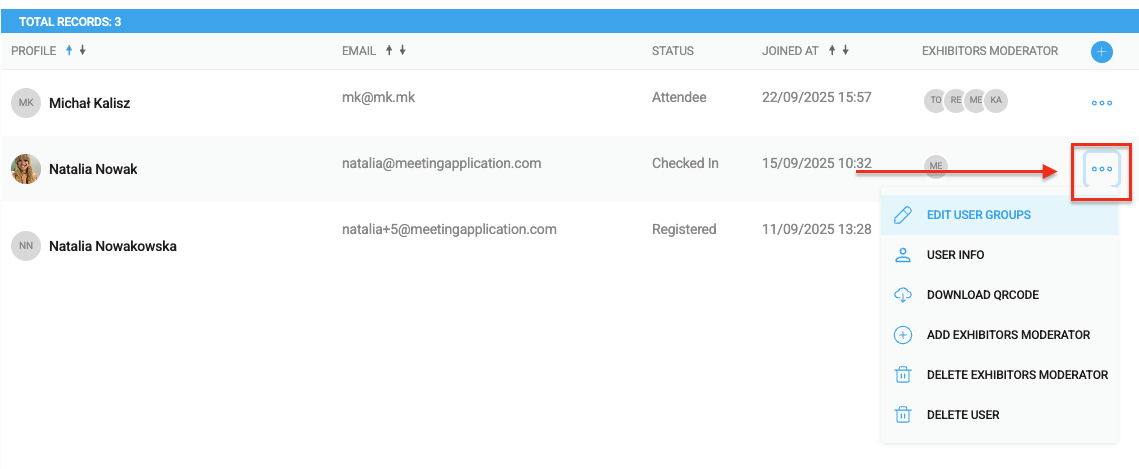
Adding an exhibitor moderator (Add exhibitors moderator) - Lets you assign the selected person as an exhibitor moderator — that is, a user who will manage a specific exhibitor/exhibitor’s asset (e.g. editing booth data, filling in content, handling elements assigned to the exhibitor — depending on the module configuration). There you’ll find additional operations for selections (including more “precise” data export, a zip with personalized QR codes). Learn more about the Moderator feature from 👉THIS ARTICLE
Acceptance of joining the event - this function applies to “by invitation only” events where some people have requested to join.
Click the three dots next to a single user to perform actions related to just that one person or to display details from the user's profile (first name, last name, email, personal QR code, what they offer, invoicing details, etc.).
For the participant list to be visible to others in the mobile app, go to the CREATE → COMPONENTS tab and add the Users module. You can find out more about the Participants module from 👉THIS ARTICLE.
When it comes to events where the configuration of the participant's calendar is important, making sure that all participants are properly assigned to specific groups and that their schedules are efficiently managed can be a challenge. Luckily, event organizers have tools available that help manage each user's program.
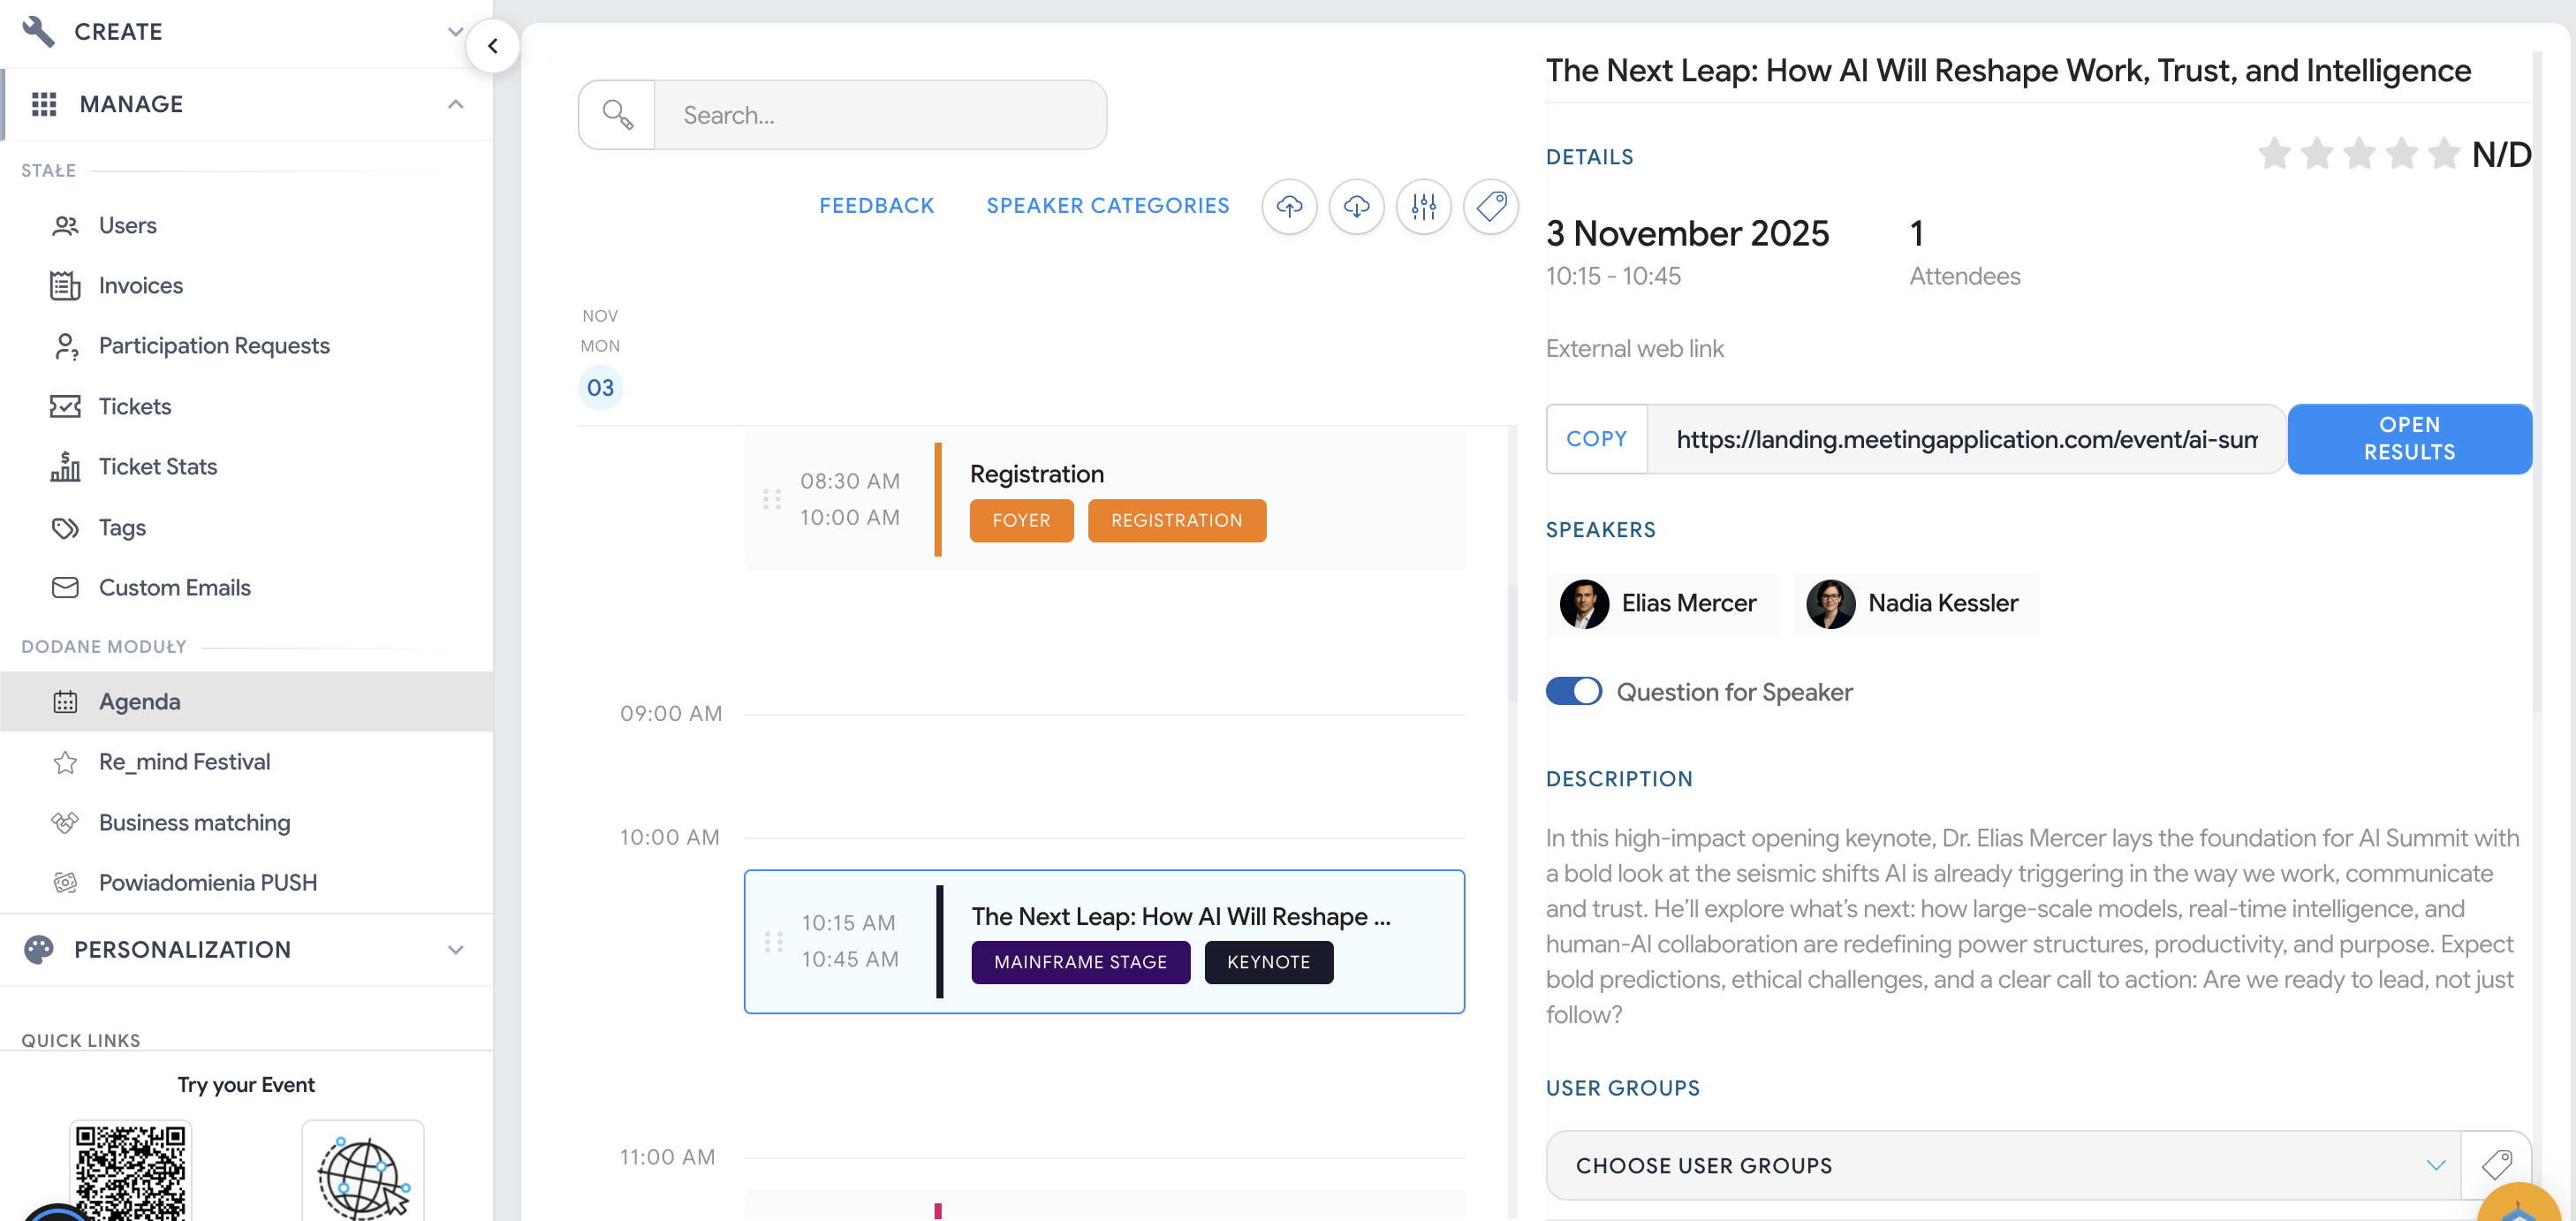
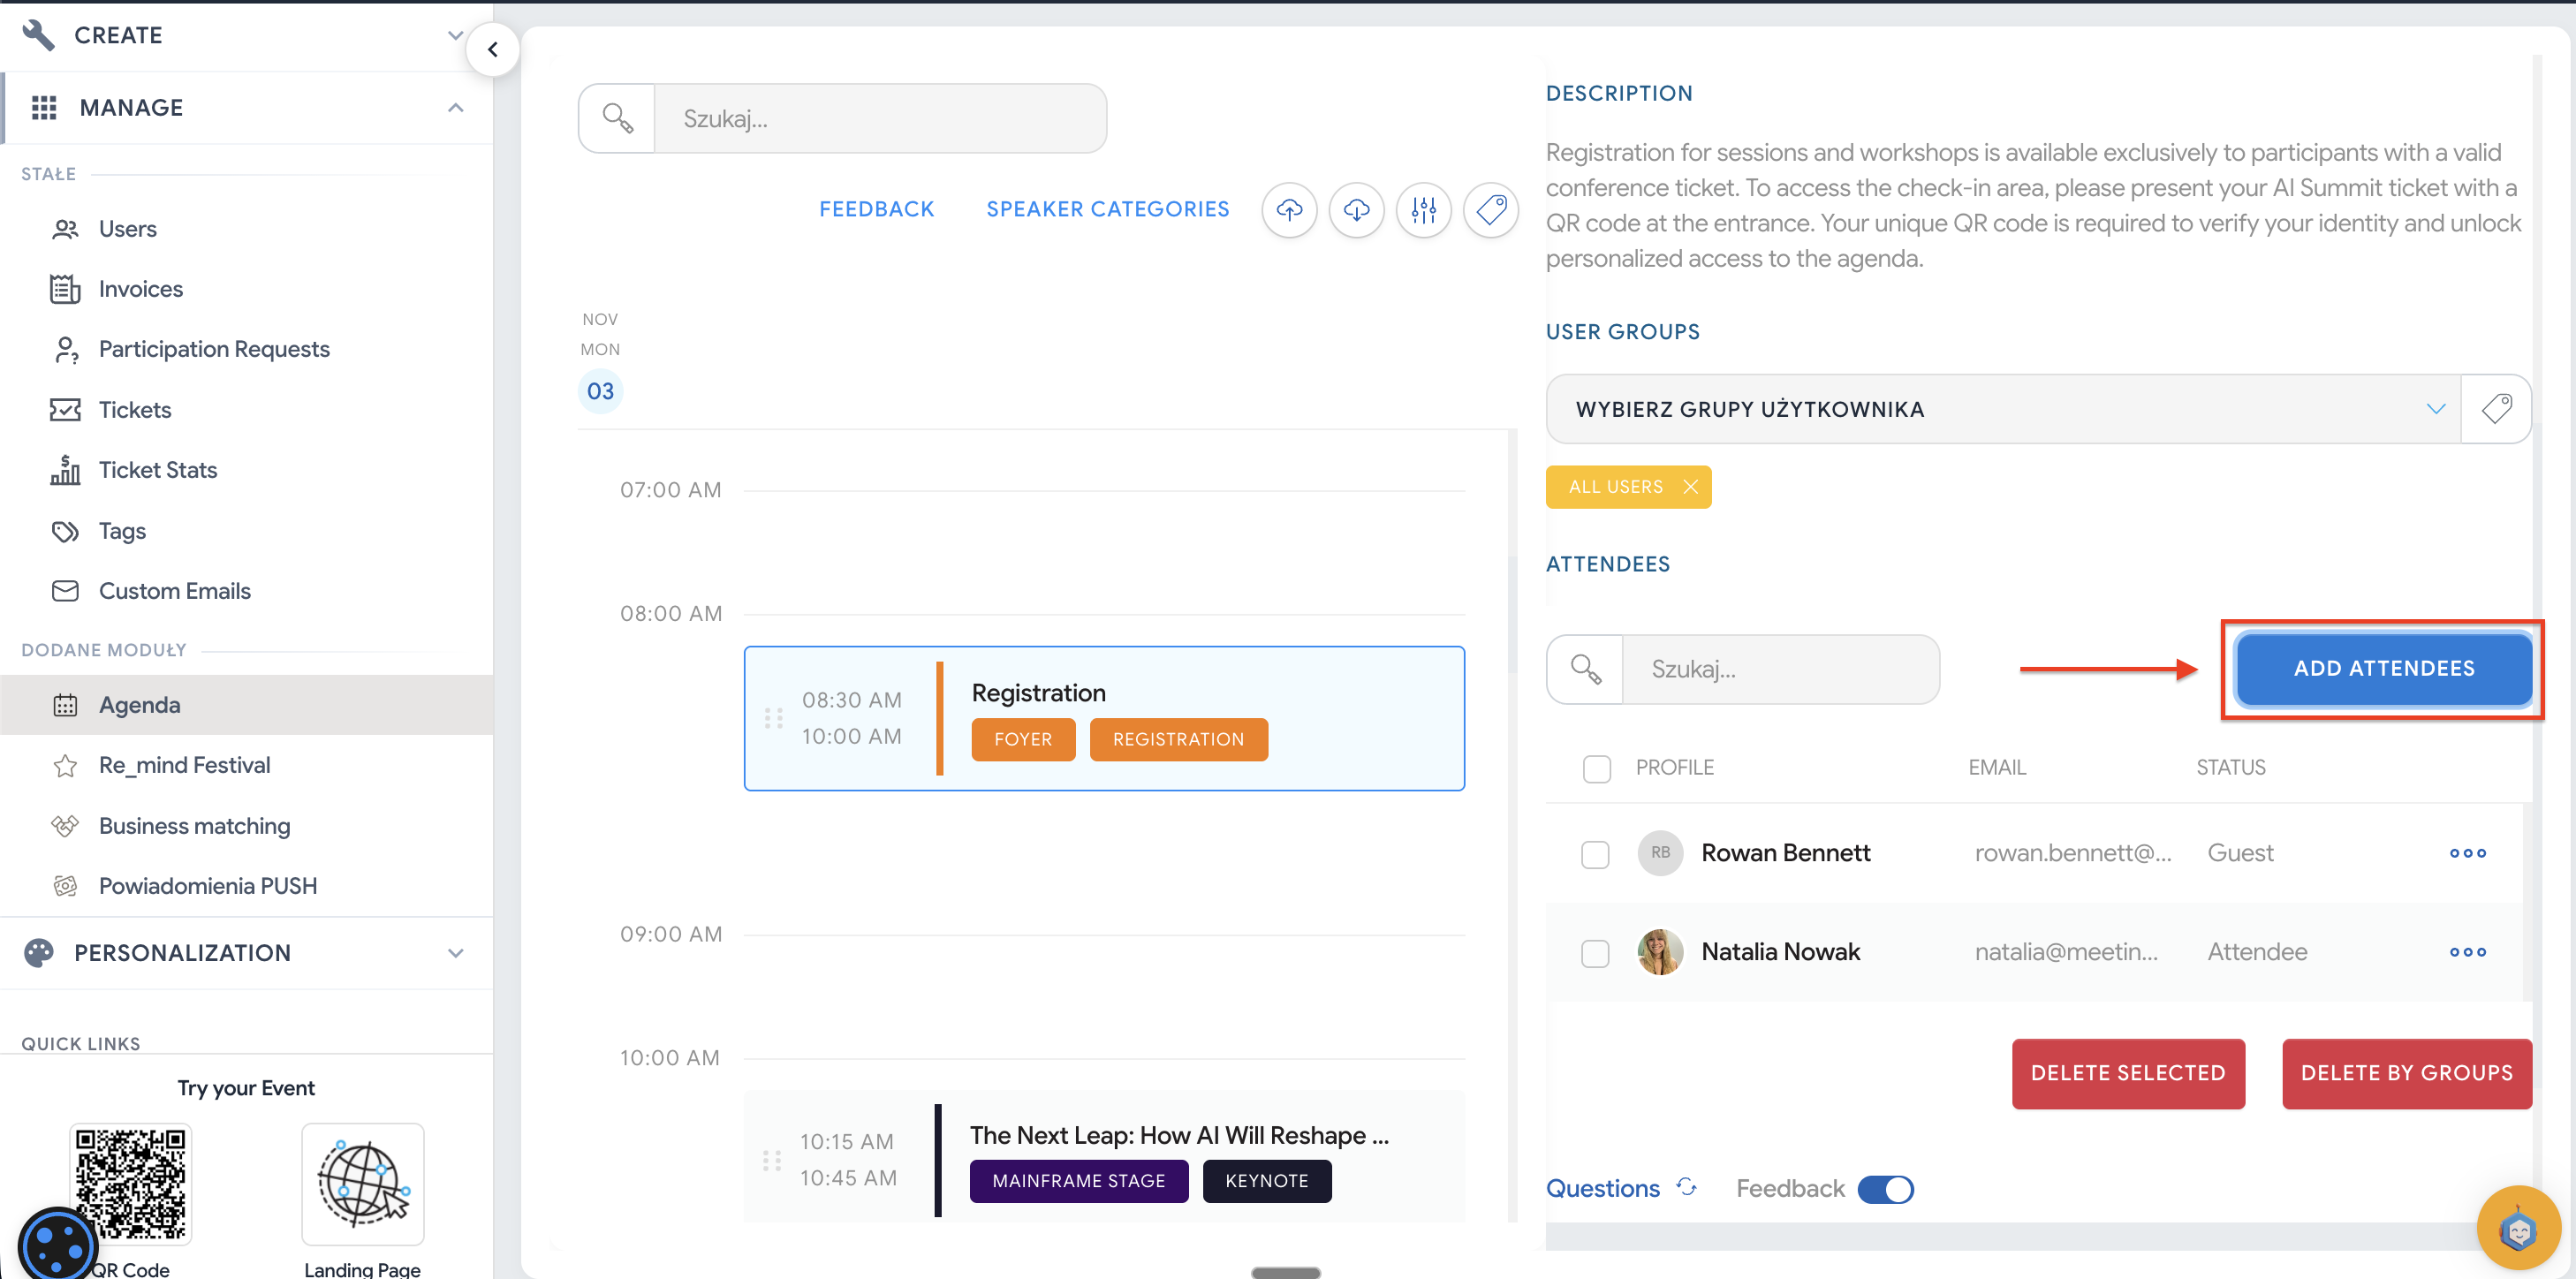
To assign participants to a specific session in the Agenda, go to the Agenda module in the Manage section. Then select the agenda event you want to manage. At the bottom of the screen, you’ll see a list of users assigned to this session (all those people logged in and clicked the plus sign next to the session in the agenda):
To add a specific person to an agenda session, click Add participants, then choose a user from the list. After selecting the user, save the changes and that participant will be assigned to the chosen session. You can also first tag multiple participants with a specific group and then choose to import members of that group into the session. Keep in mind that this kind of import won’t pull into the session those people who only get that group later on.
When a user is added to an event, they can log in to their account on the Landing Page and in the App and go to the Agenda – My plan section. In their calendar, they’ll see the event they’ve been assigned to. This way, participants don’t have to manually check which sessions their ticket is valid for and can instead rely on the event organizer, who manages their schedule:
This tool makes it way easier for event organizers to manage all participants’ schedules and ensures that everyone is assigned to the right groups and sessions during your event.
Have a great event with Meeting Application!
