We've revamped the way you enter event schedule info and speaker details, to make it easier not just for one-time imports, but also to keep things updated.
Add Agenda and Speakers modules to your event. If you plan to use more than one of these modules, just add several right away. Then, in the event modules list, click the three dots and go to rename. Give your modules new names, so it's easier to decide which content goes where.
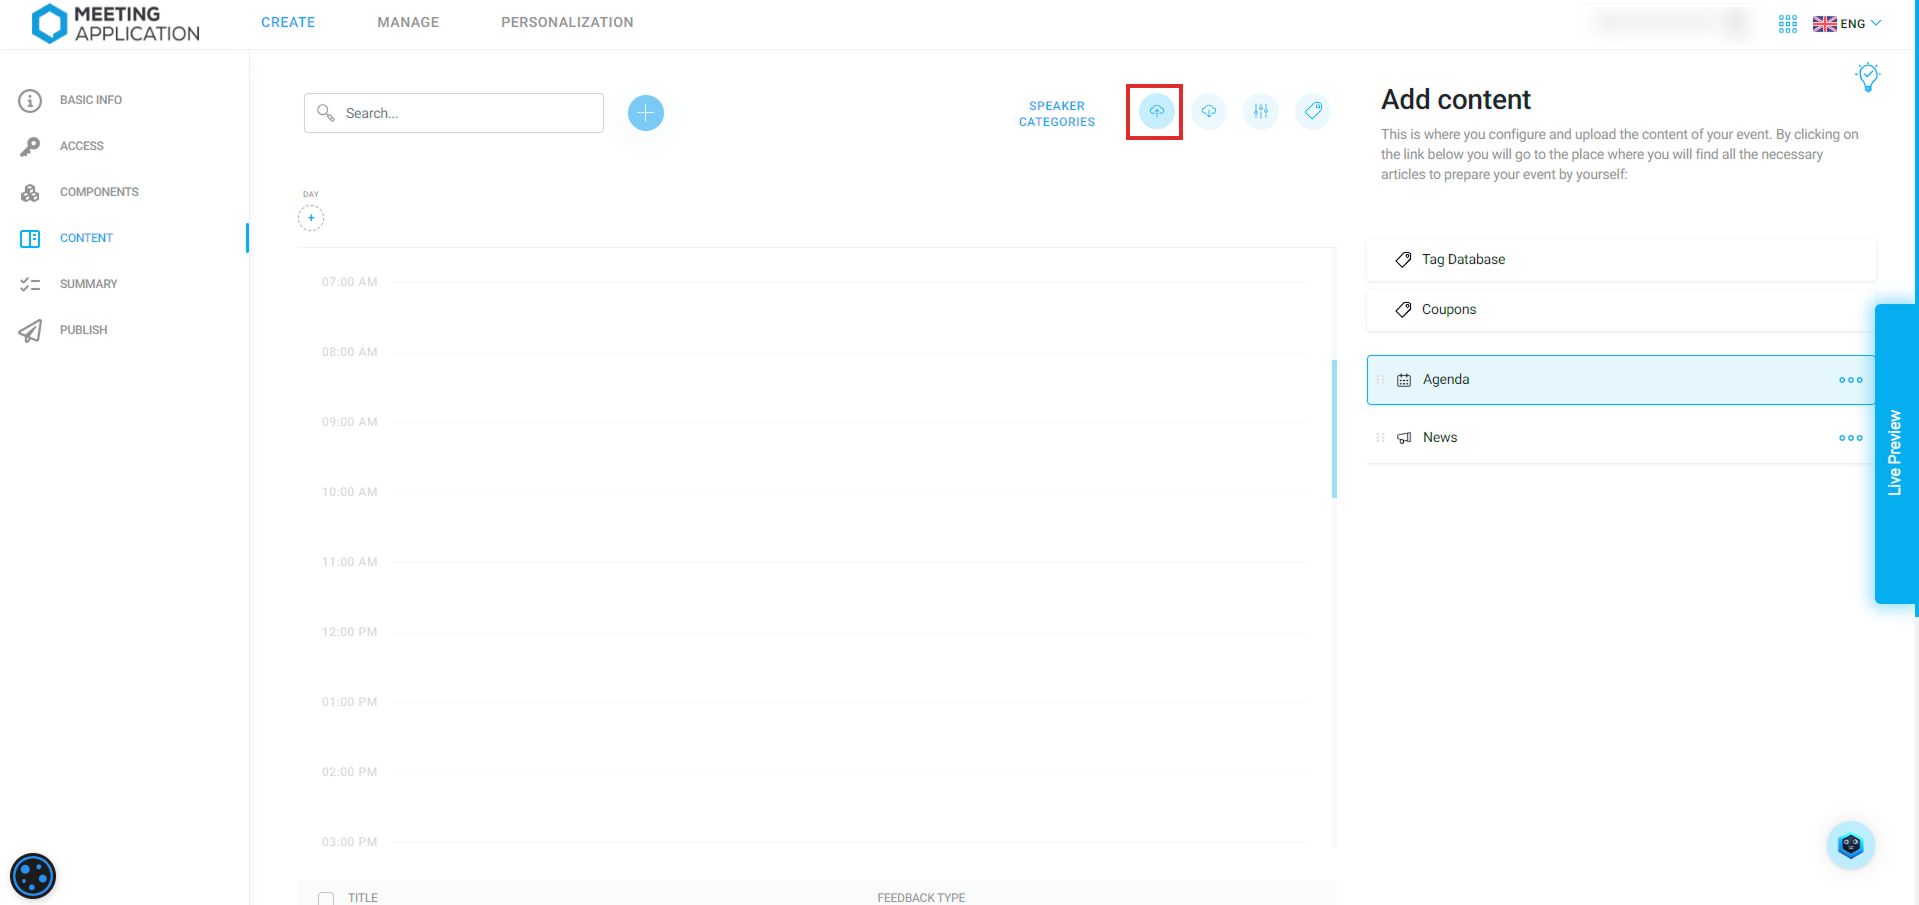
Click the Import Agenda Sessions button to get a direct tutorial for the next step.
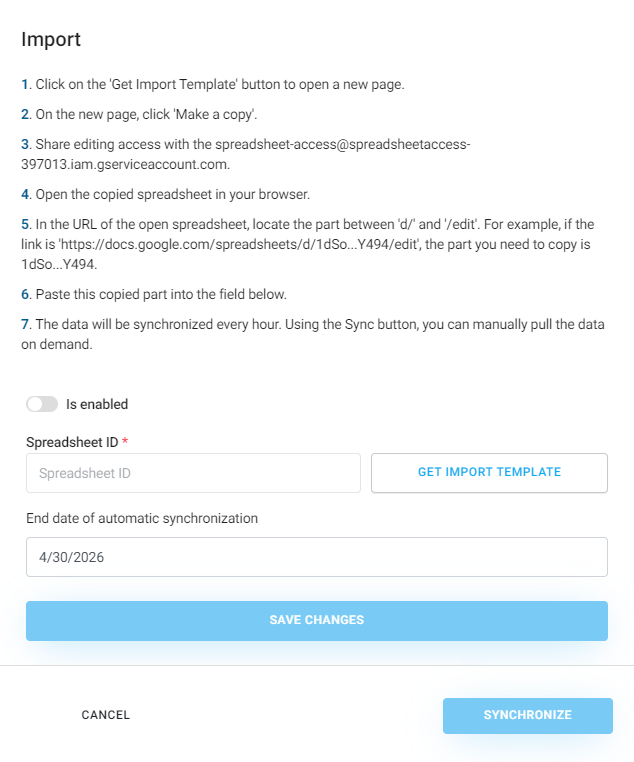
At the end, click the Synchronize button to instantly pull data from the file into the system. The sheet's data updates automatically every hour, but you can always trigger a manual update with the Synchronize button.
Grayed-out fields can’t be edited. Linked values or system messages about the integration status will pop up there automatically.
Every sheet page shows columns in blue, which are required to fill in so you can use it.

The sheet is made up of lots of pages, so you can enter session, agenda, speaker, or translation data all at once. You don’t need to use every one of them, but keep in mind that some are pretty tightly connected.
This section is for defining participant groups that you’ll be sharing content with. Add groups here so you can use them on the next pages.
If you don’t need to split up users like this at your event, just skip this section and every session will be generated with access for everyone (ALL USERS) by default.
This is the main agenda update sheet page. This is where you’ll enter most of the session data.
session_id - a unique session ID number at the event (shared pool for all agenda modules at the event). Enter the next numbers here, like 1,2,3.... The numbers shouldn’t repeat even if you’re importing sessions into a few different agenda modules.
agenda_component_id - this is the section where you pick the agenda module to import the session in this row. Don’t type the module name yourself, just pick the field, then hit Data Picker in the top navigation bar. Choose the Components category, and then click on one of the agenda modules you created earlier. If you don’t see any agenda modules, check the sheet page called Components(ReadOnly). If it’s not there, go to the management panel, choose agenda import and hit Sync.
session_name - enter the session name
description - enter the session description
day - enter the day the session will be created, in this format: YYYY-MM-DD, e.g. 2024-04-30
start_time - enter the day and start time of the session, in this format: YYYY-MM-DD hh:mm:ss, for example: 2024-04-30 14:30:00
end_time - enter the day and end time of the session, in this format: YYYY-MM-DD hh:mm:ss, for example: 2024-04-30 15:30:00
place - first, go to the AgendaPlaces tab and type in the possible session locations, for example: Aula, Sala Madryt. These will then show up on the Agenda page as options.
path - first, go to the AgendaPaths tab and type in the possible session types, for example: Workshop, Presentation. These will then show up on the Agenda page as options.
tags - leave empty if you want the session to be visible to everyone. But if it should only be available to people from a specific group, you'll choose it (them) right here. Don't type group names by hand, just pick the field and then click Data Picker on the top navigation bar. Choose the category Access Group Tags, and then click one of the group tags made on the UserGroupTags page.
streaming_link - add the link to the individual session stream, starting with “https://”
agenda_session_children_id - in this column you should put the session ID, referring to the values you entered into the session_id column for the ones that will be included in the main session. This means the main “parent” session will have access to the “child” sessions inside it. Enter a value or pick a field, then click Data Picker on the top navigation bar. Choose the category Sessions, and then click on one of the sessions you’ve created.
Enter here possible locations for sessions, e.g.: Aula, Madrid Room, which will be available to choose from on the Agenda page.
Enter here possible session types, e.g.: Workshops, Presentation, which will be available to choose from on the Agenda page.
This page lets you add translations for available language layers.
session_id - pick a field and enter the session id added on the Agenda page OR click Data Picker in the top navigation bar. Pick the category Agenda sessions, then click one of the sessions created on the Agenda page.
language_code - choose which language layer you want to add the translation for. First, you need to add the language layer in the event management panel, under Basic Information. Then check if the new language shows up in the sheet, on the Locales (ReadOnly) page. If it's not there, go to the management panel, pick import agenda, and hit Sync.
session_name - enter the session name that should show up in this language.
description - enter the session description that should show up in this language.
On this page you can fill in the speakers' info. If you want to use the sheet to automatically assign them to agenda sessions, it's necessary to add them right here. Just like agenda sessions, speakers added manually in the management panel won't show up in this file.
speaker_id - unique speaker ID number at the event (shared set for all agenda modules in the event). Just add consecutive numbers here like 1,2,3.... Numbers shouldn't repeat, even when you're importing speakers into several different modules.
speakers_component_id - this is the section for picking which speaker module to import the profile in this row to. Don't type the module name by hand, just pick a field, then click Data Picker up in the main navigation bar. Select the Components category, then click one of the previously created modules. If you don't see the right one, check the sheet called Components(ReadOnly). If it's not there either, go to the management panel, pick agenda import and hit Synchronize.
first_name - speaker's first name
last_name - speaker's last name
order - if you want the speakers to show up on the list in a specific order, use this column to set their spot on the list by typing: 1,2,3,... .
vip - use the button if you want to give a speaker vip status, which is off by default. VIP status will make the speaker show up above all the other speakers on the list.
position - the position held by the speaker.
company - the company the speaker is connected with.
country - the country the speaker comes from. You have to use the ISO standard entries, which means, for example, instead of writing Poland, you have to write PL.
description - space for the speaker’s bio. It's good to list special achievements or a quick bio.
email - speaker's email address. By default this info is hidden, even if you add it. If you want to share it, make sure the speaker is cool with it, then go to manual editing of the imported profile and switch on the “show publicly” button.
phone - speaker's phone number. By default this info is hidden, (...) same as above.
facebook, linkedin, twitter, youtube, instagram - here you can add links to the speaker's social media channels
photo_url - get a square photo of the speaker as a jpg or png. Then upload it to any cloud drive and make sure the access is set to “anyone with the link.” Alternatively, you can manually add photos after importing to the system, and in that case you can use our cropping tool.
This page lets you link speakers with the sessions they’re in. Super important: you can only do this for speakers and sessions imported from this file.
join_id - enter a unique ID that connects a single speaker and session.
session_id - this is where you pick the agenda session to add a speaker to. It uses the session id added to the Agenda page. Click the field and type in the id for the session from the Agenda page OR click Data Picker in the top navigation bar. Choose the Agenda sessions category, then click one of the sessions you made on the Agenda page.
hint_session_title - this will automatically show the name of the agenda session the speaker gets attached to.
speaker_category_id - put in a unique ID for the category you’re adding the speaker to for this session. You create these categories on the Speaker Categories page.
hint_category_title - will automatically show the selected category where the speaker will be added.
speaker_id - section for choosing the speaker you want to connect with the session. It’s based on the speaker IDs added to the Speakers page.
hint_speaker_last_name - will automatically show the last name of the speaker connected to this specific agenda session.
speaker_order_in_category - set the order in which the speaker appears in a given category for this session. Important if you’re adding a few speakers for the same session and category — just fill the cells with 1, 2, 3, etc. If there’s only one, just put “1”.
This page lets you add translations for the available language layers.
speaker_id - pick the field and enter the speaker's id from the Speakers page, the Agenda page OR click Data Picker in the top navigation bar. Choose the Speakers category, then click the speaker from the list created on the Speakers page.
language_code - choose which language layer you want to add a translation for. You'll first need to add the language layer in the event management panel, in the Basic information section. Then check if the new language has appeared in the sheet, on the Locales(ReadOnly) page. If it's not there, go to the management panel, pick agenda import and press Synchronize.
position - enter the name of the position held by the speaker, as you want it to be shown in this language.
description - enter the speaker description, which should display in this language.
This page lets you generate categories for speakers. A category is required so you can assign a speaker to a session.
speaker_category_id - unique ID number linking a category and an agenda module.
agenda_component_id - section to choose an agenda module to add this category to. Don’t type the module name manually, just pick the field, then click Data Picker on the top navigation bar. Pick the Components category, then click one of the previously created agenda modules. If you don’t see any agenda module, check the sheet page named Components(ReadOnly). If it’s not there, go to the management panel, choose agenda import and press Sync.
hint_component_name - will automatically show the name of the component where the speaker category you define here will be added.
category_name - enter the name of the category, e.g. Speaker, Moderator, Partner
order - set the category hierarchy. Each agenda module can have a bunch of categories, so it's important to pick which one shows up first, second, and so on. For example, the Speaker category should have order: 1, and the Moderator category order: 2.
visible_on_list - with a button, you decide if the category content should be already visible in the list of all sessions.
visible_in_details - with a button, you decide if the category content should show up once you open the details of a session.
This page lets you add translations for speaker category names for all available language layers.
speaker_category_id - unique ID linking the category with the agenda module. It's based on the field with the same name found on the page
hint_category_name - will automatically show the name of the category where the translation will be added.
language_code - point out which language you're creating the translation for. You need to use the ISO standard codes, so for example, instead of writing Poland, you should enter PL.
category_name - enter the name of the category translated into the selected language.
