Learn how to efficiently manage a large number of sessions, speakers, and access settings in the event agenda using a synchronized Google Sheets spreadsheet (Event Sync feature).
Entering data related to the event schedule and speakers was designed not only to make it easy to upload information to the system once, but also to conveniently update it in bulk. Thanks to Event Sync, the spreadsheet works both ways – you can import data into the system as well as export the current state of the event to the sheet.
Add the Agenda and Speakers modules to the event. If you plan to use several modules of this type, add several right away.
On the event modules list, click the three dots next to a module and go to edit name. Enter clear names (e.g. "Main Stage Agenda", "VIP Speakers") so it’s easier to decide which content goes to which modules.
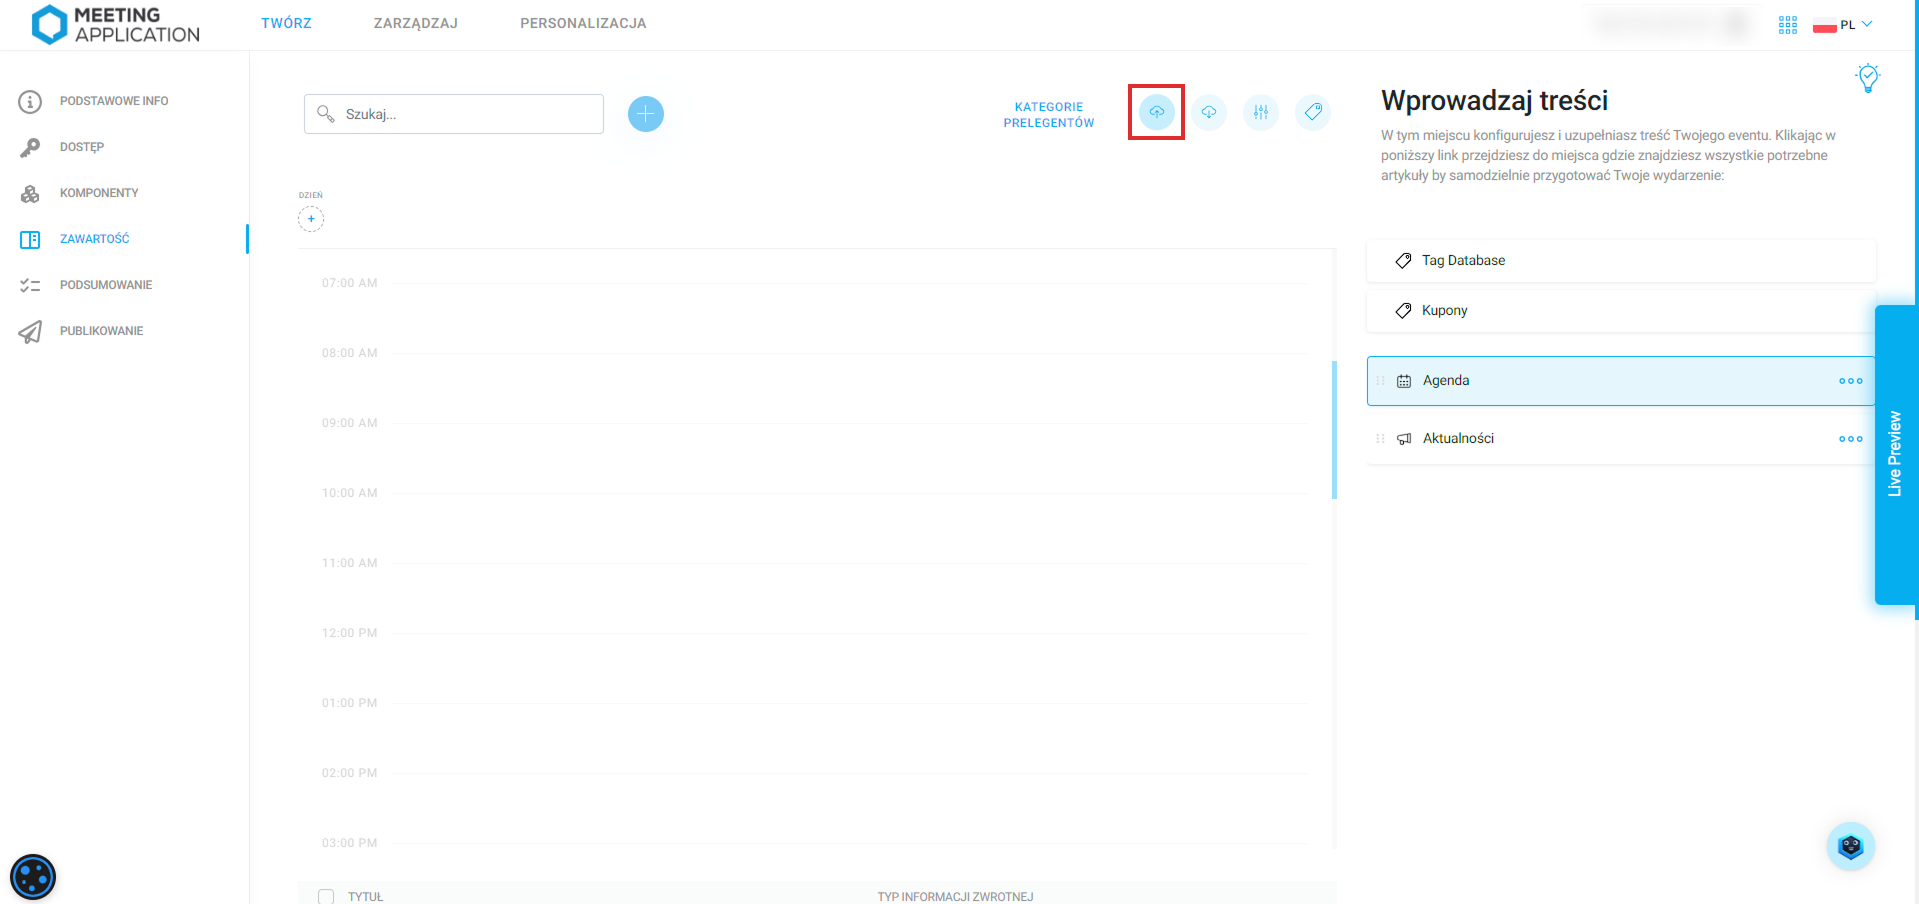
In the side menu of the panel, click Import Agenda Sessions (Event Sync) to go to the configuration.
Click the Import Agenda Sessions button to see a direct instruction for the next step.
The sync process has been streamlined. Now you can start your work by downloading up-to-date data from the system instead of starting from a blank page.
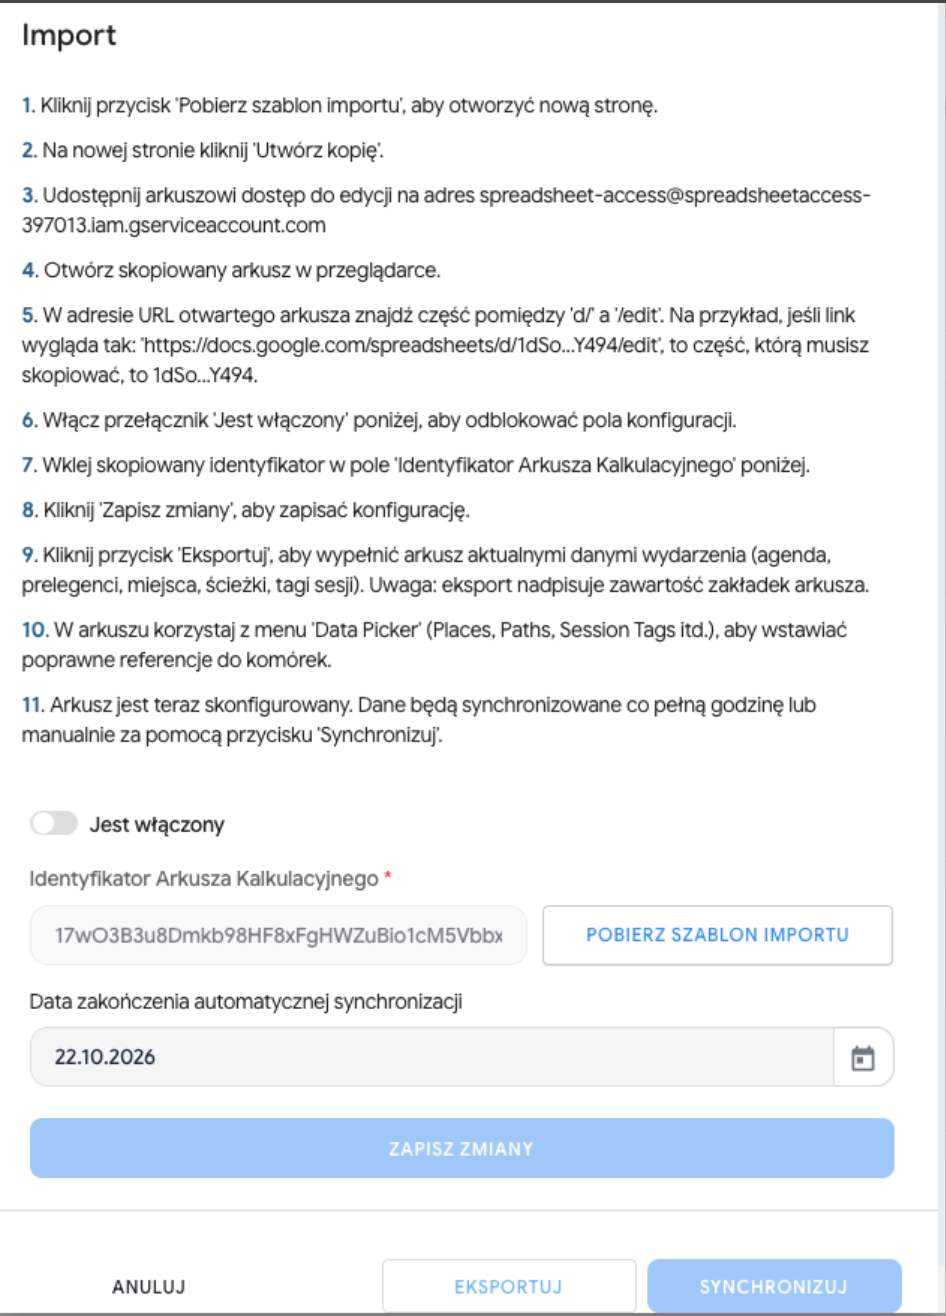
In the import window, click the Download import template button to open a new page with the current template.
On the new page, click Make a copy. The sheet will be saved to your Google Drive.
Share the copied sheet (with edit rights) to the technical address indicated in the panel, e.g. spreadsheet-access@spreadsheetaccess-397013.iam.gserviceaccount.com.
In the URL of the open sheet, find the part between /d/ and /edit. For example, if the link looks like this: https://docs.google.com/spreadsheets/d/1dSo...Y494/edit, the part you need to copy is the string 1dSo...Y494.
Paste the copied ID into the Spreadsheet ID field in the Meeting Application panel. Enable synchronization and click Save changes.

Enter or edit the data in the sheet.
To upload the changes to the app, go back to the panel and click Sync.
⏱ Automatic sync: With the integration enabled, data between the sheet and the system syncs automatically roughly every half an hour. The "Sync" button lets you instantly and manually force a data fetch from the sheet.
Before the system uploads your data, it checks if the sheet is correct (whether all tabs are there and whether the column names match). If there’s a structural error in the sheet, the import is paused so that partial or incorrect data isn’t uploaded.
Every operation (import and export) leaves a trace in the sheet in the Import Reports tab. Always check this tab after clicking sync. You’ll find a row with the date, status (success/error), and details. This is your first place to diagnose issues if you don’t see the changes on the event page.
Greyed-out fields in the sheet generally shouldn’t be edited (these are, for example, previews or system messages). Columns marked in blue are required.
Used to create and edit your own access groups (defining who can see a given session).
System groups (e.g. "All users", "Logged in users") are visible here as preview only.
Security: Synchronization never removes access groups from the system. Deleting a row in this tab will not delete the group in the management panel.
Here you create and edit tags that describe the session format (e.g. "Lecture", "Workshop", "Q&A").
The main page for managing sessions.
session_id – unique session number (e.g. 1, 2, 3). Numbers can’t be repeated within the whole event.
agenda_component_id – agenda module ID. Click the cell, use the Data Picker button in the top menu, pick Components and select the right module.
session_name / description – session name and description.
day / start_time / end_time – date and time formats, e.g. 2026-04-30 and 2026-04-30 14:30:00.
place (Location) – you choose it from the dropdown list by name (you first need to add places in the AgendaPlaces tab).
path (Track) – you choose it from the dropdown list by name (added in AgendaPaths).
group_tags (Access groups – formerly 'tags') – decides who can see the session. Use the Data Picker to insert tags from the UserGroupTags tab. Note: leaving this field empty means the session has no group restrictions (it’s visible publicly).
session_tags – tags defining the nature of the session. Enter the names created in the SessionTags tab (separated by commas).
streaming_link – link to the stream starting with https://.
agenda_session_children_id – IDs of child sessions (if you’re creating a session block).
Enter possible locations for sessions here (e.g. Aula, Madrid Room). You can define their name, color, and order. You’ll use them later in the Agenda tab. (Note: the system now ignores accidental spaces at the beginning or end of the name).
Enter possible session types here (e.g. Workshops, Presentation). Just like places, you define their name, color, and order.
Page for adding translations for available language layers (languages must be added beforehand in the management panel).
session_id – session ID from the Agenda tab.
language_code – language layer code (e.g. PL, EN). If the code is missing in the sheet (the "Locales" page), first force a manual sync.
session_name – translated session name.
description – translated session description.
Add speakers here so you can assign them to sessions. People added manually in the panel will only show up here after you run an Export.
speaker_id – unique speaker ID (e.g. 1, 2, 3). Numbers can’t repeat.
speakers_component_id – speakers module ID (use Data Picker).
first_name / last_name – speaker’s first and last name.
order – position on the list (1, 2, 3...).
vip – VIP status (forces the speaker to be shown at the very top of the speakers list).
position – job title.
company – company.
country – speaker’s country of origin. You need to use ISO standard names (e.g. type in PL instead of Poland).
description – speaker description / bio.
email / phone – contact details. By default this info is hidden publicly in the system, even after import (to reveal it, you need to turn on the right toggle in the speaker edit panel with their consent).
facebook, linkedin, twitter, youtube, instagram – social media links.
photo_url – Link to a square speaker photo in JPG or PNG format (it has to be a publicly available URL link).

This page lets you assign speakers to specific sessions. Columns with the prefix hint_ are greyed out and are filled in automatically to help you find your way around the ID numbers.
join_id – unique connection ID number.
session_id – agenda session ID.
hint_session_title – automatically shows the name of the selected session.
speaker_category_id – speaker category ID (e.g. ID for the "Moderator" role). You create categories on the Speaker Categories page.
hint_category_title – automatically shows the indicated category.
speaker_id – speaker ID from the Speakers tab.
hint_speaker_last_name – automatically shows the last name of the speaker you’re assigning.
speaker_order_in_category – the order in which the speaker will appear in a given category in the session (e.g. 1, 2, 3). If there’s only one, enter 1.
Adding translations of positions and speaker descriptions.
speaker_id – speaker ID.
language_code – language code (ISO).
position – translated position.
description – translated description (bio).
Generating speaker categories (roles) (e.g. Speaker, Moderator, Partner). They are necessary to assign a speaker in the Joins tab.
speaker_category_id – unique category number.
agenda_component_id – agenda module (use Data Picker).
hint_component_name – automatically displays the module name.
category_name – category name (e.g. "Speaker").
order – category hierarchy (e.g. Moderator = 1, Speaker = 2). Decides which category is displayed higher.
visible_on_list – whether the content of the category should already be visible on the general list of all sessions (TRUE/FALSE).
visible_in_details – whether the content should be visible after opening the session details.
Translations of the category names themselves (e.g. changing from "Prelegent" to "Speaker" for the EN layer).
speaker_category_id – category ID from the previous tab.
hint_category_name – automatically displays the translated name.
language_code – language code.
category_name – translated category name.
Have a great event with Meeting Application!
