The Custom Emails module is where you can personalize and categorize emails sent to your event participants. You can set not only the text, but also the welcome graphic, customized thematically to your event.
Email banner specifications:
Aspect ratio: 2:1
Format: JPG, PNG
Resolution: 72 ppi


This module allows you to create custom emails such as:
Welcome email (new users) - email sent to new users who are not in the Meeting Application database or/and have not yet activated their account by clicking the activation email.
Welcome email (registered users) - email sent to users who are already in the Meeting Application database and have an active account because they previously participated in an event organized on our platform.
Quick login email - email sent to users who don't remember their password and decide to use the Magic Link login option. In the sent message, the user receives a unique link that, when clicked, automatically logs them into the system.
Event ticket email - message sent to participants who registered for an event you organized by purchasing a paid ticket or filling out a form and obtaining a free ticket.
Workshop ticket email - message sent to people who, by purchasing a ticket, also gained access to a workshop or training taking place as part of the organized event.
Email for assigning items - the system allows for the sale of anonymous tickets and add-ons, to be assigned at a later stage. Email is sent to participants who did not provide the ticket holder's details at the time of purchase or later. An unassigned ticket does not authorize entry to the event.
Exhibitor moderator email - a message sent to users who have been given the status of exhibitor moderator by the event organizer. You can learn more about the exhibitor moderator function from this article.
Invoice email - a message sent to participants who requested a personal or company invoice during the ticket purchase stage. The document is sent as an attachment to the email.
Proforma invoice email - a message sent to participants who selected payment based on a proforma invoice during the purchase stage.
After paying the proforma and recording the transfer, the Organizer must confirm the received payment in the Panel, and the User automatically receives an email with the actual invoice for the paid proforma (personal or company).
Registration completion email - sent to people who previously started creating an account in the system or were imported into it by an administrator of another event, but never activated the account. Such a person must complete account registration by clicking the activation link sent in this email message.
Email address confirmation email - sent to people who are going through the registration process and are on the final step, which is confirming their email address. When registering an account to join an event organized by you, such a confirmation email may have a dedicated banner or content.
The next three types of emails are sent only for events where participation is possible only after the Organizer accepts such a request. If you don't want your competition sitting in the audience - choose the event option with Ticket reservation.
Email confirming submission of participation request - sent to participants who expressed a desire to participate in the event. This is a confirmation email that the registration was successful.
Email after accepting participation request - email informing about the acceptance of the request by the Organizer, allowing the participant to proceed to payment (for events with paid tickets) or granting a ticket to the event (for free events).
Email after rejecting participation request - email informing that permission to participate was not granted and thus the participant has no opportunity to obtain a ticket to the event.
Email about change of request status to rejected - email sent automatically when the Administrator revokes previously granted acceptance.
Email about change of request status to accepted - email sent when changing the decision from rejected to accepted.
This is a message sent automatically to participants who have just been assigned a coupon.
The condition for sending this email is to check the option "Send email notification after coupon assignment" at the stage of configuring the coupon itself. Learn more about coupons from THIS ARTICLE.
How does the system select the code format in the email? The format in which a participant receives the code is not selected in the email editor – it depends strictly on how the coupon was distributed (Distribution Type):
Group: the participant will see a QR code in the email content.
Manual CSV: the participant will see a text code in the email content (this is the standard path for issuing external VOD codes, discount codes to be used on the partner platform).
Sales (Cart): the participant will receive a message with a PDF attachment containing a QR code (this attachment is generated by the system automatically – the organizer does not need to upload anything).
Specifics of editing this template Due to the automation described above, this email follows its own rules in the editor:
Fixed elements (lock icon 🔒): Special system blocks (box with code and conditional sections "if" / "end if") are permanently locked. Do not delete or modify them. The system will dynamically insert the appropriate coupon format from the table above in their place. Attempting to delete them will prevent you from saving changes.
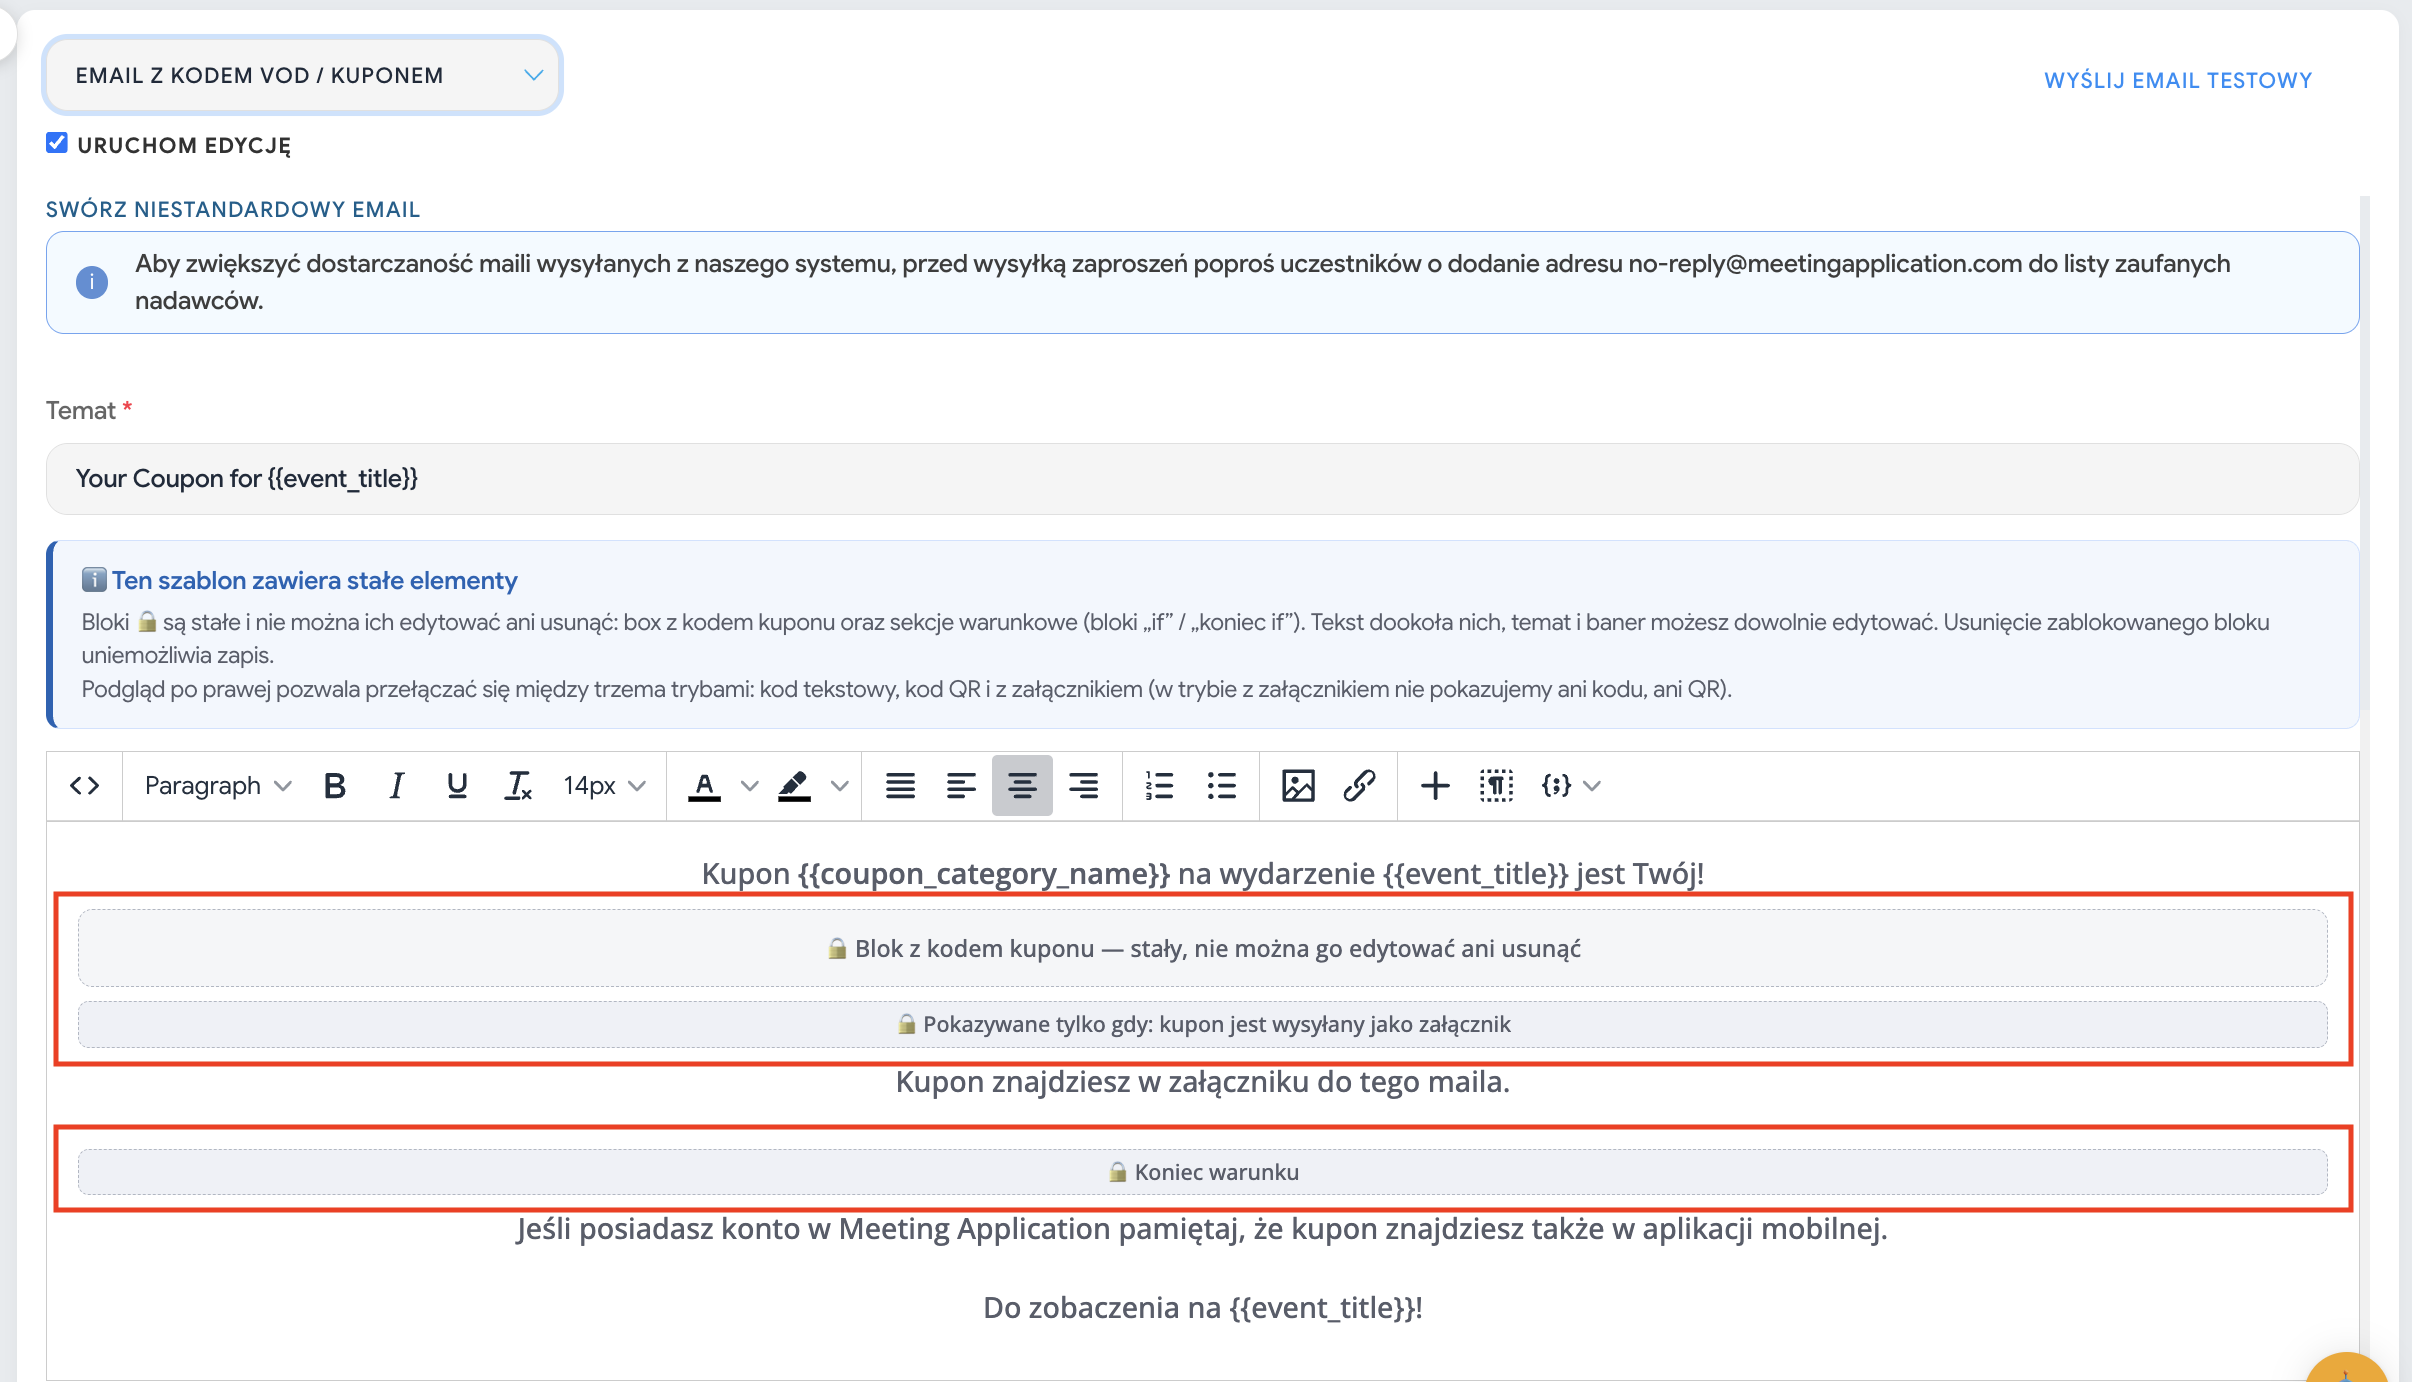
Personalization: You have complete freedom to edit the theme, upload an event banner, and change the text above and below the locked blocks. Remember to add clear instructions for participants there about what to do with their code.
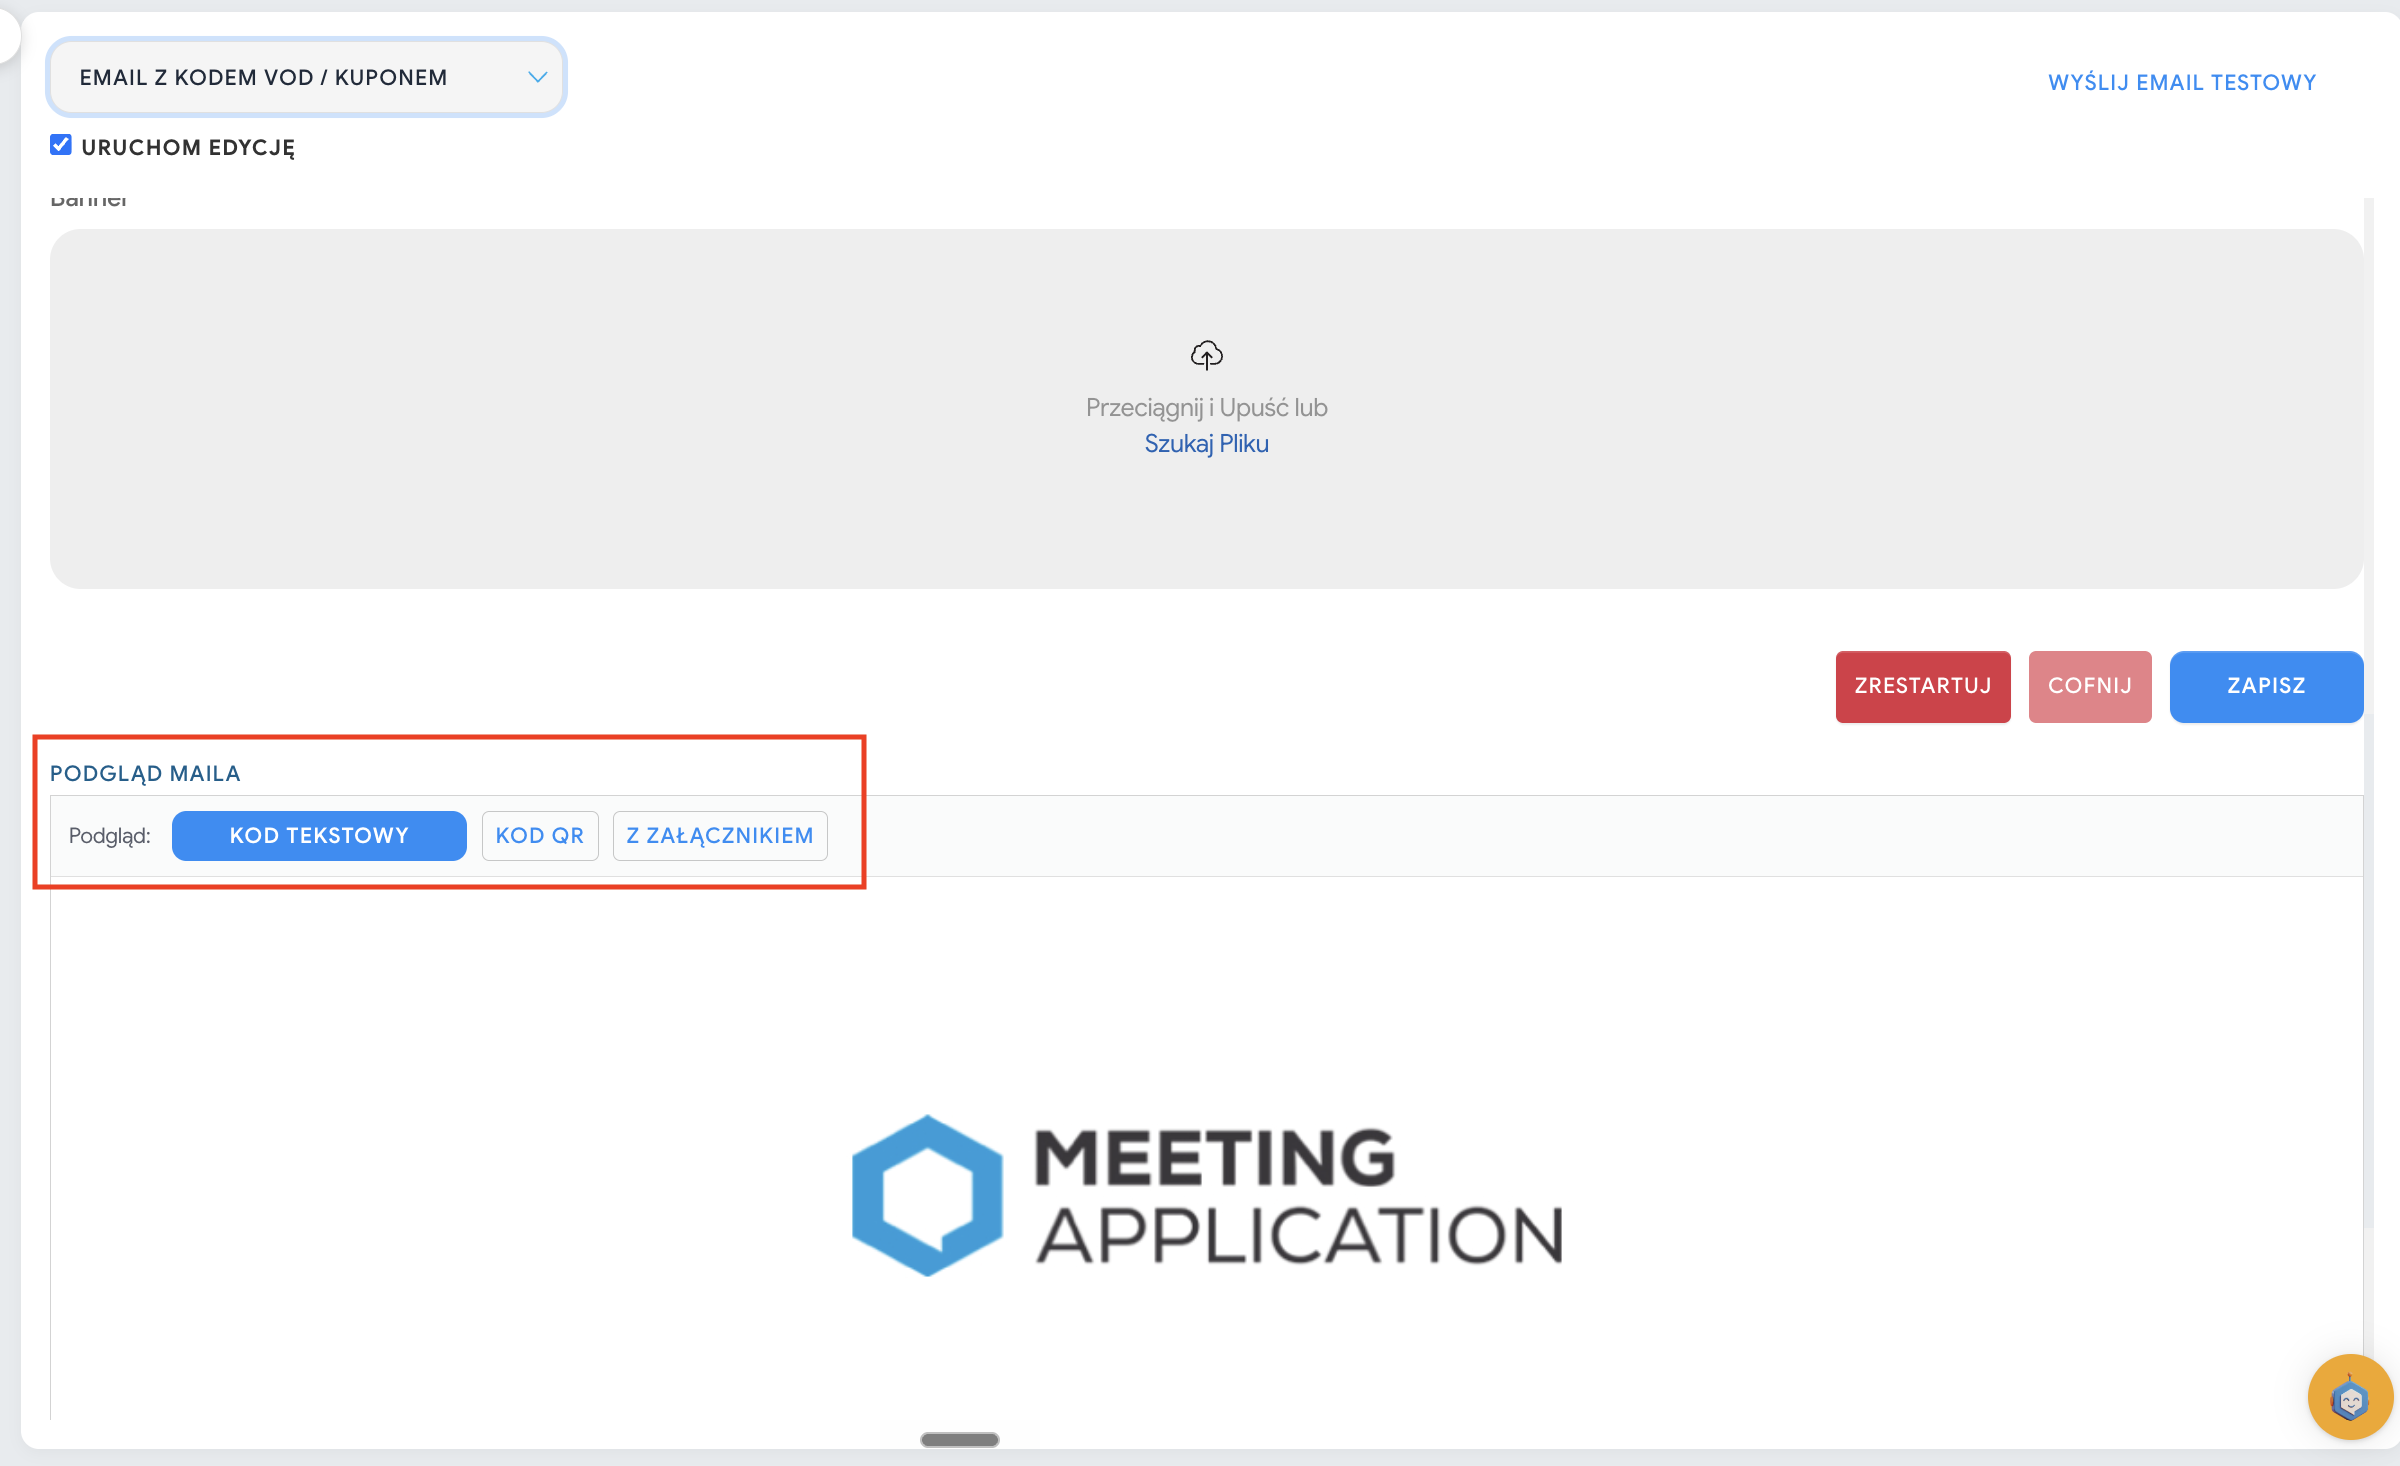
Format previews: At the bottom of the editor you'll find three preview options (TEXT CODE, QR CODE, WITH ATTACHMENT). These buttons are not meant to enforce a delivery format – they only allow you to check ("simulate") how your content will compose with each of the three possible distribution variants.
Mailing is a key element of communication with event participants — it's the content and clarity of the messages you send that determine whether a participant will easily join the event, download the app, and find all the information they need.
Depending on the type of access you use for the event (e.g. open event, event with tickets, event with white list), the login or joining path to the app and the landing page will be different. Learn more about access types from THIS ARTICLE.
If you're organizing an event with access only from the list, to which you manually import participants, be sure to indicate in the welcome email for new or registered users that joining the app and event page is only possible after logging in with the email address to which the invitation was just sent. You can explain that the restricted access path is due to security and maintaining a closed event environment.
The default welcome email for new users doesn't have a button to download the app (only an account activation button), but there's nothing preventing you from including such a button in the welcome mail. Remember that you can use the "Download app" module available for free in the Landing Page configurator 👉 LINK TO ARTICLE.
For open events, but with limited access to sales (e.g. tickets visible by groups), you should also clearly ask participants to log in to the website to see available purchase options.
A well-designed mailing is not just a technical message — it's an instruction for action that guides the participant step by step. Without it, participants are left "on their own", they have to guess what they should do and how to get a ticket or access to the event. That's why it's so important that every email clearly explains what to do next, why and how.
To start editing the email content and add a graphic file for the banner, in the "Manage" section go to the "Custom Emails" module. First, expand the email list and select the type you're interested in.
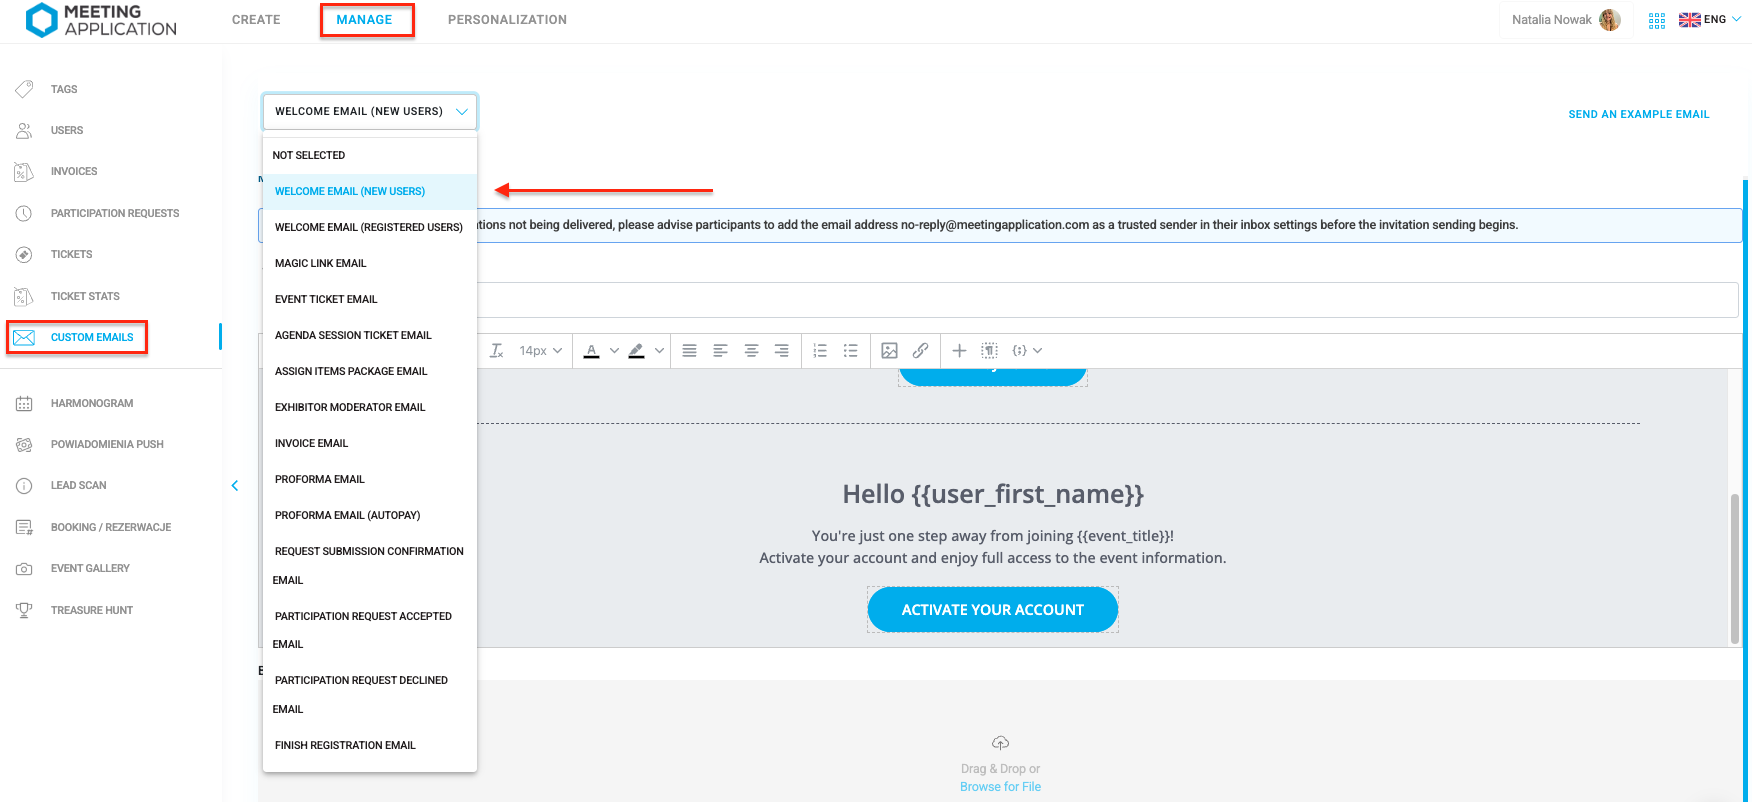
To go to the editing of the selected email type, check the checkbox ☑ENABLE EDITING located just below the dropdown list.

Our system allows you to pull certain information from the database, which means email content is personalized.
An example is {{event_title}} in the subject of a system email, which will automatically pull the event name entered in the panel under the BASIC INFORMATION tab.
The {{user_first_name}} snippet is responsible for the first name of the participant to whom the message is being sent, pulled from the user profile.
The {{user_last_name}} snippet is responsible for the last name of the participant to whom the message is being sent, pulled from the user profile.
The {{user_full_name}} snippet is responsible for the first and last name of the participant to whom the message is being sent, pulled from the user profile.
Snippet {{event_email}} is responsible for the email to the Organizer provided in the CREATE → BASIC INFO tab
Edit email content freely so it fits your recipients and event character as well as possible.
Select the type of message you want to edit
Click ☑ and unlock the ability to make changes
Adjust the email subject so it is consistent with your communication concept.

In the top bar you'll find tools to customize your message to your event's tone of voice. Personalized communication and adding interactive links won't be a problem! 🙌
Choose a header

and freely format the email copy you enter using basic tools such as: bold, italic, underline, color and text highlighting, alignment, bulleted or numbered lists.

Add any graphic in png; jpg; jpeg; bmp; webp format.
Insert any link in the text or use snippets, e.g. the recipient's name.
Do you want an interactive CTA button to appear in the email content that will redirect the participant to a specific page when clicked? Click ➕ and have fun exploring the possibilities by changing the appearance, content, or position!


Upload a banner dedicated to the event you are organizing, which will be displayed in the sent emails where it is configured.
Add the graphic of your choice and click save. In the email preview, verify that this element is displayed the way you want it.
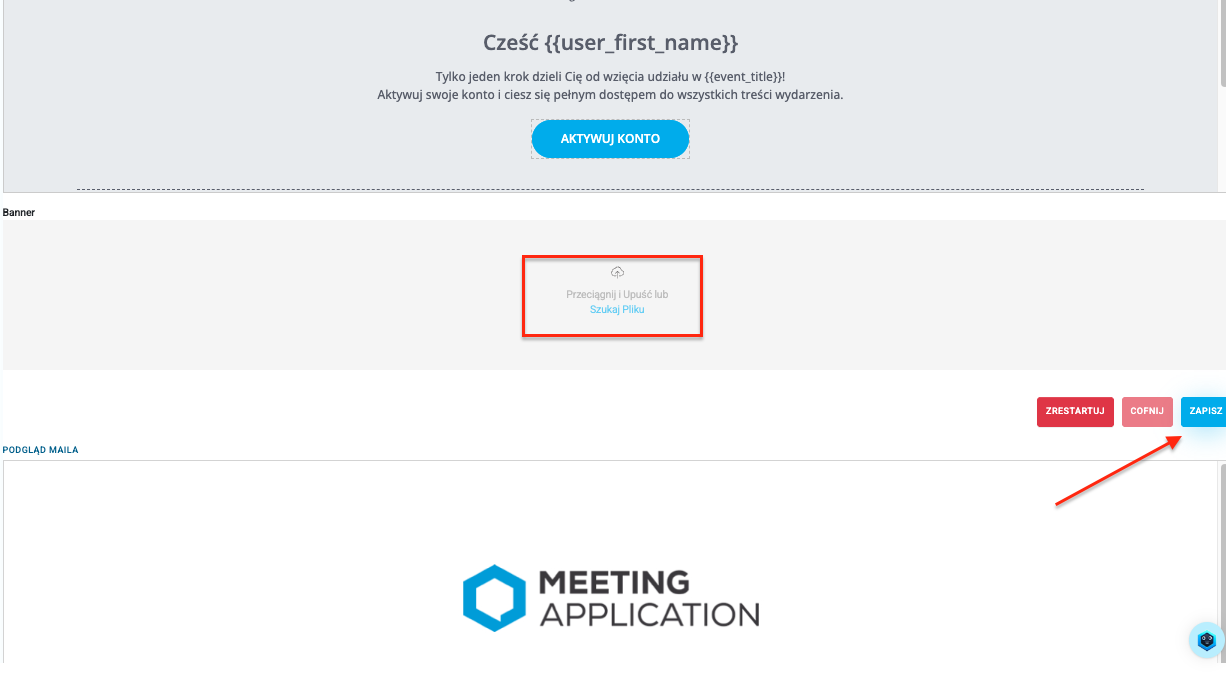
Below the editor there is an email preview window where all changes you make are updated in real time. This way you can check if the email content you are editing matches your assumptions. If you have made changes and you see them in the email preview, click SAVE.
In the next step you can send a test email to check exactly how the message will look in the recipient's inbox. To send such an email, go to the top of the panel and click SEND TEST EMAIL - the message will be sent to the event Administrator's email address.

To send an email to all people on the list use the SEND TO ALL button on the top bar

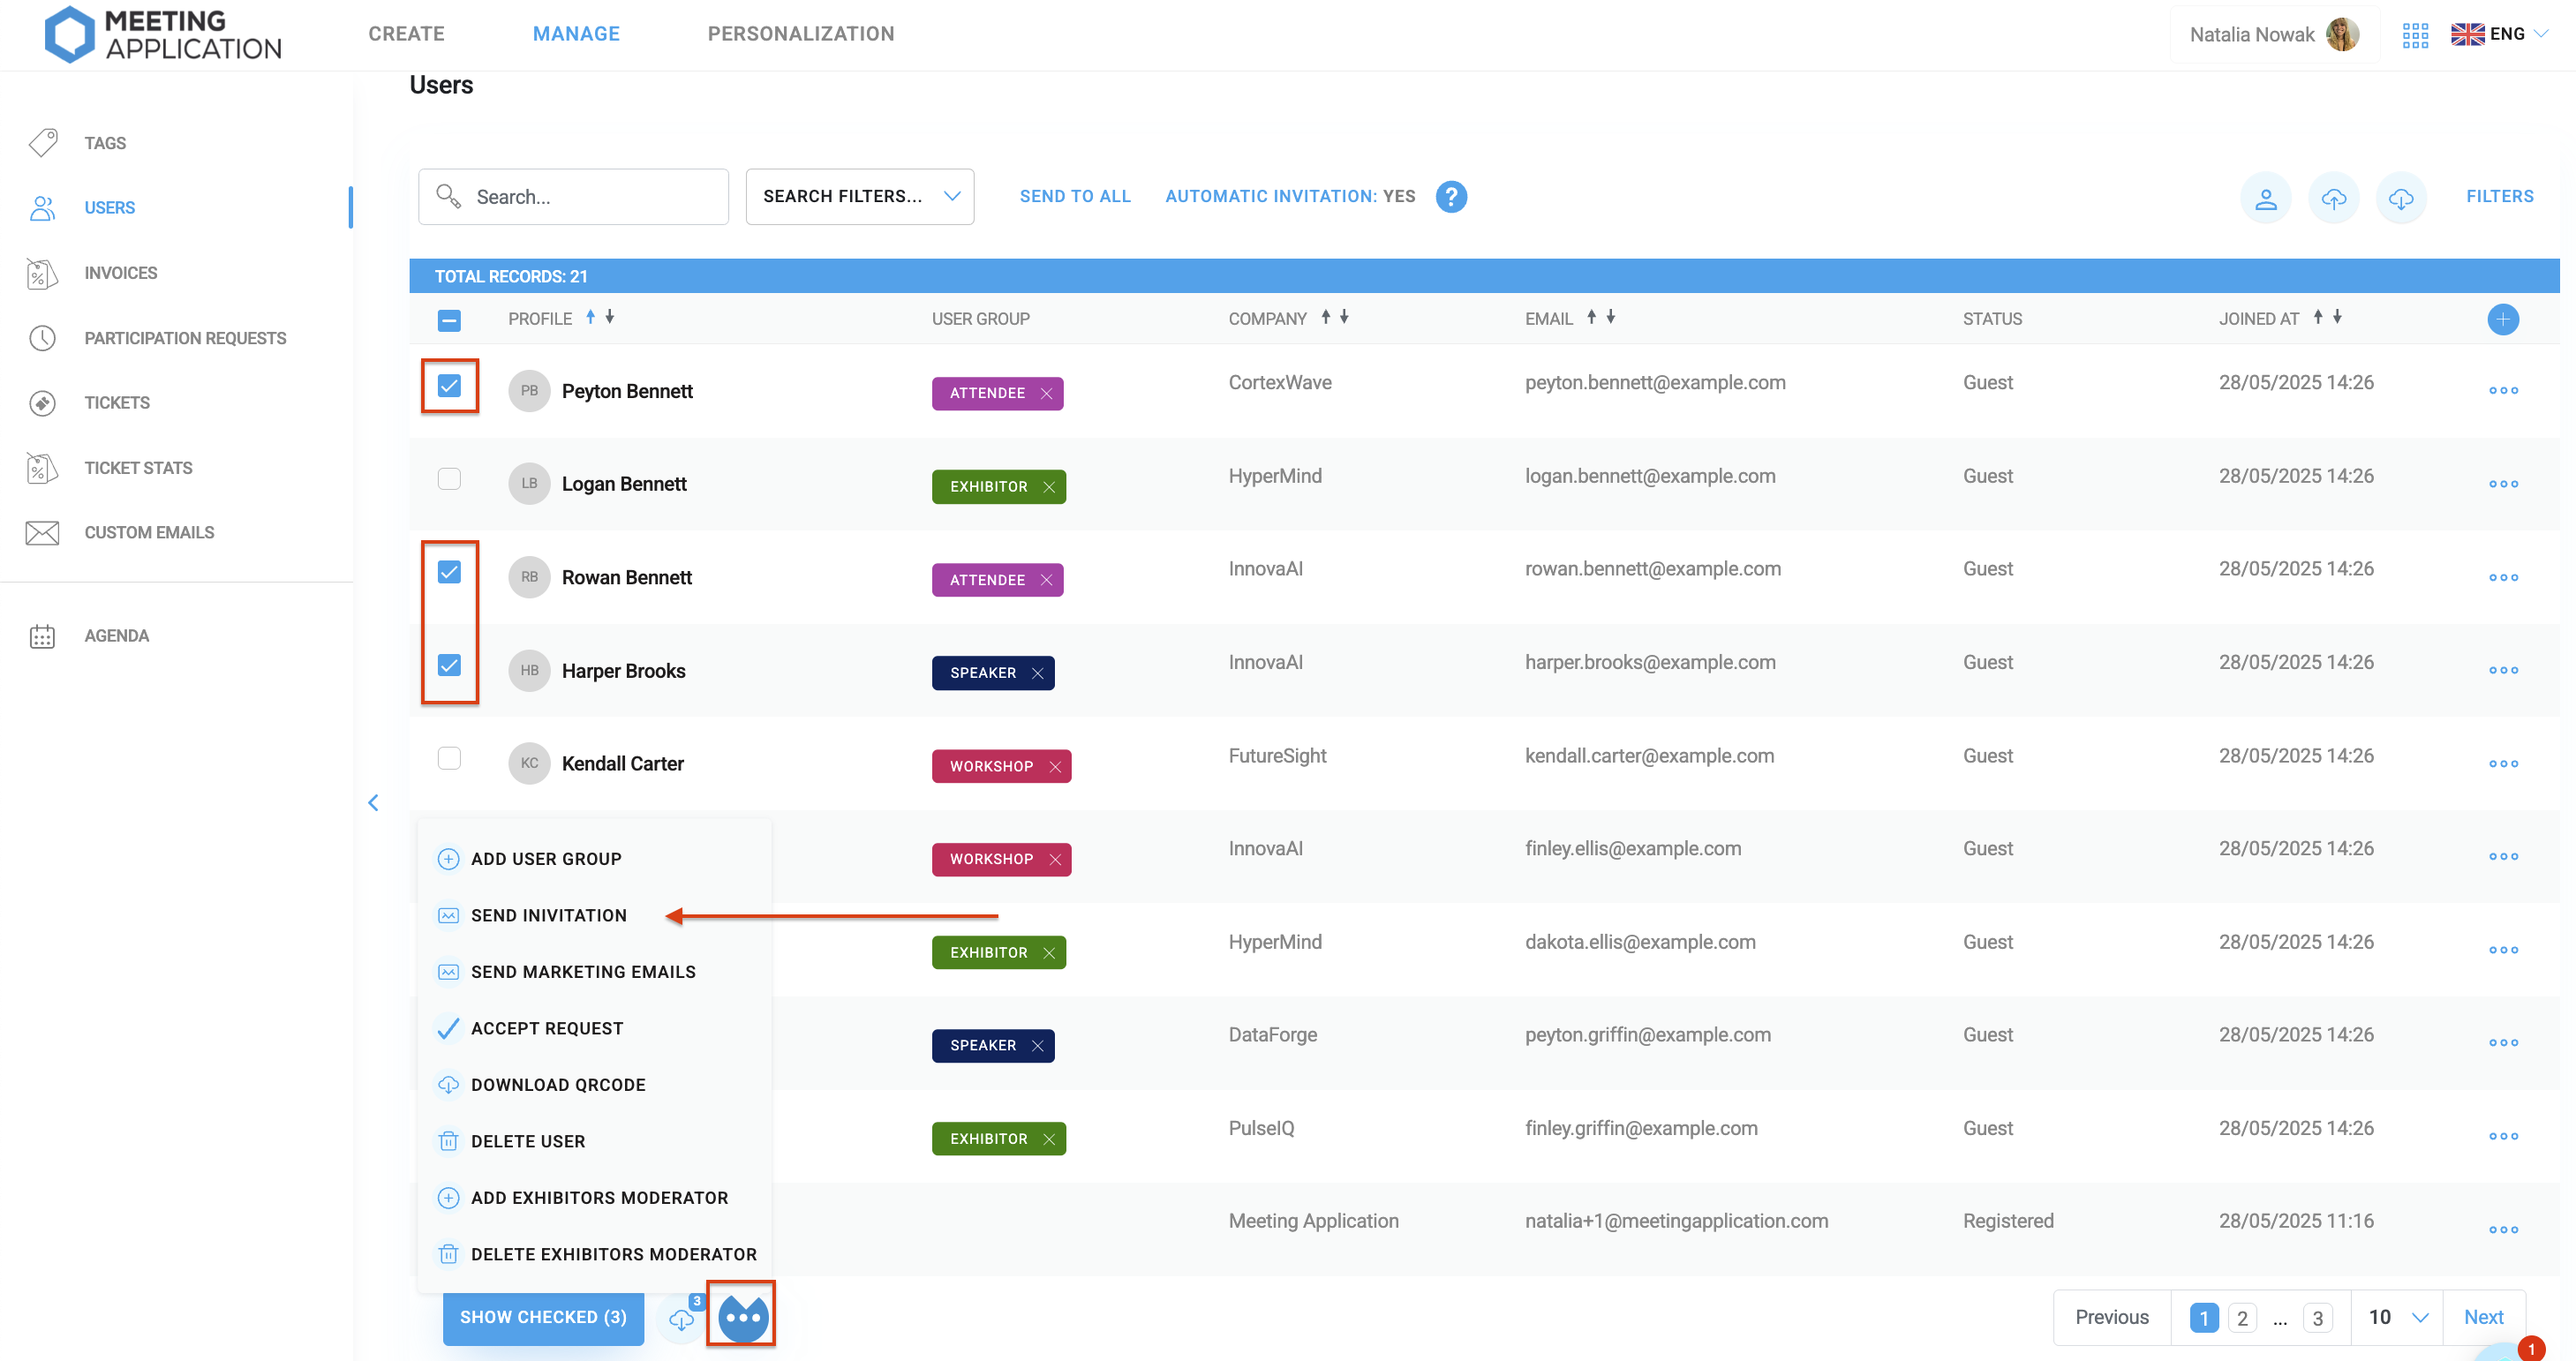
To send a welcome email to a selected group of people, select the Users to whom the invitation email should be sent, for example by filtering in selected user groups.
Then select the three dots at the bottom of the page and SEND INVITATION.
Proper delivery and display of system messages (such as invitations, tickets or registration confirmations) is crucial for the success of your event. However, it's worth remembering that for corporate participants using Microsoft Outlook email, difficulties with fully reading received emails can sometimes occur.
These problems – most often manifesting as missing visible information in the content, blocked graphics, removed formatting, or downloading only the header (banner) of the message – are not the result of an error in the Meeting Application platform. They result directly from the restrictive, default privacy settings of the Outlook application itself and corporate security policies imposed by IT departments or corporate firewalls.
If you receive a report from a participant about incomplete or incorrect display of system messages, suggest they verify their individual email settings.
Below we've compiled the three most common causes of this problem along with ready-made step-by-step instructions that you can pass directly to your participants to help them configure their mailbox correctly:
1. Unblocking image downloads (Trust Center)
By default, Outlook blocks images to protect you from tracking (e.g., checking whether an email was opened). If you see text but images are missing:
Click File in the top left corner of the application.
Select Options at the very bottom on the left side.
In the new window, go to the Trust Center tab and click the Trust Center Settings... button.
On the left side, select Automatic Download.
Uncheck the checkbox "Don't download pictures automatically in standard HTML emails and RSS items".
Confirm with the OK button.
2. Downloading full messages instead of just headers
If the message text and links are also missing, and only a "banner" (header with subject and sender) is being downloaded, Outlook may be saving data transfer:
Na głównej wstążce u góry przejdź do zakładki Wyślij/Odbierz (Send/Receive).
Kliknij Grupy Wyślij/Odbierz (Send/Receive Groups) i wybierz Zdefiniuj grupy Wyślij/Odbierz... (Define Send/Receive Groups).
Wybierz swoją główną grupę (zazwyczaj Wszystkie konta) i kliknij Edytuj (Edit).
Wybierz swoje konto po lewej stronie.
W sekcji opcji folderu upewnij się, że zaznaczona jest opcja Pobierz pełne elementy z załącznikami (Download complete items including attachments), a nie „Pobierz tylko nagłówki”.
Kliknij OK.
3. Wyłączenie trybu "Zwykłego tekstu"
Jeśli maile są pełne, ale wyglądają bardzo "surowo" (nie ma klikalnych linków, kolorów ani układu strony), mogła włączyć się opcja czytania bez formatowania HTML:
Go back to File > Options > Trust Center > Trust Center Settings.
Select the Email Security tab.
In the Read as Plain Text section, make sure that the Read all standard mail in plain text checkbox is unchecked.
Click OK.
Have a great event with Meeting Application!
