From this article, you’ll learn how to create a ticket add‑on so that participants of your event can buy it at the ticket selection stage. You can create a shared pool of add‑ons and sell them at different prices depending on which ticket they’re attached to.
Add‑ons can be purchased as an Add-on to the ticket for the event or as a separate item, independent of the main ticket.

Make sure you have the right clauses dedicated to the products you’re selling. If the ticket sales terms and conditions also define the conditions for purchasing an add‑on, it can be one and the same document. However, if the sales conditions are different, it’s worth preparing the relevant clauses in a separate file. You can learn more about terms and conditions from THIS ARTICLE.
Usually, add-ons and workshops are sold in a package with the main admission ticket. However, it may happen that you want to sell a spot for a closed workshop to people from outside or offer the purchase of parking to a participant who received the main ticket earlier, e.g. from a sponsor.
In Meeting Application you can create a standalone offer (standalone offer). It allows you to buy just the add-on or workshop via the shopping cart, without having or selecting the main event ticket.
How to set up standalone sales?
Go to the CREATE → ACCESS → ADD-ONS tab or WORKSHOPS.
For the selected product, click Add sales settings.
Assign the user group that will be added automatically after purchase.
Assign the coupon that will be automatically distributed after purchase.
Set the price, visibility (e.g. access only via hidden link), and quantity limits – in exactly the same way as you do for standard tickets.
After publishing, the product will appear on the Landing Page as a separate item that can be purchased.
Depending on whether you’re selling a workshop separately or an add-on, the file delivery process is different. This is key from the perspective of your front desk operations:
Buying a standalone Workshop: A participant who pays for a workshop always receives a ticket as a PDF file by email. This file contains a unique QR code that the staff can scan right before the participant enters the workshop room.
Buying a standalone Add-on: If a participant buys only an add-on (e.g. lunch package, parking), the system by default will not generate any PDF file with a QR code. The purchase will be correctly recorded in the system (and on the invoice), and the participant will only receive an email confirming that the order was placed. This is because the add-on doesn’t have a main ticket on which it could be printed.
If you sell an add-on as a separate item and you want the participant to physically show a QR code when picking it up (e.g. at the parking lot or when handing out goodies), you need to assign Coupons to this add-on (distribution configuration with coupons of type sale).
In this setup, after a successful purchase, the system will generate and send the participant a Coupon as a PDF with a QR code, which the booth staff can easily scan.
Learn more about creating coupons 👉IN THIS ARTICLE.
For the system to automatically distribute a previously created coupon:
Go to the CREATE → ACCESS → TICKETS / WORKSHOPS / ADD-ONS tab.
Open the edit view of the product you want to add coupons to.
Scroll down to the Coupon Configuration section and click Add coupon configuration.
From the dropdown list, choose the coupon created in Step 1. (Note: this list will only show coupons where the Distribution type has been set to "Sale").
In the "Coupons per item" field, specify how many digital vouchers the attendee should receive for each purchased unit of this product (e.g. 1 "VIP Lunch" add-on = 1 coupon).
Save the form.
Done! From now on, every successful purchase of this add-on will trigger automatic distribution of a coupon with a QR code straight to the participant’s email and mobile app.
In the CREATE → ACCESS → TICKETS tab, create a ticket for the event to which you’ll then add and attach add-ons. You can learn more about configuring tickets from THIS ARTICLE.
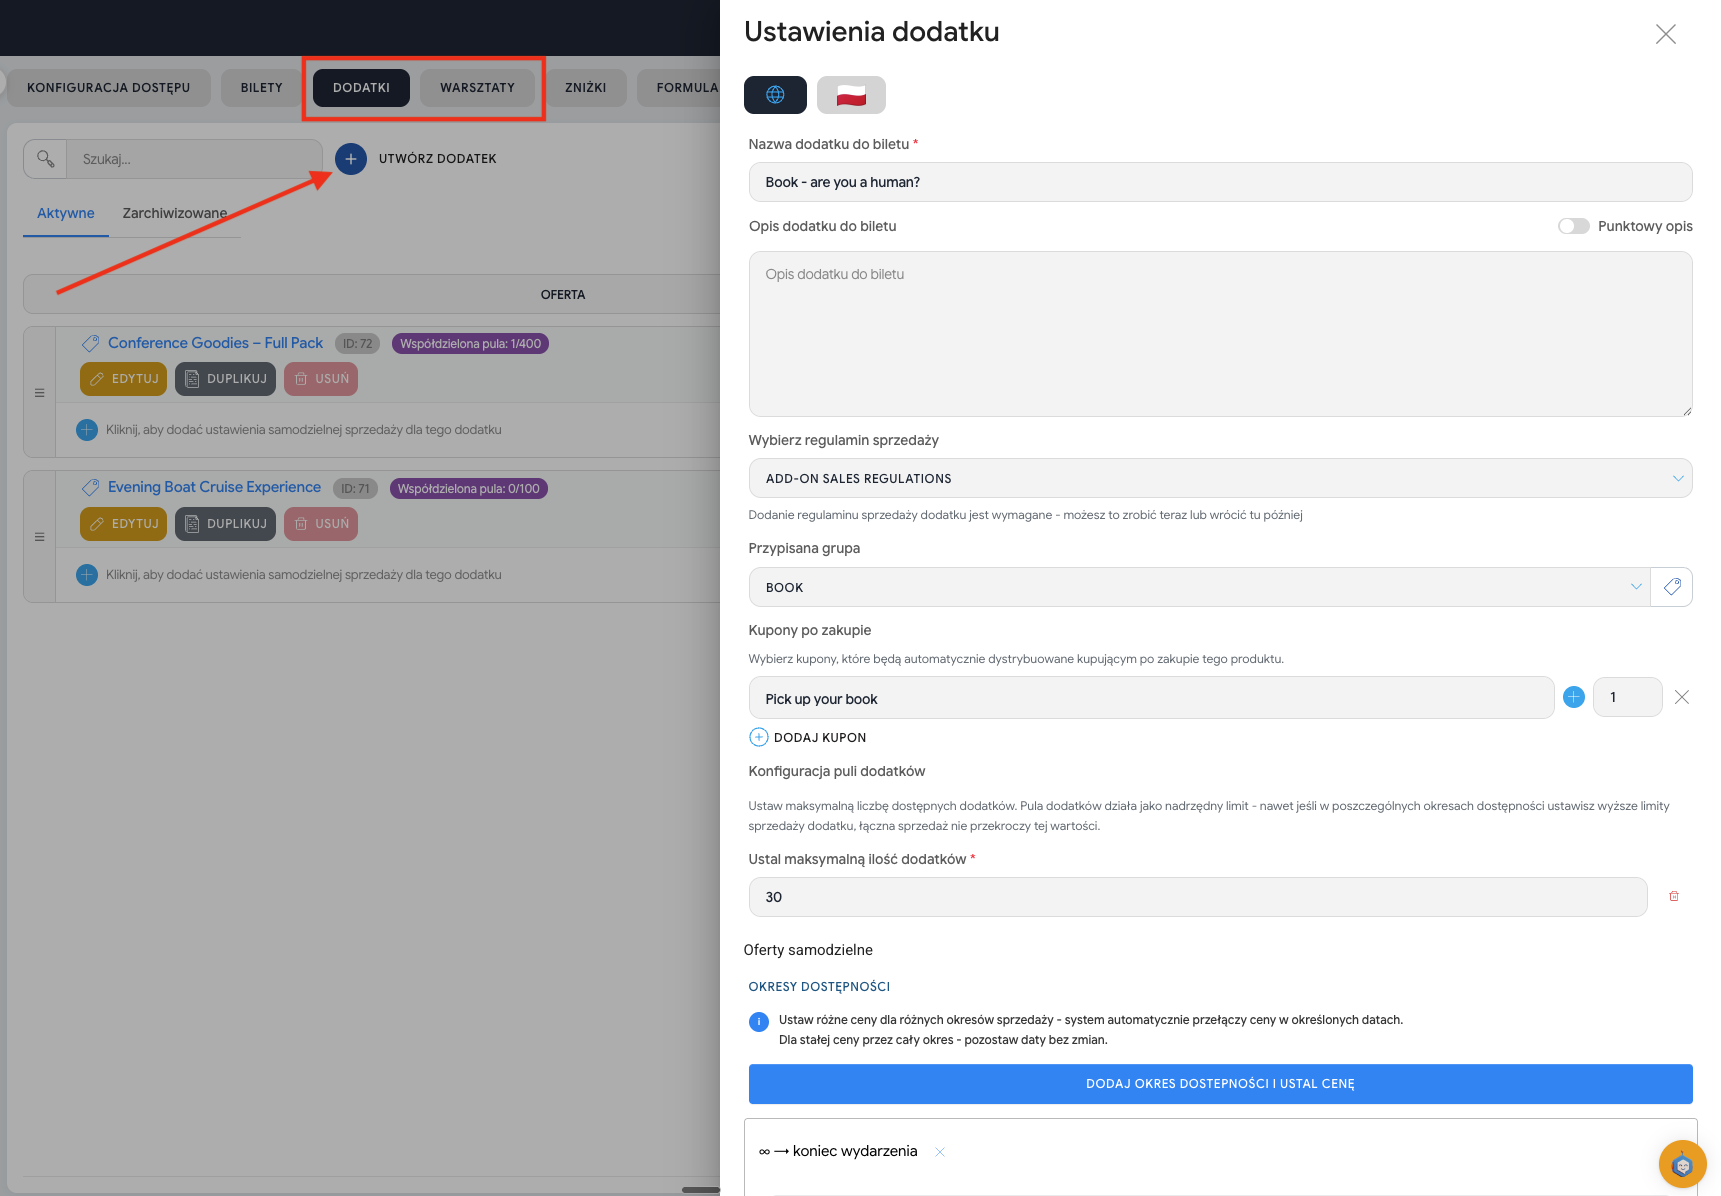
To create a new add-on or workshop, click the “+” icon in the add-ons section.
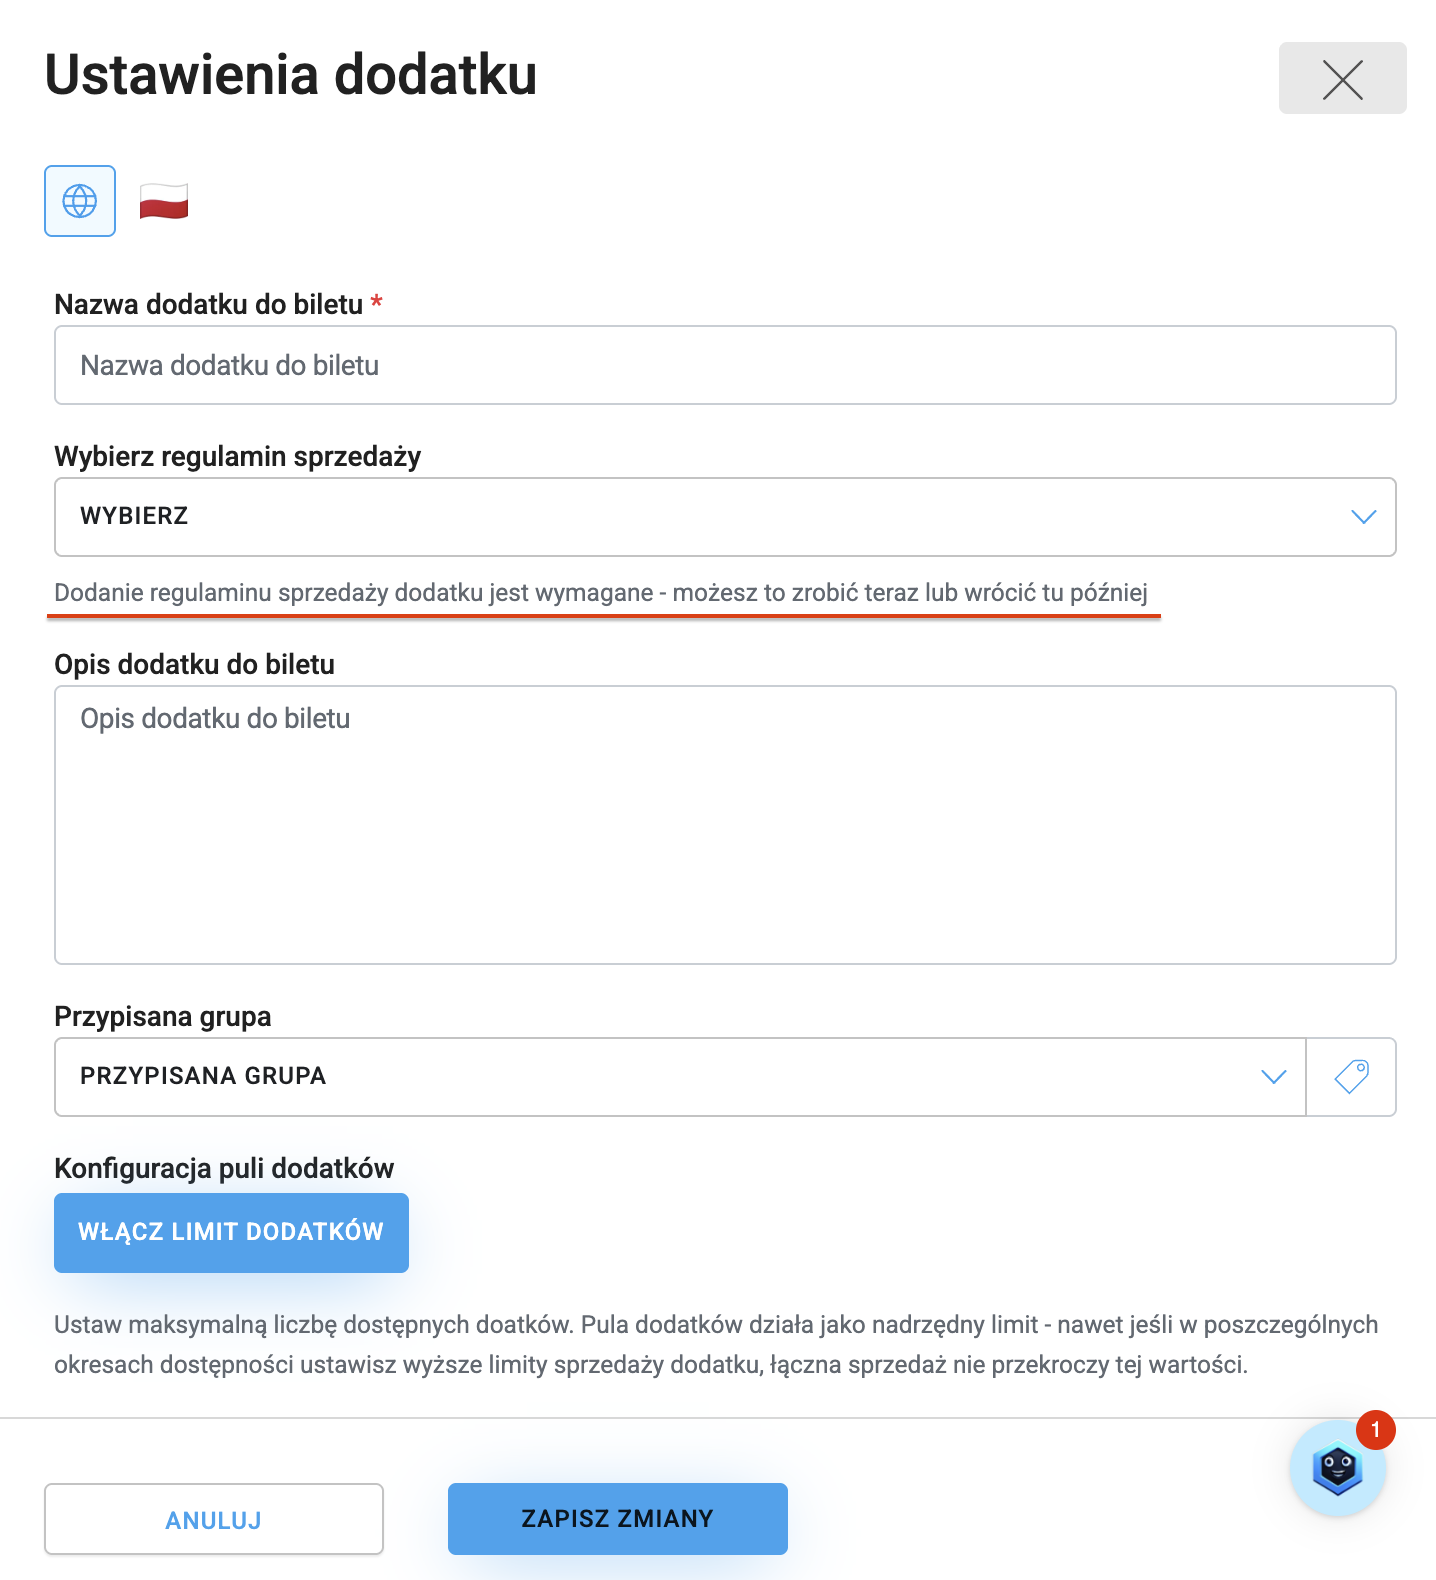
Addon name – visible to the participant on the page, listed as an item on the invoice.
Sales terms and conditions – the sales terms and conditions will be required to accept at step 3 of the shopping cart.
Addon description – it will be visible in the shopping cart, so make sure the description is clear and encourages people to buy.
Assigned user group – the user group automatically assigned to the participant after buying the addon, displayed during check‑in and allowing you to configure coupons, show dedicated content, or send PUSH to a selected group of people.
Addon limit – a shared quantity pool that controls the maximum sales of an addon, no matter how many tickets it will be sold with. You’re selling a book by one of the speakers and you’ve got only 50 copies? TURN ON THE ADDON LIMIT to make sure you don’t sell more copies than you have.

For such automation to be possible, the EXHIBITORS module and the MODERATION AND SCANNING.
You can read about coupons and how to configure them properly in THIS ARTICLE.
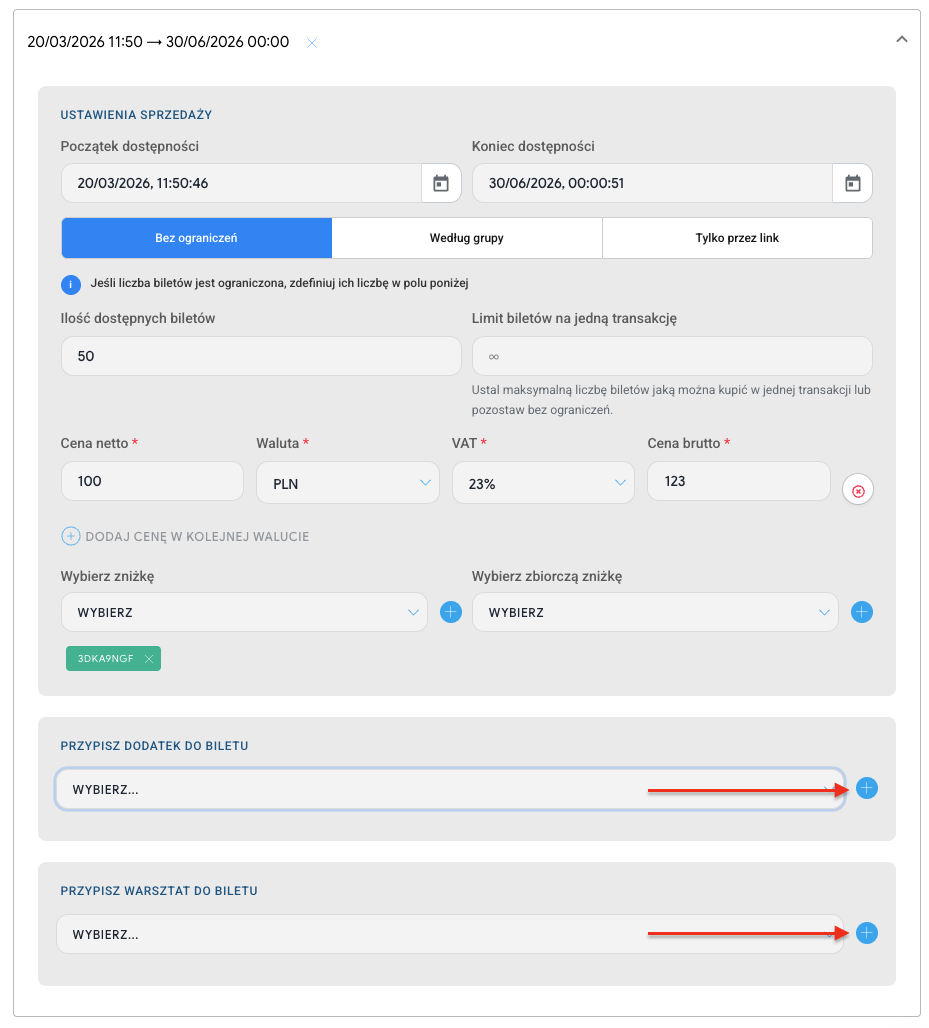
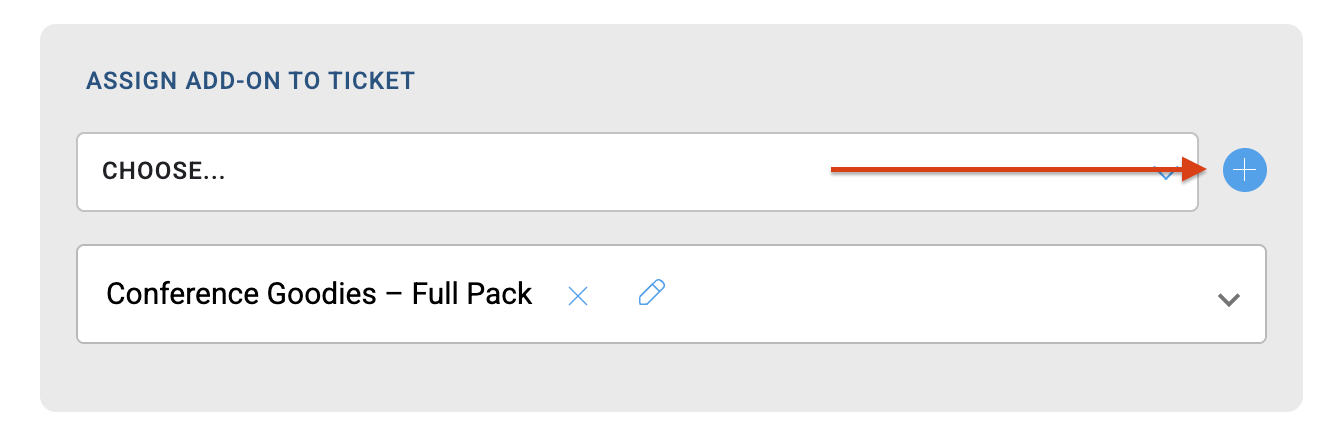
After creating the add-on, in the assign add-on to ticket or assign workshop to ticket section, choose the add-on from the list and adjust the settings for the ticket.
Here you can set:
the number of available add-ons,
the maximum number per ticket,
the net/gross price and the currency,
a per-item or total discount.
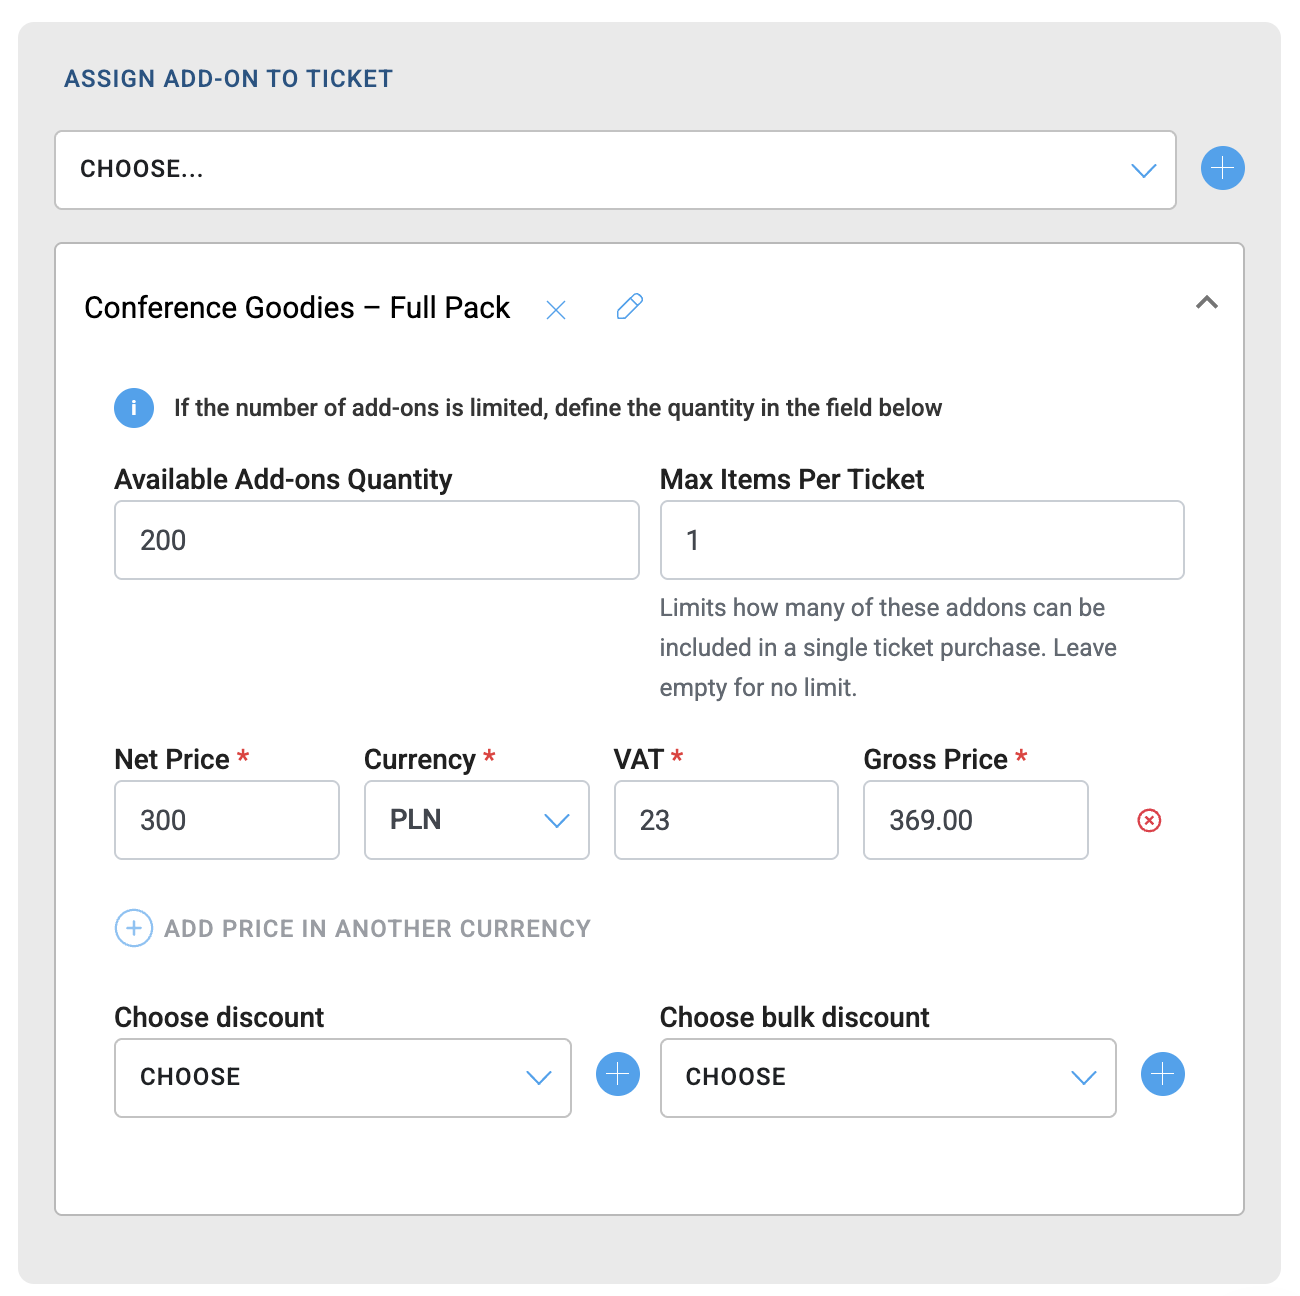
You can assign several add-ons to a single ticket – each of them has its own price and availability configuration. You decide which add-ons are sold with which ticket. It’s up to you whether discounts will also apply to the ticket add-on.
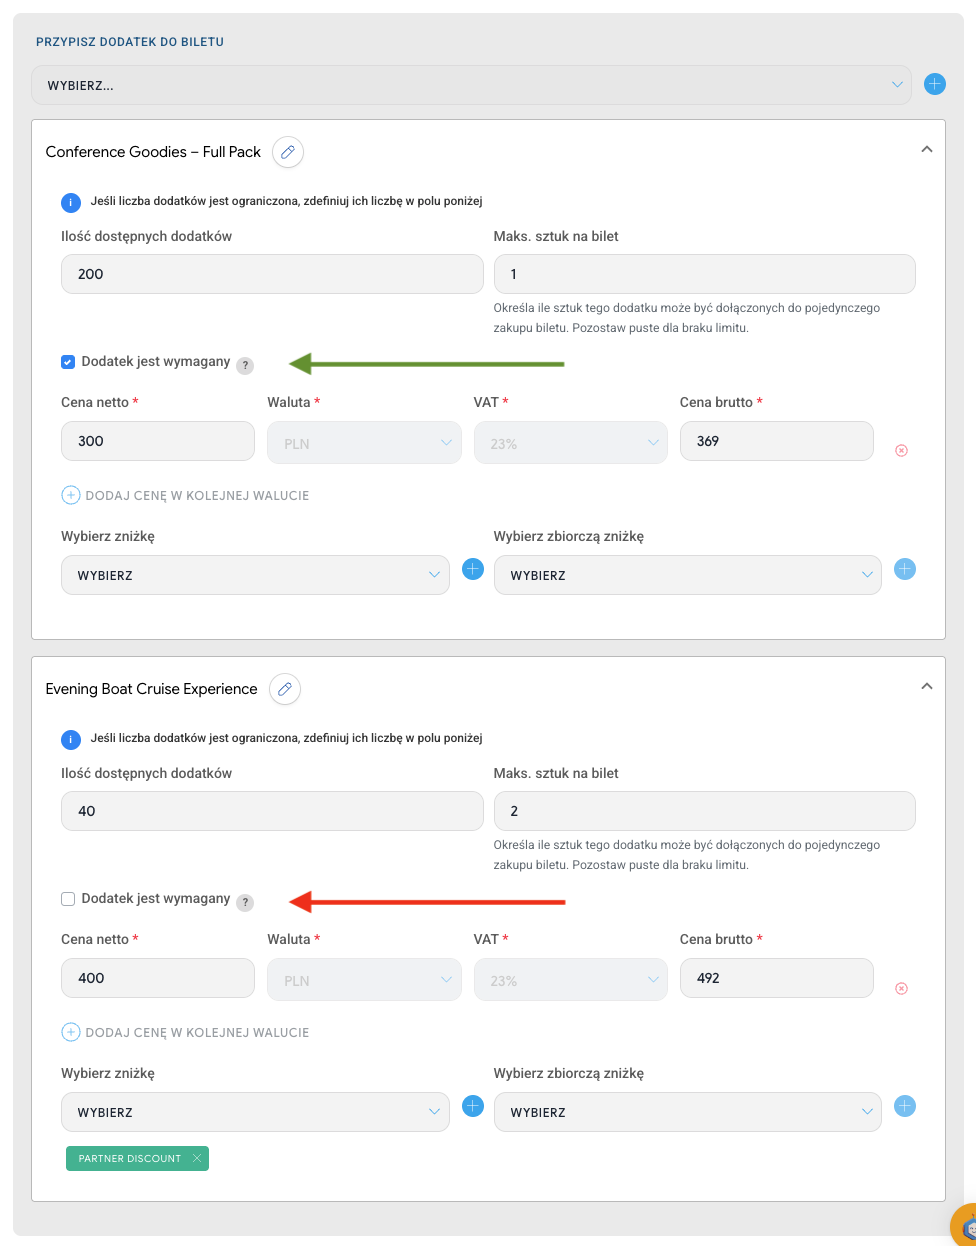
Sometimes the specifics of an event require that the participant must declare the choice of a specific option (e.g. choosing one of three parallel workshop tracks or choosing one of several book options as a welcome gift).
Selecting the Add-on is required option makes the system force the buyer to choose exactly one option from the group of required add-ons.
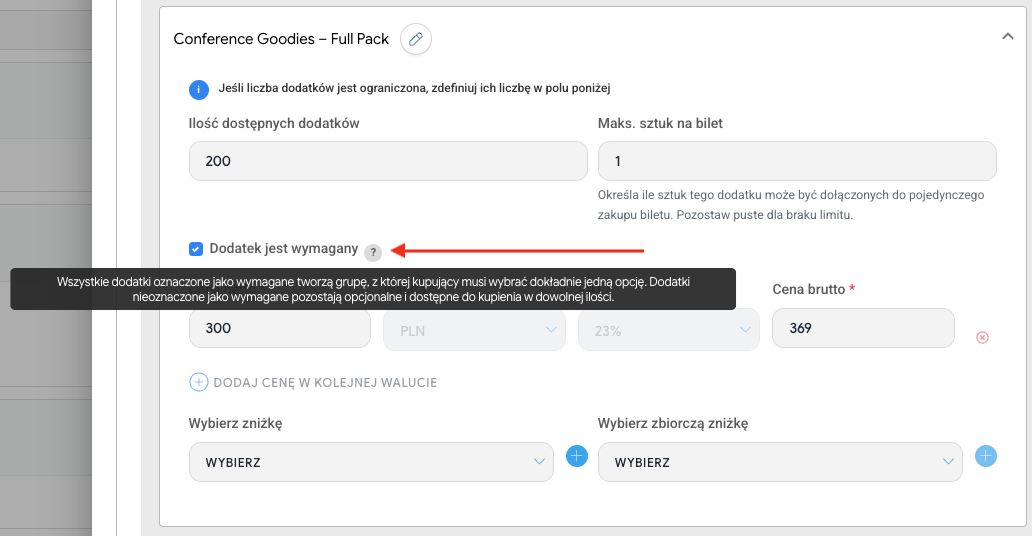
How does this work in practice?
Required group: All add-ons assigned to a given ticket, in which you tick this checkbox, will form a shared group. The participant won’t move on to the next step of the cart until they select exactly one item from it.
Optional add-ons: The remaining add-ons that are not marked as required stay completely optional. The participant can (but doesn’t have to) add them to their order in any quantity.
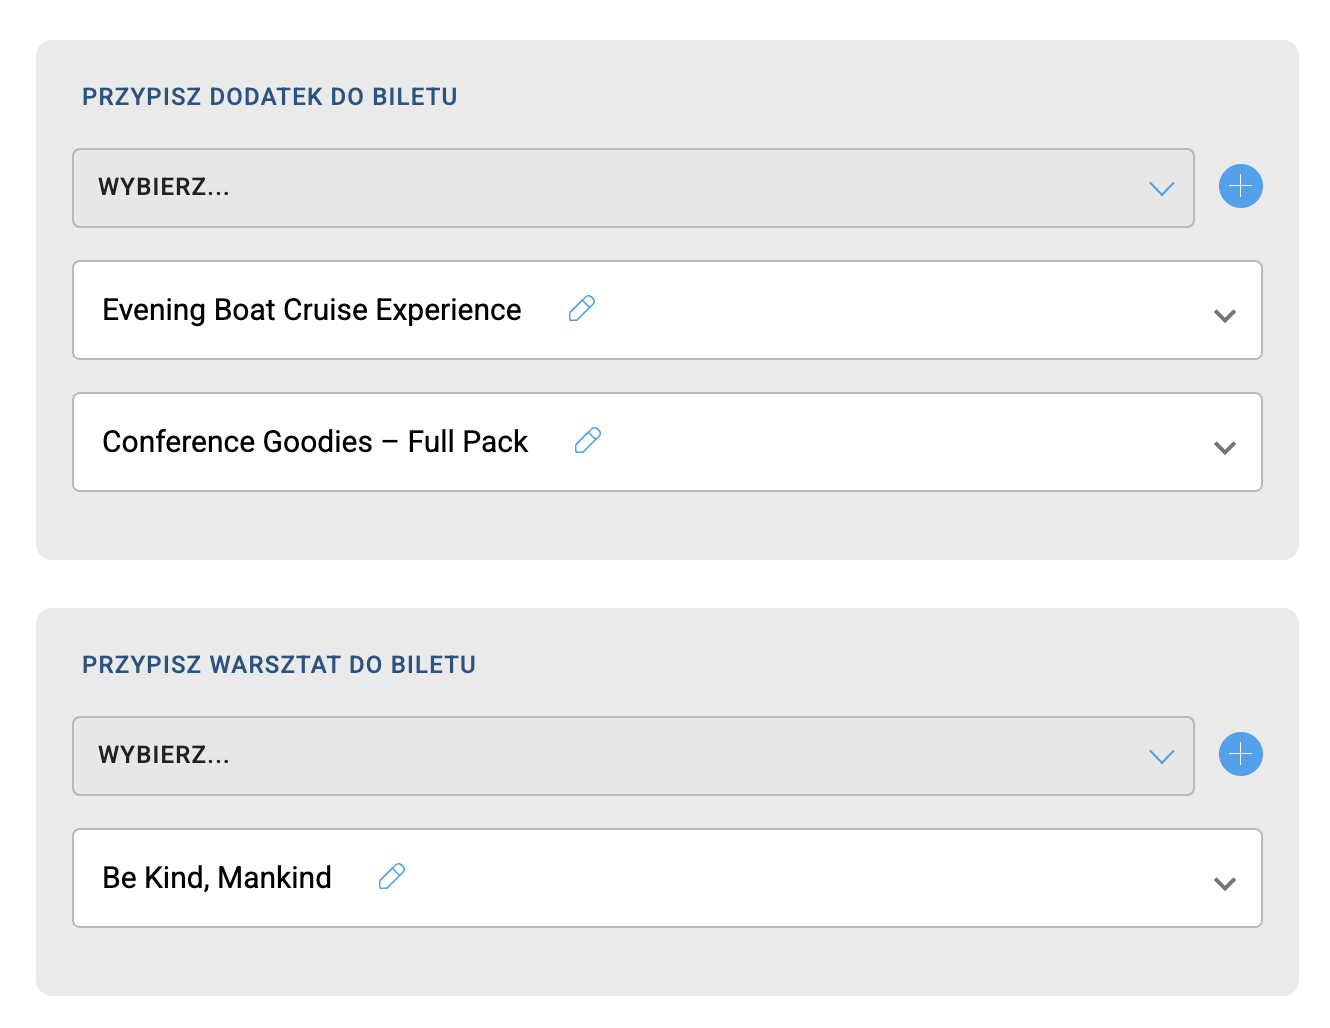
After you publish tickets and add-ons, they’ll show up in active sale on the Landing Page.
In the cart (step 2), add-ons and workshops are displayed in separate sections.
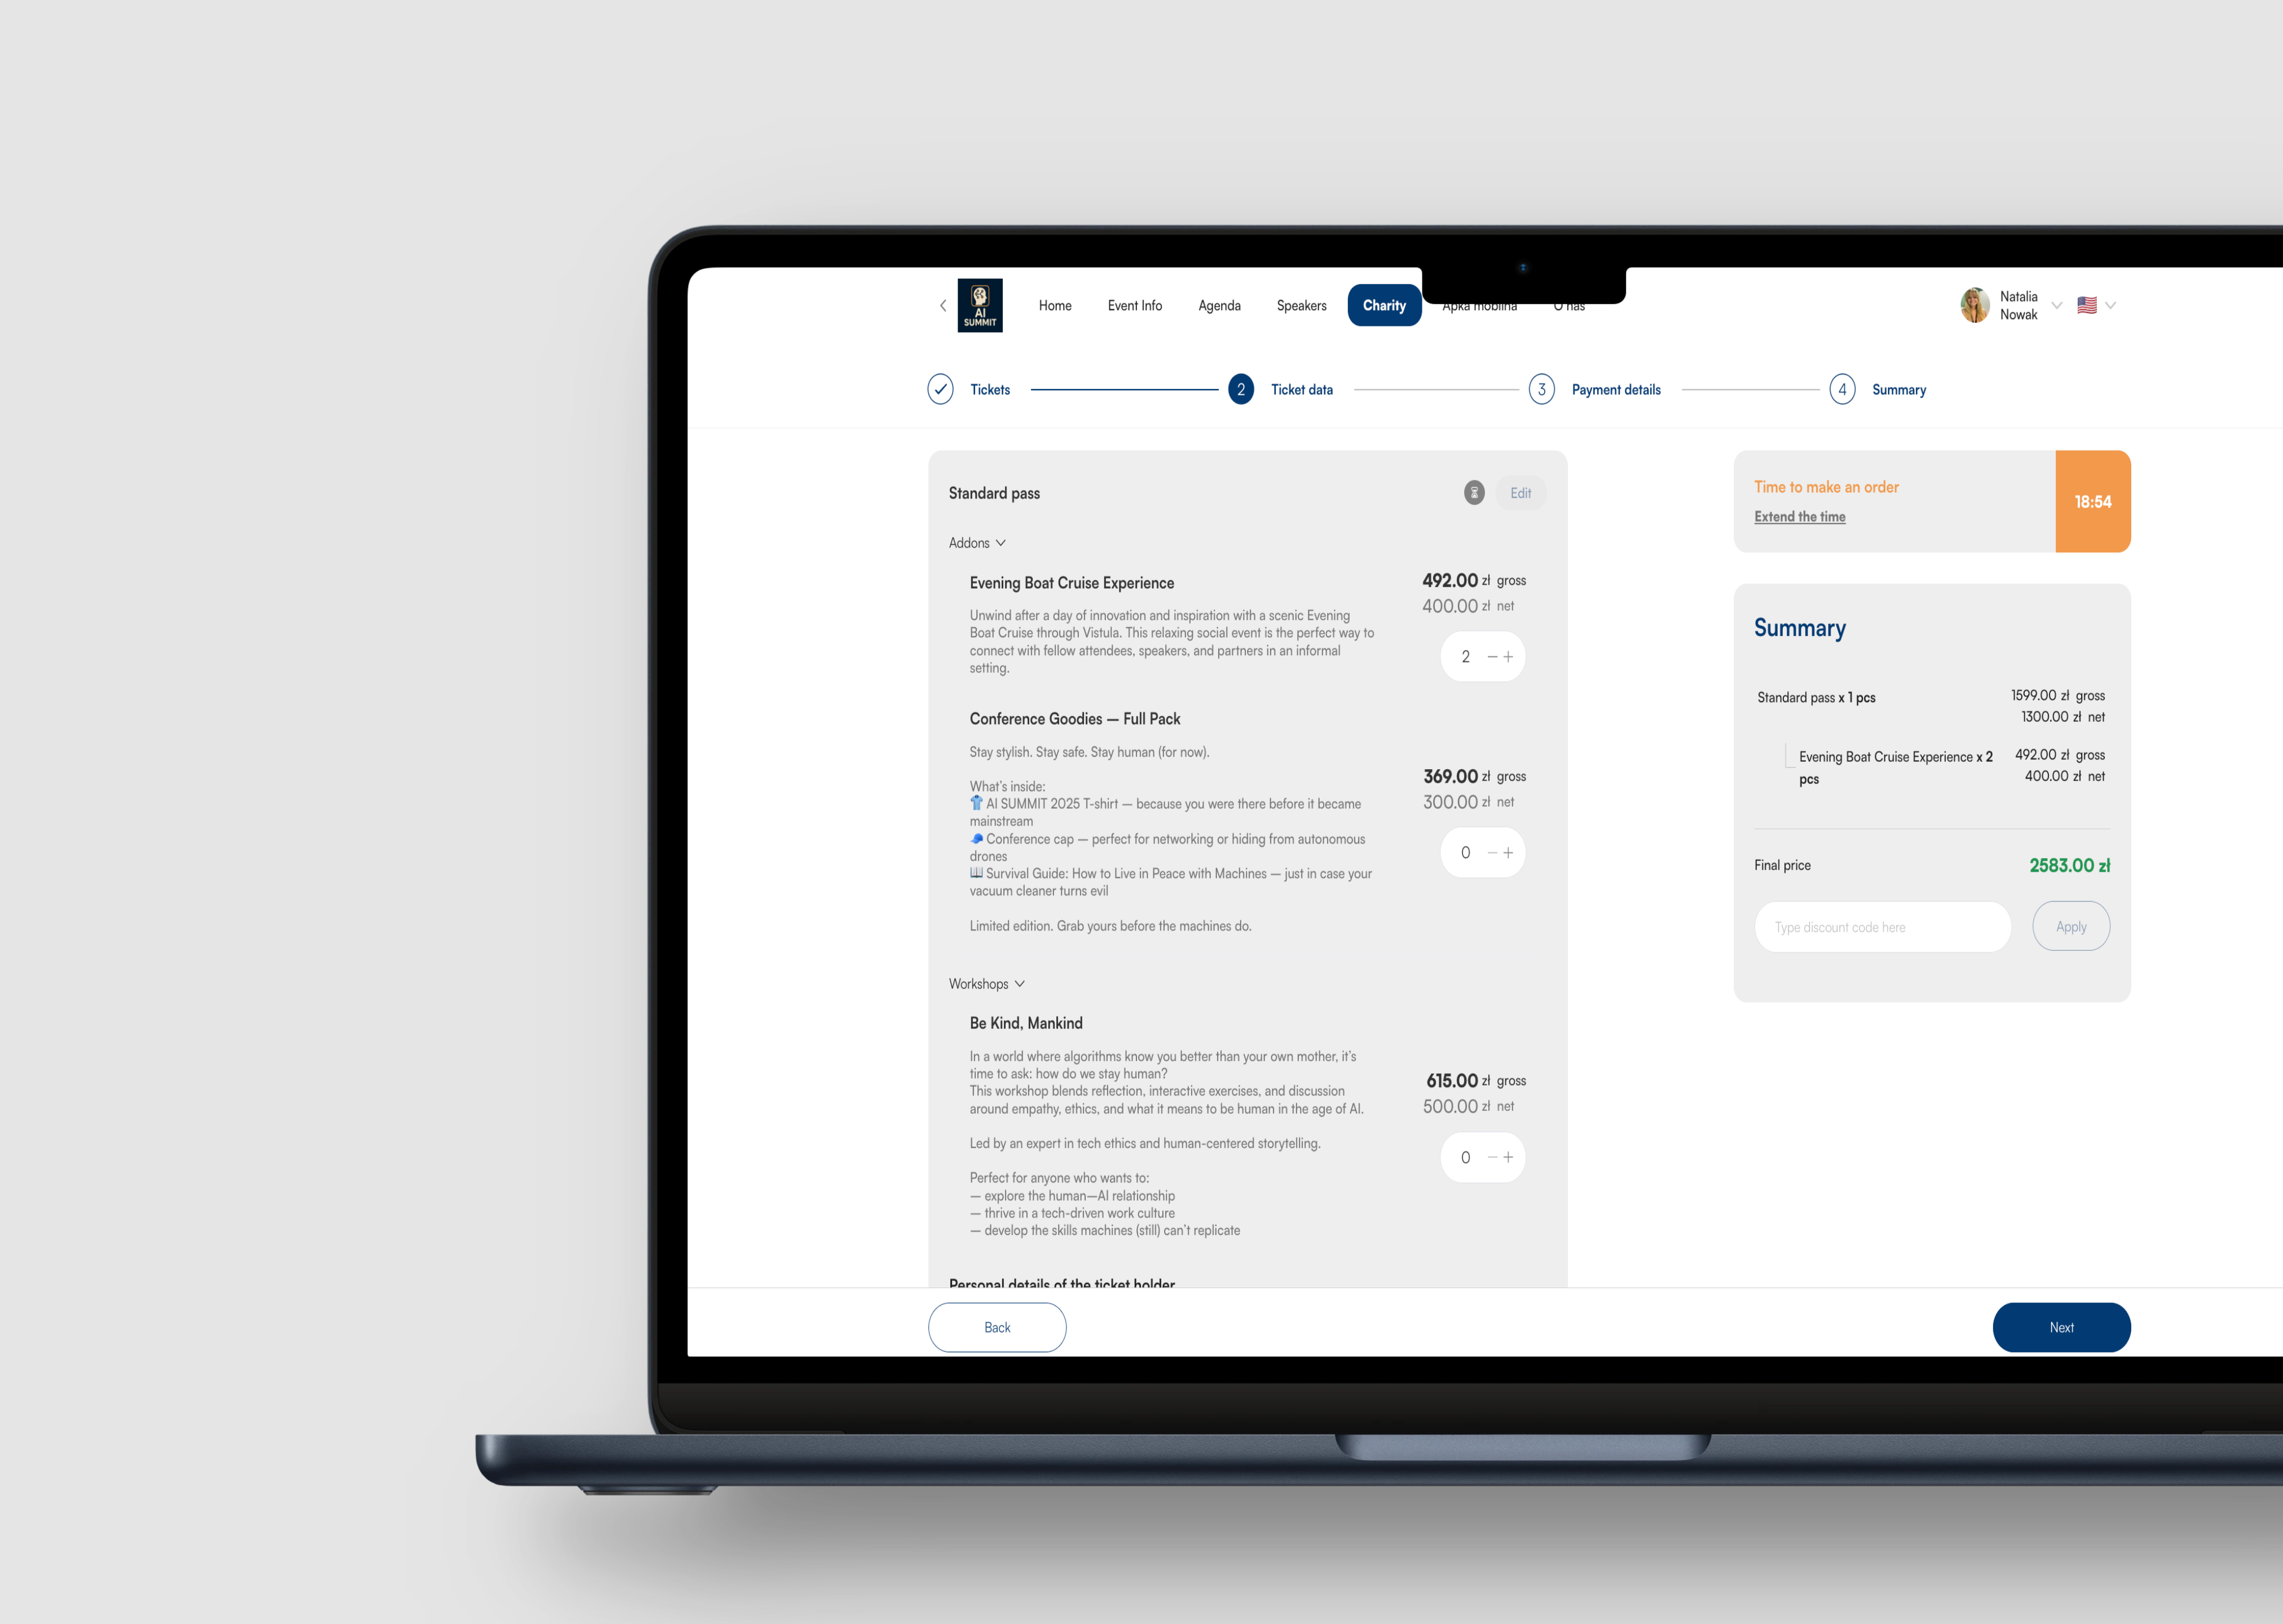
If a participant tries to add more than the limit set in the panel, they’ll see a message about the maximum number of add-ons that can be bought with one ticket.

After buying the add-on, the amount will appear as an item on the VAT invoice or personal invoice.
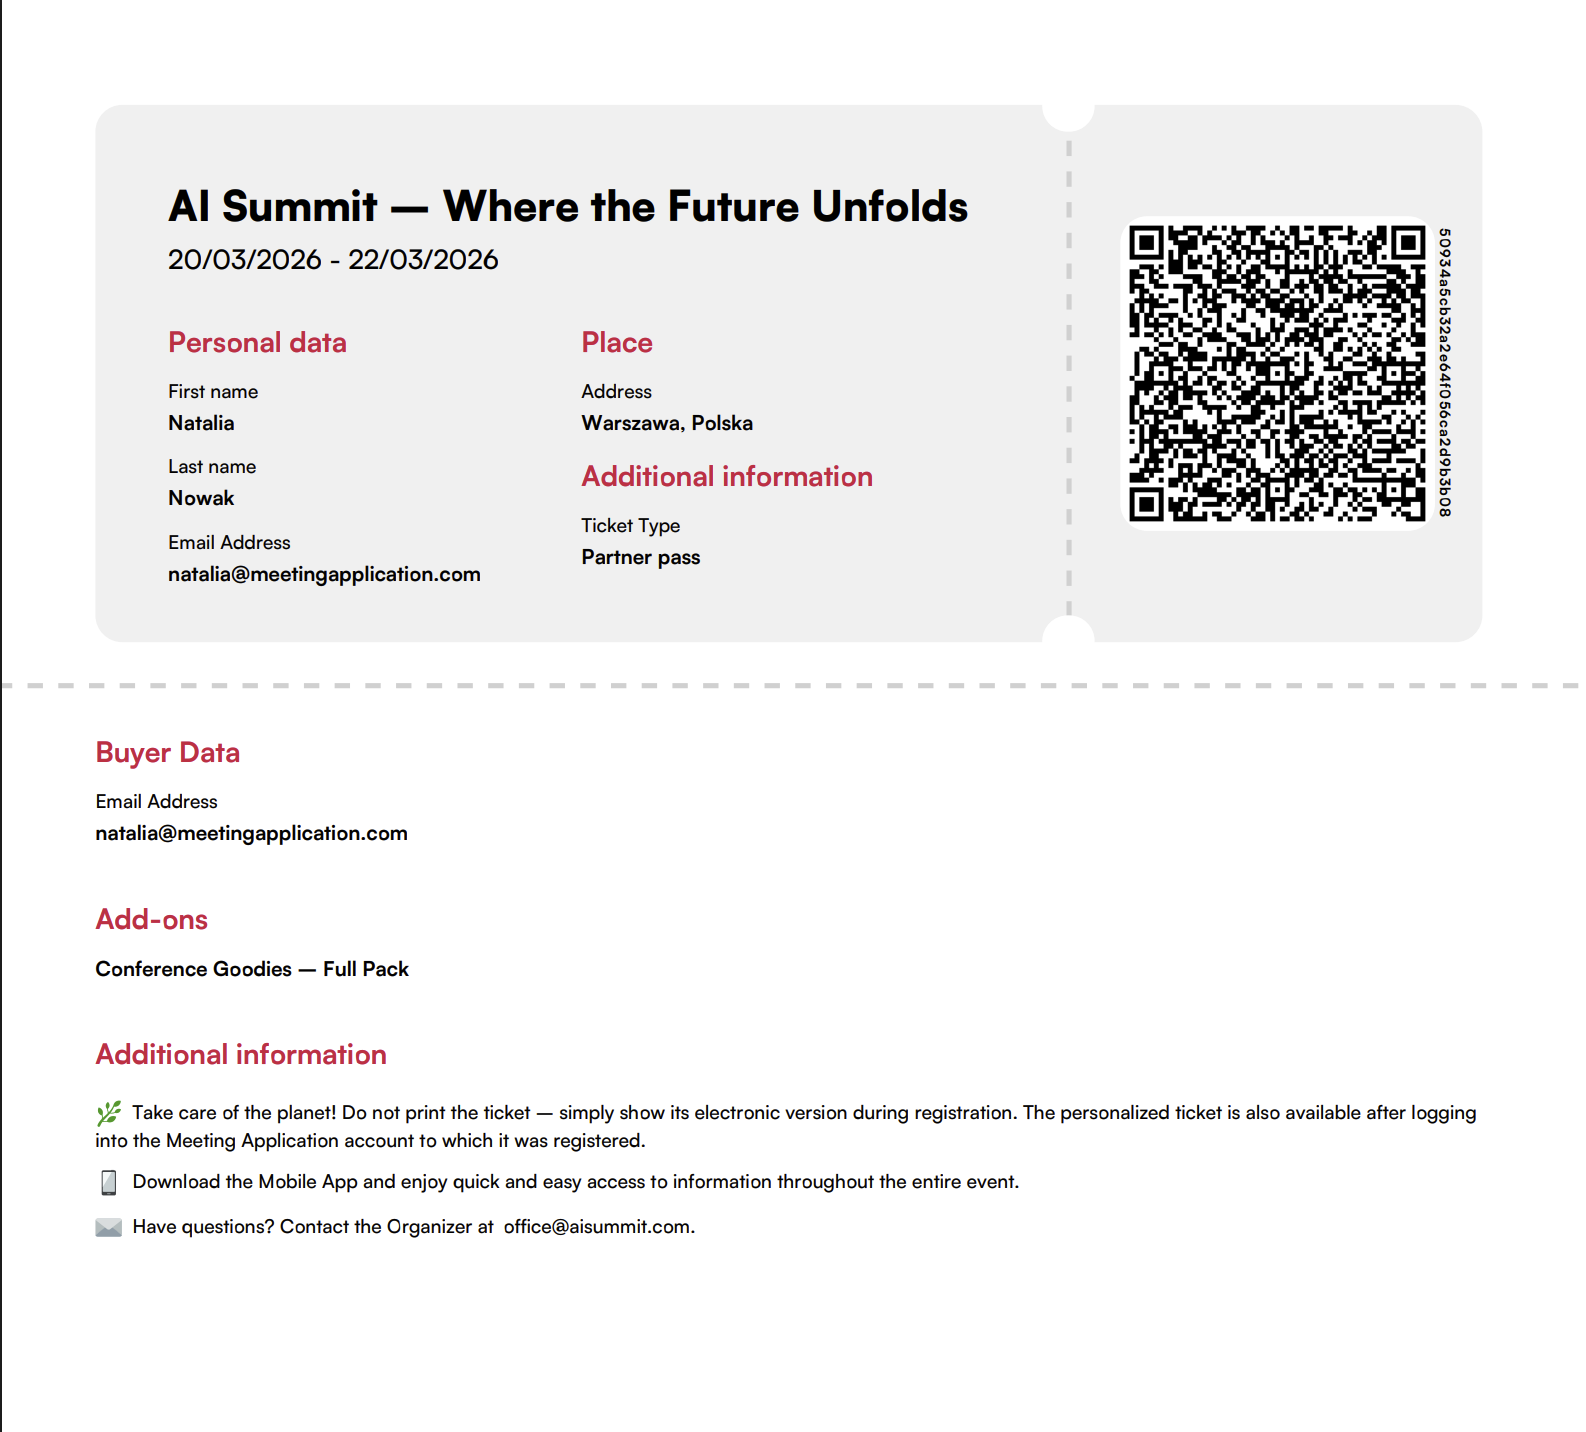
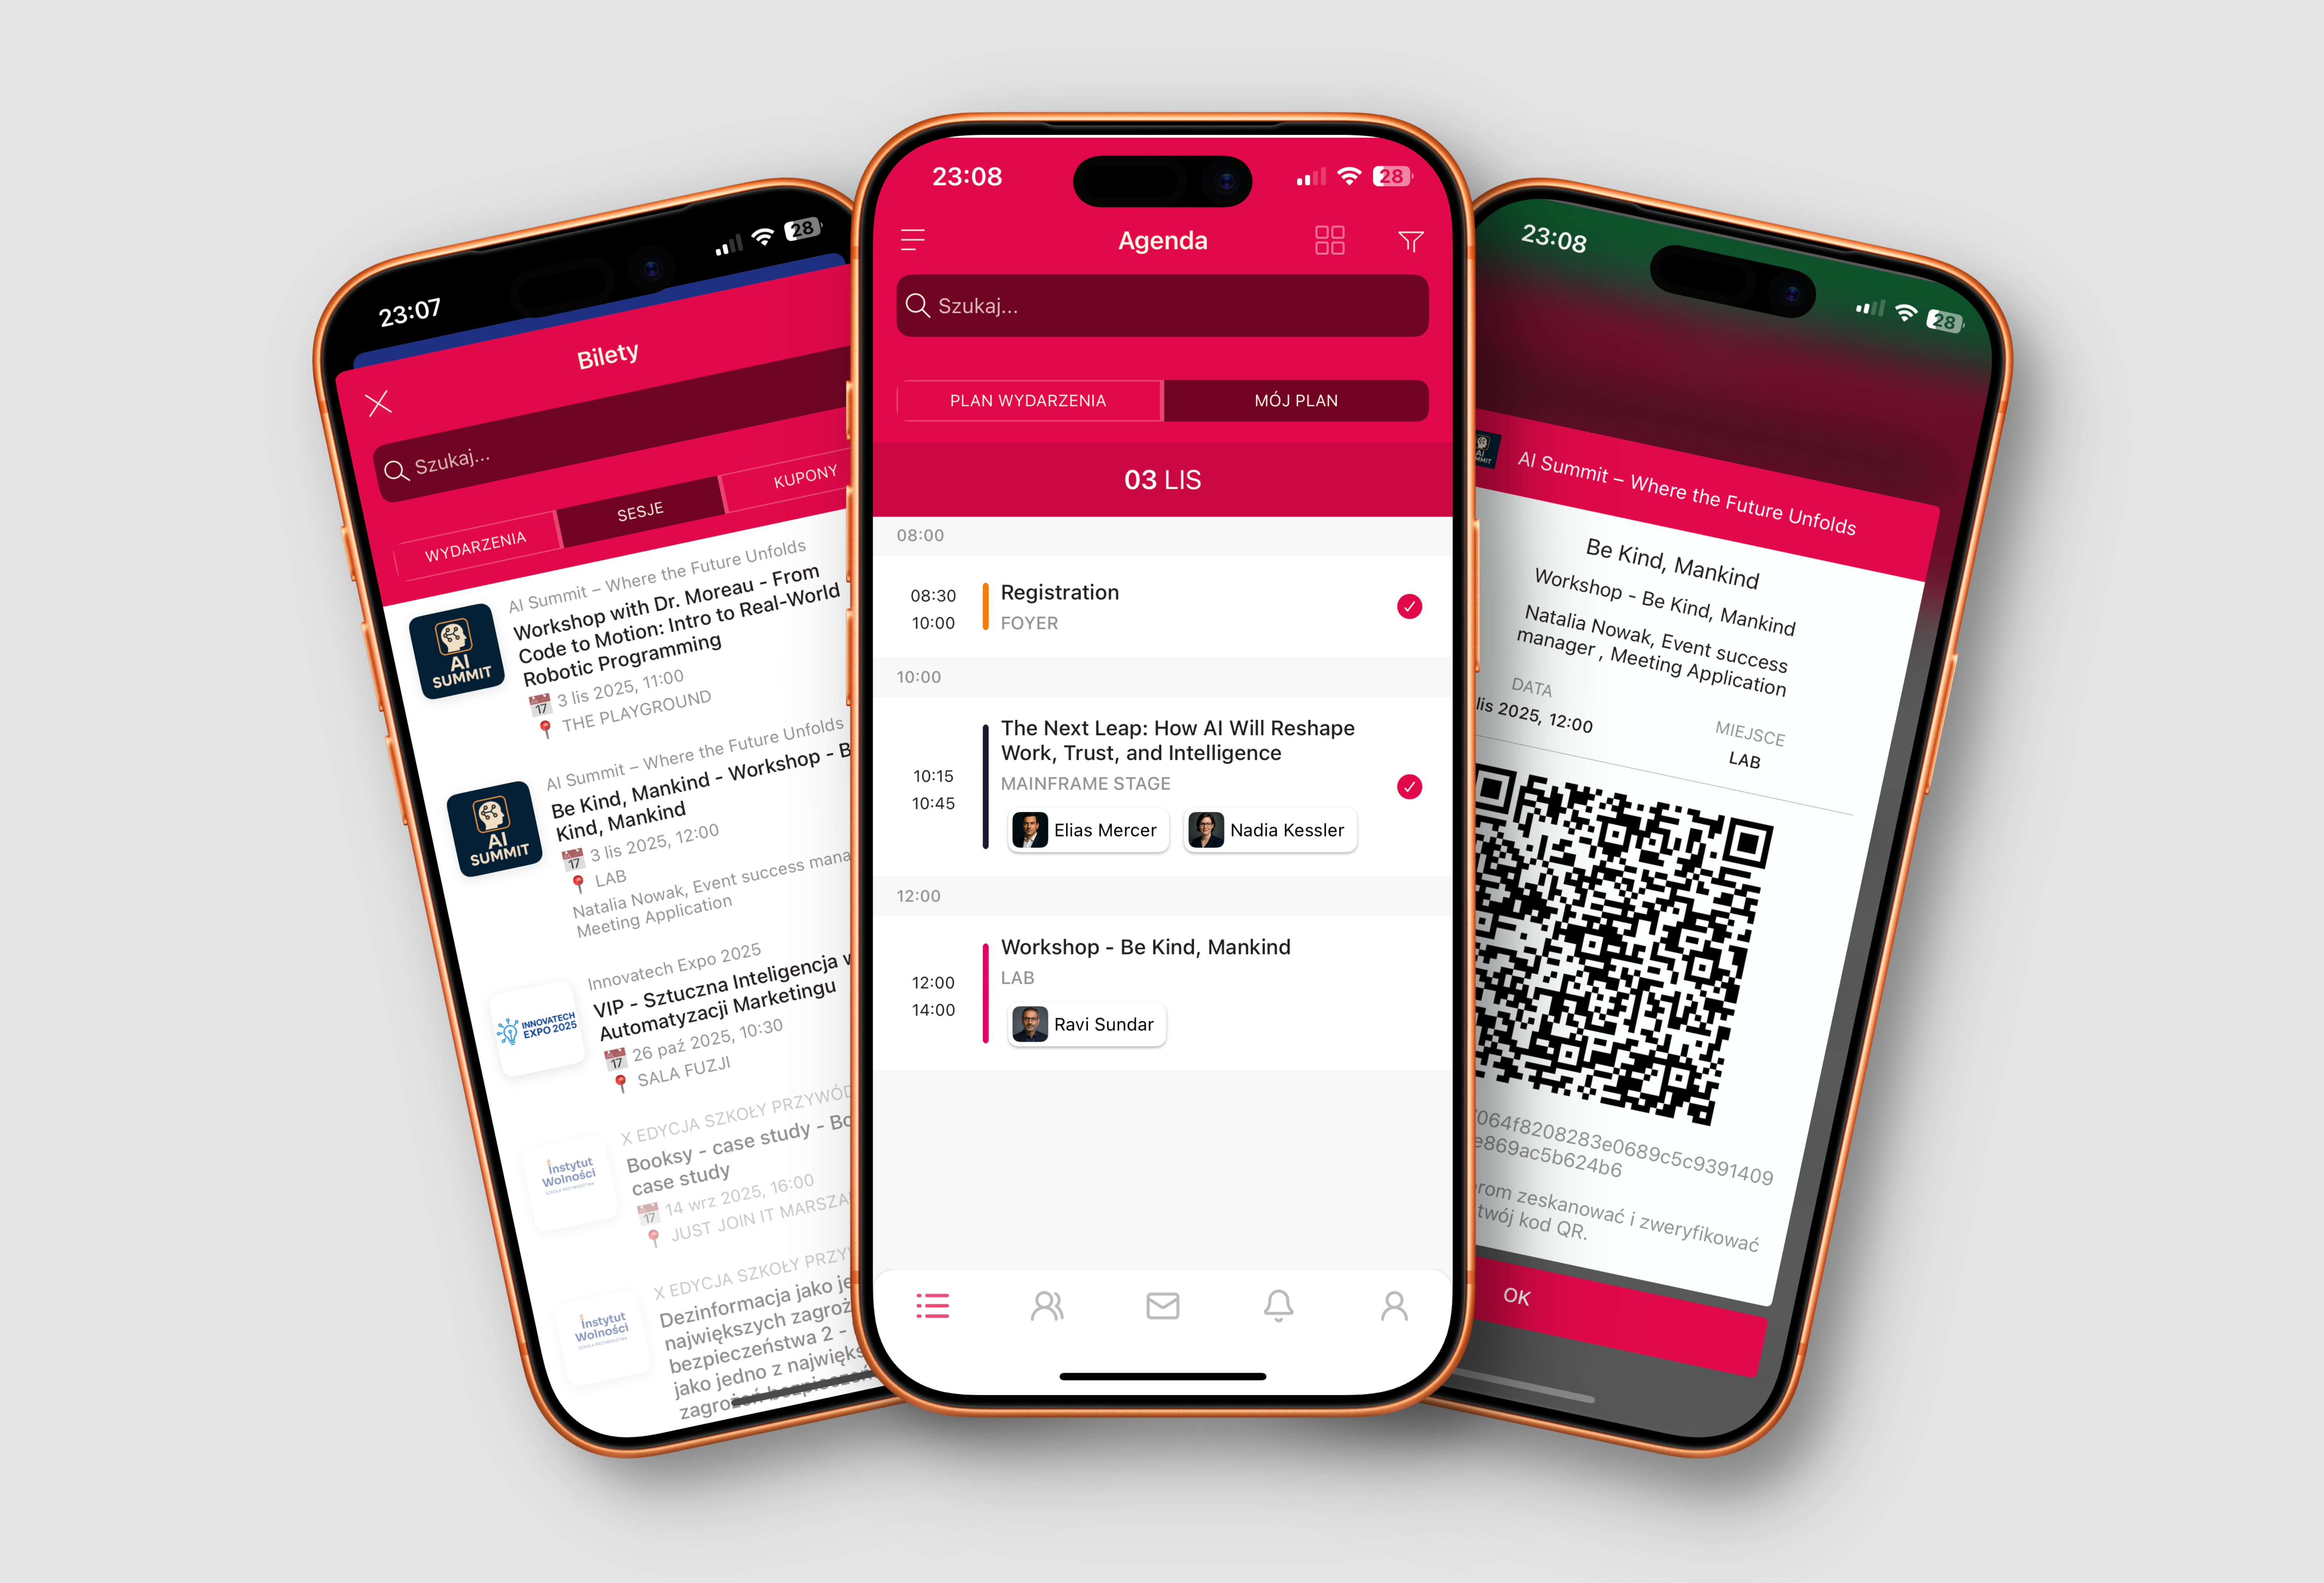
The purchased add-on will be listed on the PDF ticket sent by email and available after logging in with the ticket holder’s email address on the landing page and in the mobile app.
in the CREATE → TICKETS tab the ADD-ONS column shows how many add-ons are linked to the ticket offer
in the MANAGE → TICKETS tab you’ll see which participants bought an add-on to their ticket
in the MANAGE → TICKET STATS tab you can check how many add-ons have already been sold
in the MANAGE → AGENDA → AGENDA SESSION tab you can check the list of people registered for workshops, as long as you link the ticket to the agenda session.
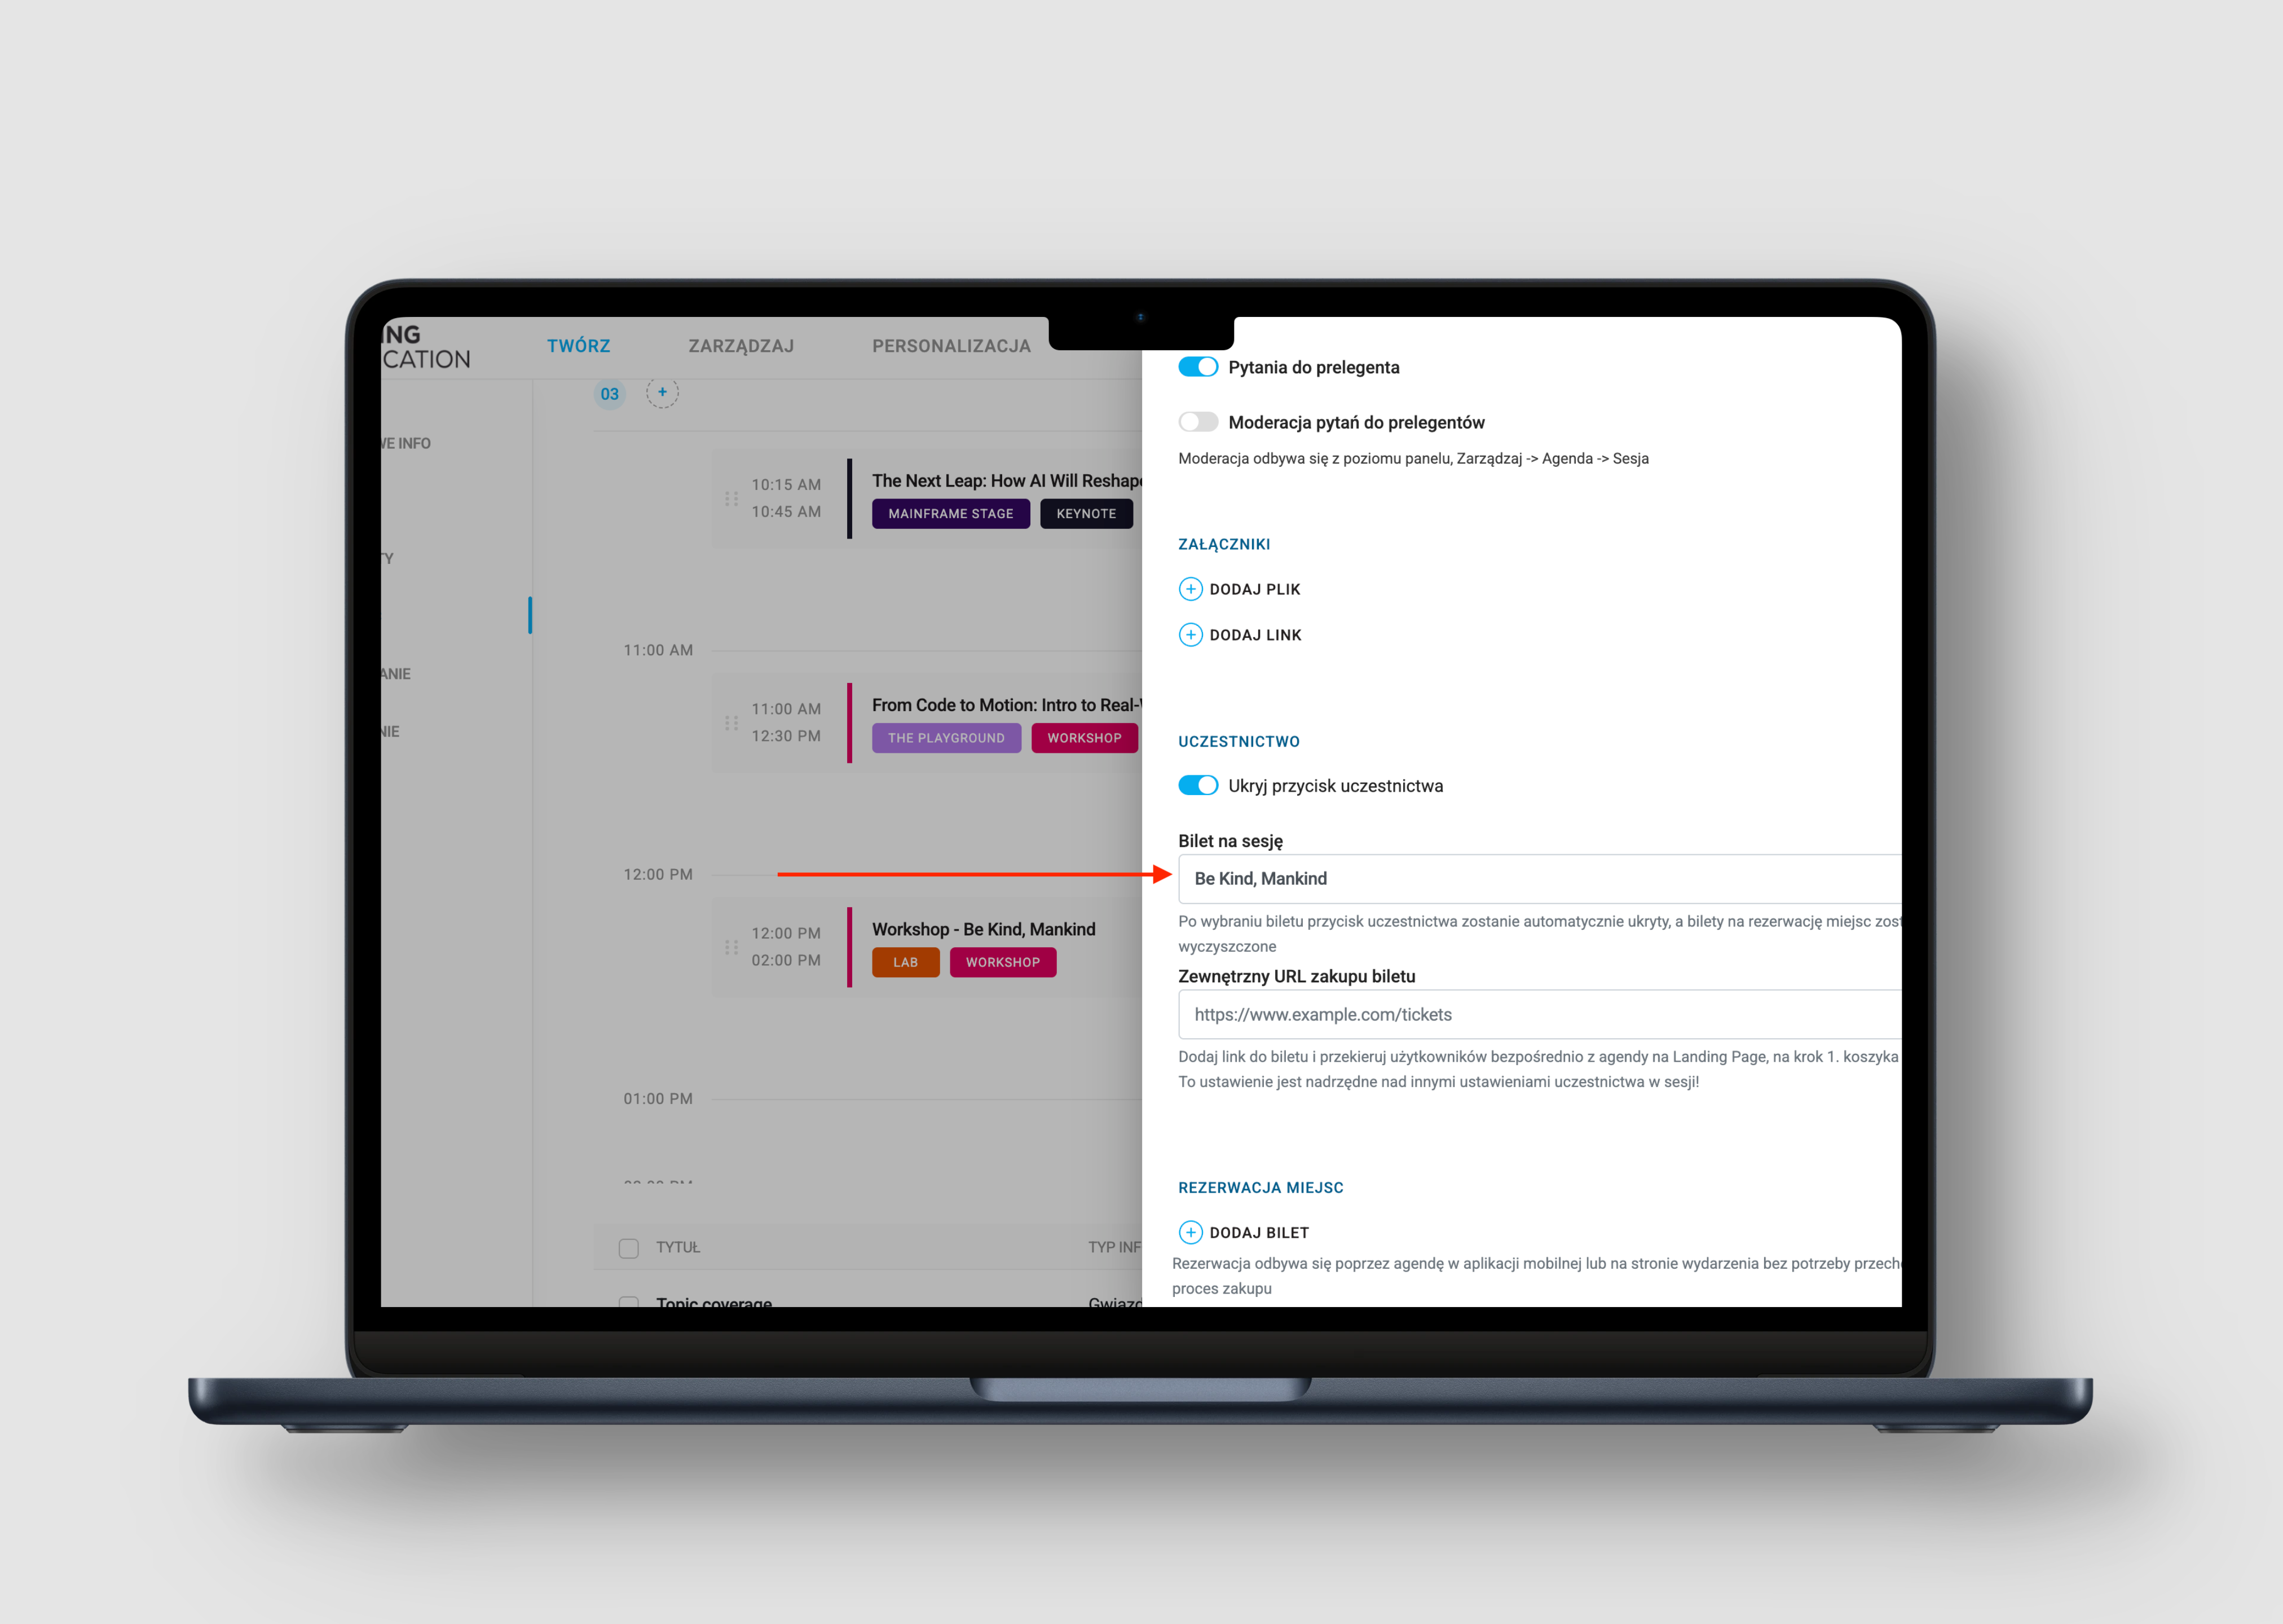
Often when creating tickets, there is still no certainty about the date or the specific room where the workshop will take place. That’s why at the ticket creation stage it’s worth naming the add-on properly, e.g. Workshop with John Doe, and closer to the event date you can add a specific session to the agenda and link the ticket being sold with the agenda session.
Every attendee who bought the add-on will be automatically assigned to this session, and the workshop will show up in their My Schedule in the app and on the landing page.
Have a great event with Meeting Application!
