Zdajemy sobie sprawę z tego, jak ważnym elementem każdego wydarzenia jest sprzedaż biletów. Różne rodzaje wejściówek, zmiana okresów obowiązywania cen, dystrybucja zniżek, rejestracja inna dla różnych grup osób. Organizatorze, doskonale rozumiemy Twoje potrzeby i mnogość scenariuszy.
Platforma Meeting Application to narzędzie umożliwiające dowolną konfigurację i prowadzenie sprzedaży biletów. Z tego artykułu dowiesz się jak wykorzystać pełnie możliwości i przeprowadzić konfigurację tak, aby sprzedaż i check-in w dniu wydarzenia wyglądały dokładnie tak jak tego potrzebujesz.

Sprzedajesz dodatki do biletów? Świetnie! Dowiedz się jak skonfigurować dodatek i warsztat z TEGO ARTYKUŁU.

Jeśli bilet został już sprzedany, system nie pozwoli ci na wprowadzanie zmian w opisie, cenie czy okresie dostępności. Wprowadzanie zmian w bilecie możliwe jest tylko do momentu sprzedaży pierwszego biletu. Chronimy interesy zarówno Organizatorów (m.in.: dbając o zgodne z prawem gromadzenie danych osobowych), jak i Uczestników wydarzeń (dbając o to, że zakres biletu nie zostanie zmieniony przez Organizatora).
Jeśli założenia się zmieniły i dalszą sprzedaż chcesz prowadzić na innych zasadach - stwórz nowy bilet, a poprzedni ukryj za pomocą suwaka w panelu administracyjnym. Pamiętaj, że uczestnik który kupił bilet o określonym zakresie, ma pełne prawo do skorzystania ze wszystkich przysługujących mu na dzień zakupu benefitów.
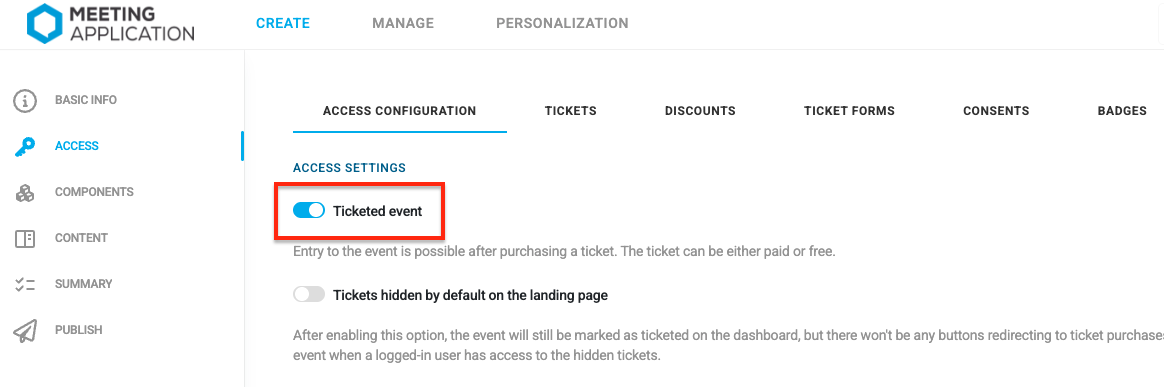
W Panelu Administracyjnym, w zakładce TWÓRZ → DOSTĘP, włącz opcje wydarzenia biletowanego.
Jeśli twój prawnik nadal pracuje, w pocie czoła konstruując Regulamin Sprzedaży Biletów czy Politykę Prywatności - nic nie szkodzi! Zawsze możesz wrócić do tego kroku już po stworzeniu rodzajów biletów, cen czy okresów dostępności. Legal nie zając... 🐰 lecimy dalej!
Bądź Panem swojego Eventu i prowadź sprzedaż czego chcesz, kiedy chcesz, dla kogo chcesz, za ile chcesz - generalnie tak jak chcesz! 😏Nasza platforma to twoja bileteria, którą możesz skonfigurować całkowicie samodzielnie.
W zakładce TWÓRZ → DOSTĘP → BILETY czeka na ciebie panel do samodzielnego, dowolnego konfigurowania sprzedaży, według założeń organizacyjnych.
Wiemy, że organizacja niektórych Wydarzeń oprócz standardowych biletów lub wejściówek wymaga dodatkowego etapu weryfikacji zgłoszeń chętnych uczestników. Dla tych Eventów sprawdzi się bileteria w trybie rezerwacji z prośbą o uczestnictwo. O tym, jak skonfigurować taki wariant sprzedaży i jak zarządzać wnioskami o uczestnictwo, dowiesz się z artykułu Rezerwacja biletów.
Ah! A wspominaliśmy już, że pieniądze trafiają zawsze na twoje konto? No to wspominamy, że my nigdy nie dotykamy twoich pieniędzy. A żeby środki wpadały do twojej kieszeni bez przeszkód, pamiętaj o:
Ustaleniu metod płatności i podpięciu klucza do wybranej bramki. Więcej przeczytasz w tym artykule.
Konfiguracji wystawianej automatycznie faktury i faktury proforma. Tutaj więcej o tematach fakturowych.
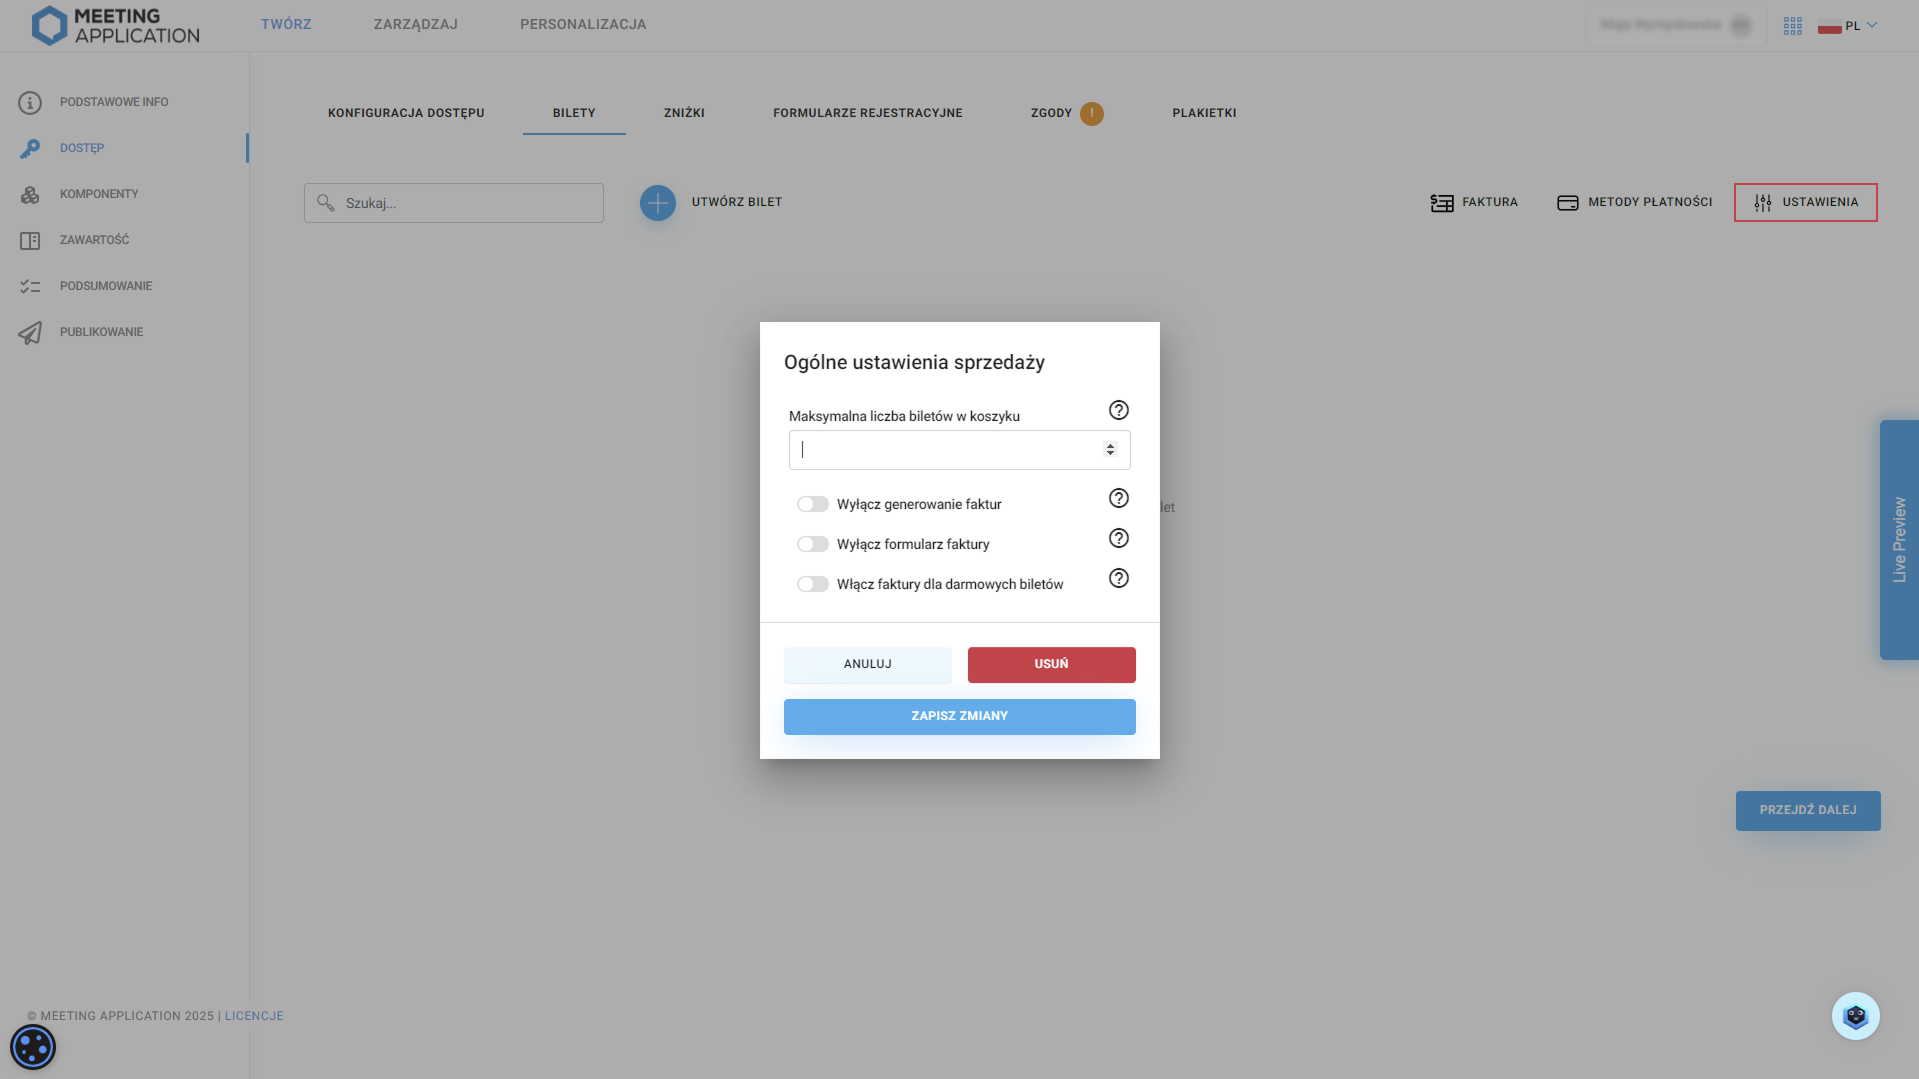
Ponadto, w Ustawieniach znajdziesz szczegółowe ustawienia konfiguracji sprzedaży. To, ile biletów na raz będą mogli kupić Uczestnicy pozostaje do Twojej decyzji, jeśli martwisz się o reselling lub nieczysto grającą konkurencję. Tak samo decydujesz o włączeniu/wyłączeniu generowania faktur, formularza do zbierania informacji do wystawienia faktury i wysyłce faktur w przypadku dystrybucji darmowych wejściówek - wszystko zależy od tego, czy chcesz korzystać z osobnego narzędzia do wystawiania faktur za sprzedaż i czy w ogóle potrzebujesz wystawiać faktury w przypadku braku transakcji finansowych :) Te ustawienia znajdziesz w prawym górnym rogu, obok Metod Płatności.
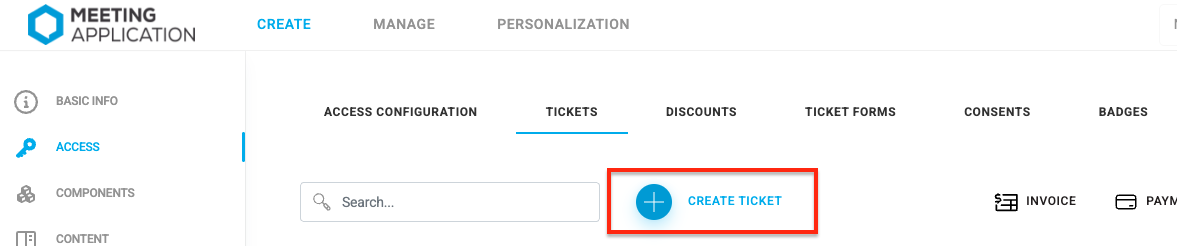
Stwórz pierwszy rodzaj biletu klikając ➕.
Po stworzeniu nowego biletu, w pierwszej kolejności uzupełnij nazwę i opis, np.: Early bird lub Standard.
Następnie uzupełnij opis biletu, który będzie wyświetlany na stronie wydarzenia. Zadbaj o jego czytelność tak, aby nie tylko zachęcał do zakupu, ale też informował co wchodzi w jego skład.
Możesz stworzyć opis ciągły lub opis punktowy - zobacz, jak mogą wyglądać na twoim Landing Page:


W kolejnym kroku wybierz jego rodzaj.
Bilet na okaziciela to taki, który upoważnia do wstępu na wydarzenie osobę która go posiada, trzyma w dłoni - niezależnie czy jest to wydrukowany pdf (odradzamy), czy też bilet elektroniczny w Aplikacji mobilnej lub na mailu (Planeta jest Ci wdzięczna! 🌎); działa na zasadzie biletu do kina, masz? To wchodzisz!
W Meeting Application adres e-mail osoby kupującej bilet zawsze wpada do Twojej bazy kontaktów. Dzięki temu możesz poinformować kupującego mailowo o kolejnej edycji wydarzenia, wysłać mu powiadomienie PUSH (jeśli pobrał Aplikację mobilną) w razie nagłych zmian, ale przede wszystkim - w odróżnieniu od innych bileterii - jesteś właścicielem zgromadzonych adresów mailowych! 😎
Bilet skanowany jest przy użyciu modułu check-in w Aplikacji (dostępny dla administratorów wydarzenia), a osoba wpuszczona na wydarzenie wpada do statystyk ilościowych dostępnych dla Organizatora.
Potrzebujesz zebrać dodatkowe informacje w formularzu rejestracyjnym, jak np.: rozmiar koszulki czy preferencje żywieniowe? Jest to możliwe tylko w przypadku sprzedaży biletów imiennych.
Bilet imienny to taki, na którym znajduje się konkretne imię i nazwisko, i który upoważnia do wstępu tylko tę konkretną osobę.
Sprzedaż biletów imiennych umożliwia:
tworzenie formularzy rejestracyjnych.
podpinanie różnych formularzy dla różnych rodzajów biletów (np.: inny dla wystawcy, inny dla uczestnika, inny dla prelegenta). Więcej o możliwościach jakie dają formularze dowiesz się z tego artykułu.
weryfikację roli Uczestnika na wydarzeniu, tagowanie funkcji, przyznawanie dostępów.
check-in z możliwością druku etykiet imiennych na identyfikator
kontrolowane przekazywanie biletów między uczestnikami
wysyłanie spersonalizowanych wiadomości mailowych
kontrolę tożsamości, zapewniając tym samym większe bezpieczeństwo w dniu wydarzenia na etapie recepcji
Wybór biletu imiennego narzuca od uczestników podania swoich danych osobowych na etapie kupna biletu - w zależności od charakteru i skali Twojego wydarzenia, weź pod uwagę jak wybór biletu na okaziciela lub imiennego wpłynie na proces check-inu i charakter recepcji.
To dokument, bez którego prowadzenie sprzedaży biletów nie będzie możliwe. Nasz system wymaga od Administratora określenia warunków prowadzonej sprzedaży biletów czy dodatków. Taki regulamin chroni nie tylko kupujących, ale też samych Organizatorów.
Meeting Application pozwala na dodanie do systemu różnych regulaminów dedykowanych konkretnej sprzedaży, np.: Regulamin sprzedaży biletów; Regulamin sprzedaży dodatków; Regulamin sprzedaży usług cyfrowych. Wystarczy skonfigurować treści zgód do wyświetlenia na etapie zakupu, a następnie z rozwijanej listy wybrać właściwy dokument
Więcej o Regulaminie sprzedaży i innych zgodach dowiesz się z artykułu dotyczącego Zgód dla Uczestników Wydarzenia.
Prowadząc sprzedaż biletów na platformie Meeting Application możesz stworzyć dowolną ilość formularzy rejestracyjnych, dedykowanych dla danej grupy osób czy rodzaju biletu tak, aby zbierać wszystkie niezbędne informacje od uczestników już na tym etapie. Bądź na bieżąco z preferencjami dietetycznymi czy rozmiarami koszulek na długo przed realizacją. Dzięki temu zaplanujesz odpowiednio produkcję czy układ % diet w menu na wieczornym bankiecie.
Z rozwijanej listy wybierz wcześniej stworzony formularz który chcesz przypisać do konfigurowanego biletu. O tym, jak skonfigurować formularze rejestracyjne i o wszystkich możliwościach jakie dają, przeczytasz TUTAJ.

Każdy uczestnik Twojego wydarzenia może mieć przypisaną grupę użytkownika. Na podstawie grup możesz ustawić widoczność treści wydarzenia, np. osobny kanał informacyjny dla uczestników z tagiem grupy “Prelegenci” albo “Wystawcy”, lub tylko dla uczestników “VIP” odsłonić komponenty z funkcjami premium Twojego wydarzenia.
W tym miejscu, możesz wybrać jaka grupa zostanie przypisana każdemu uczestnikowi po zakupie danego biletu. Dlatego konfigurując np. “Bilet Standard” możesz ustawić dla każdego uczestnika który kupi ten bilet, przypisanie grupy “UCZESTNIK”, a osoby które zakupią “Bilet VIP”, dostaną inny, np. “VIP”. Segmentacja uczestników pozwoli na tworzenie dedykowanych kanałów komunikacji czy widoków poszczególnych komponentów dedykowanych dla wybranej grupy osób.
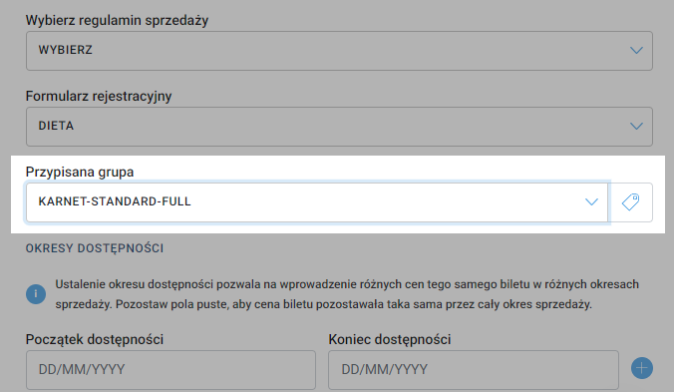
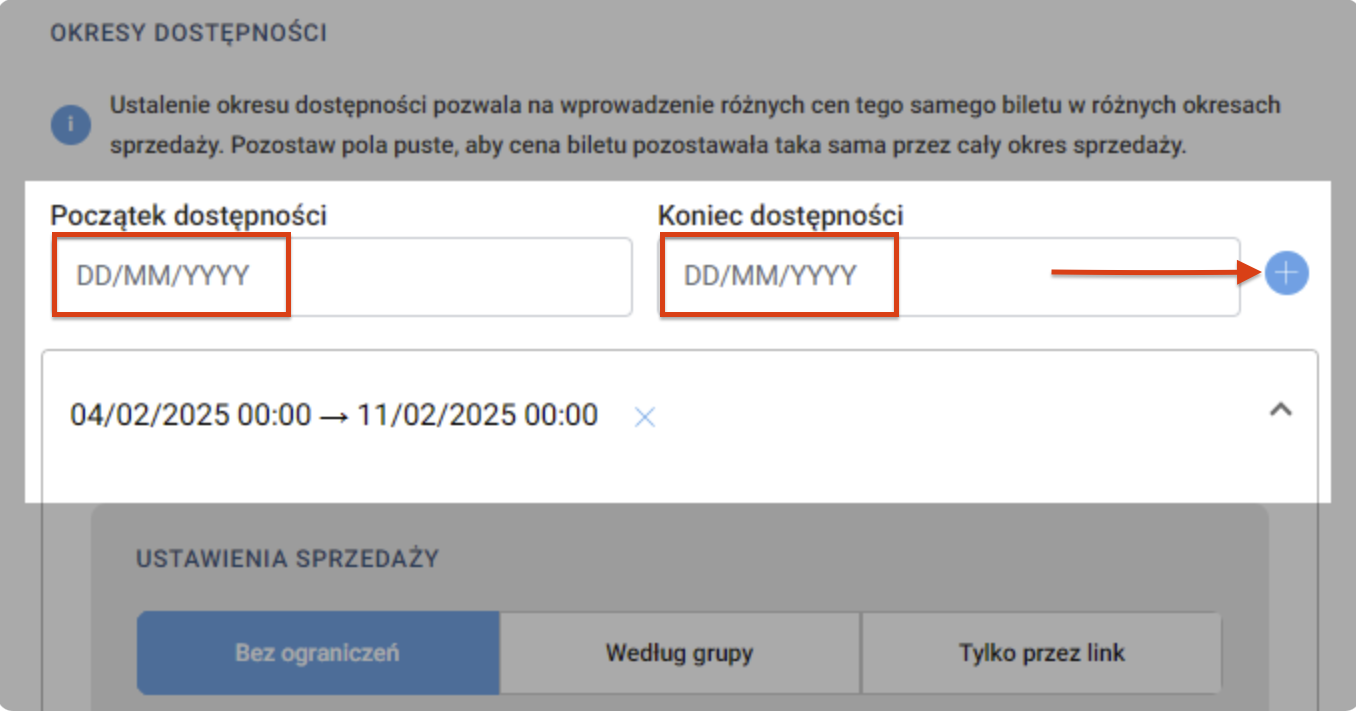
Już nie musisz się więcej martwić o konfigurowanie nowych biletów dla każdej puli! Ustawienie okresu dostępności sprzedaży pozwala Ci na pełną dowolność i kontrolę nad tym, w jakiej cenie, jakie zniżki i jakie dodatki obowiązują przy sprzedaży w danym okresie czasu.

Standardowo, okres dostępności zawiera datę początkową i datę końcową, ale nasz system pozwala na nieuzupełnianie tych pól, jeśli nie zakładasz rozróżnienia w cenach bądź dostępnych dodatkach dla biletów dostępnych w różnym okresie czasu - bilet może mieć wtedy np. jedynie początek daty sprzedaży, tylko datę kiedy kończy się możliwość kupienia biletów, albo nie mieć ani początku, ani końca - wtedy są dostępne cały czas przez od momentu publikacji do końca trwania wydarzenia lub dopóki ręcznie nie wyłączysz ich ze sprzedaży.
Po uzupełnieniu terminu początku i końca sprzedaży (albo pozostawieniu obu lub jednego z tych pól pustych) kliknij niebieski plus obok pól, aby przejść do dalszej konfiguracji.
Wiemy, że są sytuacje, kiedy jako Organizator chciałbyś, żeby tylko ścisłe grono osób dostało pewien rodzaj biletu, bez wprowadzania tej informacji dla wszystkich uczestników wydarzenia - np. organizujesz wieczorny bankiet i chciałbyś aby możliwość zdobycia wejściówki miały tylko nieliczne osoby. I na to właśnie pozwala ustawienie sposobu dystrybucji biletu!
By selecting the option “Unlimited”, the ticket will be visible on the Landing Page for all users with access to the Landing Page. The ticket will be available for public sale.

Option By group is the ideal solution if you already have a list of email addresses of people who should have access to a dedicated, closed pool of tickets (e.g., employees of a specific organization, partners, or invited guests for whom you have prepared tickets at a lower price).
How to correctly configure such a sale? Step by step:
Stwórz bilet: Skonfiguruj bilet zgodnie z wcześniejszymi krokami w tym artykule. W sekcji Ustawienia sprzedażyjako sposób dystrybucji wybierz Według grupy, a następnie wskaż lub stwórz nową Grupę Użytkownika (np. PRACOWNICY; STUDENCI).
Przygotuj bazę kontaktów: Stwórz plik z listą adresów e-mail osób uprawnionych do zakupu tego biletu. Pamiętaj, aby skorzystać z szablonu dedykowanego Twojemu wydarzeniu, do pobrania w zakładce ZARZĄDZAJ → UŻYTKOWNICY.
Zaimportuj uczestników z przypisaną grupą: Wgraj plik do systemu w zakładce ZARZĄDZAJ > UŻYTKOWNICY. Pamiętaj, aby w odpowiedniej kolumnie przypisać importowanym osobom dokładnie tę samą Grupę Użytkownika, którą przed chwilą ustawiłeś w bilecie. Dowiedz się więcej o IMPORCIE UŻYTKOWNIKÓW oraz USER GRUPACH.
Co musi zrobić uczestnik, aby zdobyć bilet? Bilet przypisany do grupy nie jest widoczny publicznie. Aby uczestnik mógł go zobaczyć i kupić, musi wejść na Landing Page wydarzenia i zalogować się. Niezwykle ważne jest to, aby użył do logowania dokładnie tego samego adresu e-mail, który został przez Ciebie zaimportowany do systemu. Po zalogowaniu bilet automatycznie pojawi się w jego koszyku.
Import użytkowników do systemu umożliwia automatyczną wysyłkę maili zapraszających. Dowiedz się więcej o mailach systemowych z TEGO ARTYKUŁU. Aby proces zdobycia biletu był dla uczestnika jasny i bezproblemowy, zastosuj dwie sprawdzone praktyki:
Zaktualizuj Welcome Maile: W edytorze Emaila powitalnego (Nowi użytkownicy) oraz Emaila powitalnego (Zarejestrowani użytkownicy) dodaj wyraźną instrukcję krok po kroku. Poinformuj uczestników, że bilety w ich promocyjnej cenie są ukryte i pojawią się na Landing Page'u dopiero, gdy zalogują się na konto powiązane z tym adresem e-mail.
Dodaj komunikat przez moduł iFrame: Na stronie głównej wydarzenia (Landing Page) możesz umieścić moduł iFrame z krótkim tekstem informacyjnym, np.: "Jesteś członkiem organizacji XYZ? Zaloguj się na stronie swoim adresem e-mail, aby odblokować widok biletów w promocyjnych cenach przygotowanych specjalnie dla Twojej grupy!".

Opcja Tylko przez link to doskonała alternatywa, gdy nie chcesz z góry importować bazy kontaktów do systemu, ale zależy Ci na udostępnieniu biletów wyłącznie wyselekcjonowanemu gronu odbiorców. Bilet w tym trybie jest całkowicie niewidoczny na publicznej liście wejściówek widocznych na Landing Page'u.
Jak możesz wykorzystać link do biletu?
Własne ścieżki mailingowe: Wygenerowany link skopiujesz z panelu i bez problemu osadzisz we własnych, zewnętrznych narzędziach do newsletterów lub wyślesz w bezpośredniej wiadomości do swoich gości.
Współpraca afiliacyjna i partnerska: To idealne rozwiązanie, aby zaangażować w sprzedaż partnerów Twojego wydarzenia. Możesz wygenerować osobny, dedykowany bilet ukryty pod linkiem (w razie potrzeby połączony z kodem rabatowym) i przekazać go sponsorom lub podwykonawcom. Partnerzy mogą wtedy łatwo rozesłać ten link bezpośrednio do swoich klientów i współpracowników.
Co widzi uczestnik? Proces jest tu zaprojektowany tak, aby zminimalizować liczbę kroków do wykonania. Po kliknięciu w udostępniony link, uczestnik trafia bezpośrednio do koszyka zakupowego na stronie wydarzenia (Landing Page). Od razu widzi dedykowany bilet (np. w okazyjnej cenie), oznaczony jako “bilet specjalny”, i może natychmiast sfinalizować rejestrację lub opłacić zamówienie – bez konieczności szukania oferty na głównej stronie.

To pole pozwala na ustawienie maksymalnej ilości biletów dostępnych w sprzedaży. Sprzedaż biletów ograniczonych ilością odbywa się na zasadzie "kto pierwszy ten lepszy" i pozwala uniknąć overbookingu - wiemy, jak duża odpowiedzialność spoczywa na Organizatorach w kwestii przestrzegania limitów osób które mogą jednocześnie przebywać w obiekcie lub na terenie wydarzenia, więc dostosowywując ilość dostępnych biletów do ograniczeń względem miejsca dostępnego na terenie wydarzenia, dbasz też o bezpieczeństwo swoich uczestników.
Czas na najważniejszą część - ceny! Nasz system od razu przelicza cenę netto lub brutto, na podstawie procentu podatku VAT, który podasz. Jedynie co potrzebujesz uzupełnić to VAT i jedną z cen netto lub brutto.
Jeśli planujesz sprzedaż biletów kilku walutach, najpierw upewnij się, że masz skonfigurowane odpowiednie metody płatności, które umożliwiają sprzedaż w kilku walutach. Gdy wszystko będzie poprawnie skonfigurowane, będziesz mieć możliwość dodania kolejnej waluty za pomocą guziku "Ustaw cenę dla kolejnej waluty".

W tym polu możesz wybrać kody zniżkowy, który uczestnicy będą mogli wykorzystać przy kupnie danego biletu. Jeśli wcześniej ich nie konfigurowałeś - możesz zrobić to na tym etapie, klikając niebieski plusik. Każdy bilet może mieć nieograniczoną ilość przypisanych zniżek lub grup zniżek.

Zbiorcza zniżka to nic innego niż rabat na cały koszyk przy zakupie kilku sztuk biletów, np. kupując 3 bilety otrzymujesz rabat 10% na każdy z nich. Podobnie jak z kodami zniżkowymi, zbiorcze zniżki również możesz stworzyć z poziomu konfiguracji biletu, klikając niebieski plusik.


The administrator has three ways to assign a ticket to a participant in the admin panel.
1. Import multiple users from a CSV file
Go to the tab MANAGE > USERS.
Click the button Import users.
Select the .CSV file with the list of participants with information and ticket ID in column ticket_ids. You can find ticket IDs in the tab ACCESS > TICKETS.
Confirm the import, and each user will receive an email with an assigned ticket to the event.
You can learn more about preparing the file for import from THIS ARTICLE.
2. Dodanie pojedynczego użytkownika wraz z biletem
Wejdź do zakładki ZARZĄDZAJ > UŻYTKOWNICY.
Kliknij ikonę dodania nowego użytkownika (ludzik z „+”).
Wypełnij podstawowe dane uczestnika (imię, nazwisko, e-mail).
W polu Bilet wybierz odpowiedni typ biletu z rozwijanej listy.
Kliknij Importuj – użytkownik zostanie dodany do wydarzenia z przypisanym biletem.
3. Nadanie biletu użytkownikowi, który jest już na liście użytkowników wydarzenia
Wejdź do zakładki ZARZĄDZAJ > BILETY.
Kliknij przycisk Nadaj bilet.
Z rozwijanej listy wybierz użytkownika, który znajduje się już w zakładce ZARZĄDZAJ > UŻYTKOWNICY.
Wybierz typ biletu oraz język biletu.
Kliknij Importuj, aby przypisać bilet wybranej osobie.
Po udanej rejestracji lub zakupie, uczestnik otrzymuje bilet w formie pliku PDF jako załącznik do systemowej wiadomości e-mail. Jest on generowany automatycznie na podstawie danych wprowadzonych przez Ciebie w panelu administratora.
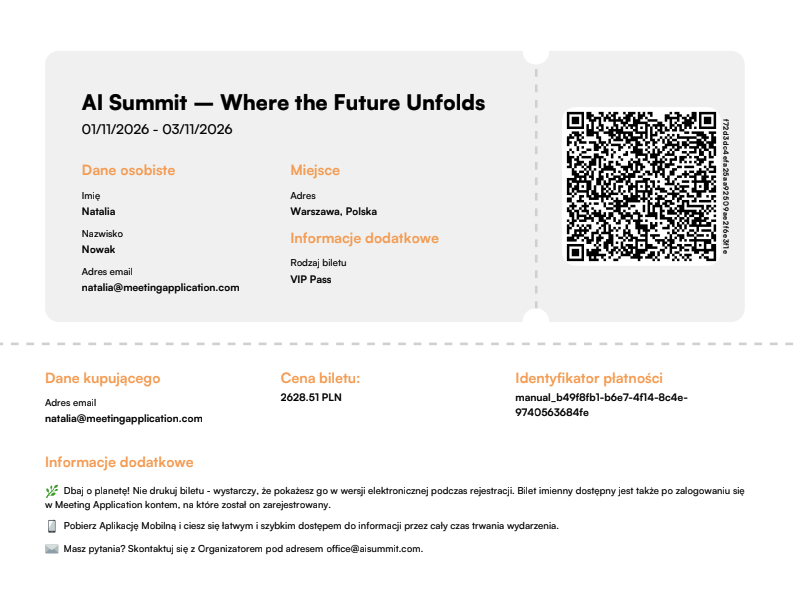
Co dokładnie znajduje się na bilecie PDF?
Event name (e.g., AI Summit): Pulled automatically from the name entered in the tab Create → Basic info.
Event date: Start and end date, also pulled from the tab Create → Basic info.
Personal data: First name, last name, and email address of the ticket holder (for named tickets).
Venue: Event location provided in Create → Basic info.
Ticket type (Additional info): The specific name of the ticket that the participant purchased or received (e.g., VIP Pass), exactly as configured in the tab Create → Access → Tickets.
Ticket price: The purchase price of the ticket.
Payment ID: Transaction number directly from the payment gateway (e.g., PayU, Stripe, Autopay) or from a paid proforma invoice.
Buyer data: Email address of the person who completed the cart transaction (if the ticket was purchased for someone else). If the ticket was assigned by an administrator (e.g., via CSV import), this field shows the email of the organizer/administrator who assigned the ticket.
QR code:The most important operational element! The same QR code will be available to the participant in the mobile app. Once shown at the reception, staff can verify the identity (check-in) in a few seconds and optionally print a personalized badge.
👉 Do you want to know more about reception service? Check out THIS ARTICLE.
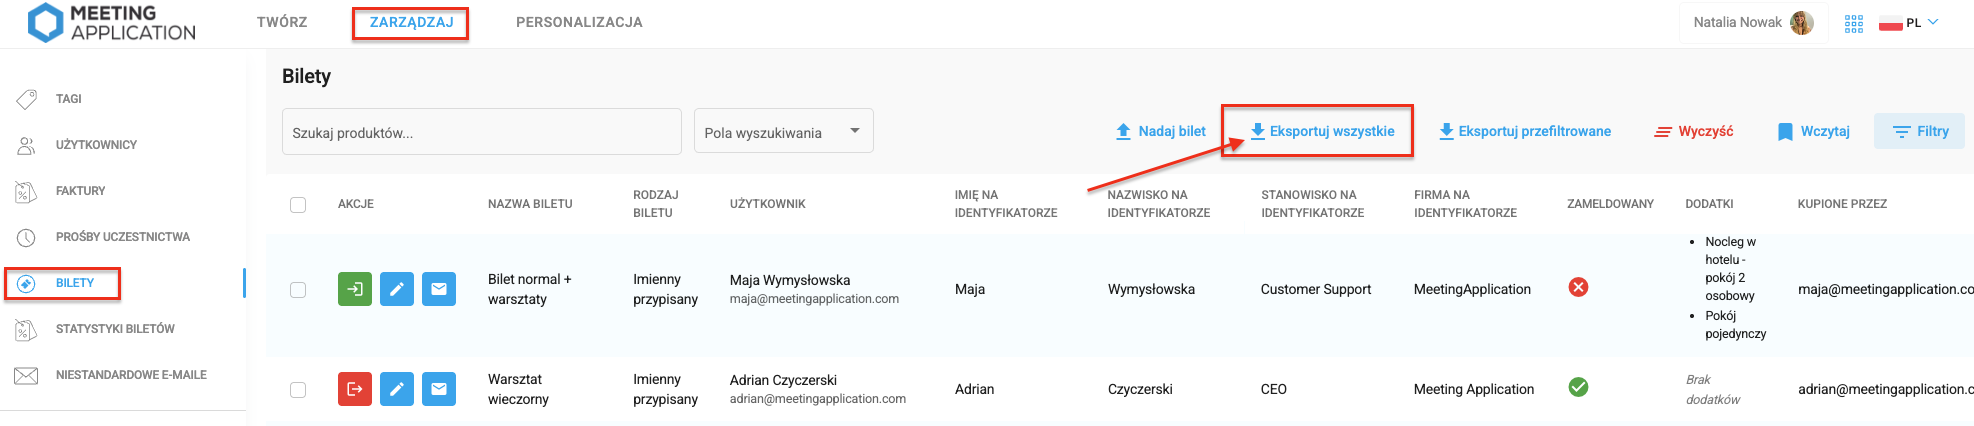
Do you want to check if a specific person had their ticket checked and was at the event? Go to the MANAGE > TICKETS tab, search for the participant on the list, then check the CHECKED IN column.
Do you want to download entry statistics and check the exact time a participant was let into the event or filter entry statistics? Click Export all, open the downloaded document and check the information you're interested in.
Ticket refunds are processed in accordance with the rules set out in Ticket Sales Regulations of the event. If your sales regulations allow ticket refunds, the participant should follow the described refund procedure.
After accepting a ticket refund request, the Organizer contacts our team via chat available in the bottom right corner of the page.
The message should include the information available in the MANAGE → TICKETS tab, i.e.:
first and last name of the ticket holder,
email address,
Transaction ID.
Based on this, we remove the indicated ticket from the system. What does that mean?
bilet znika z sekcji „Moje bilety” na landing page’u i w aplikacji mobilnej użytkownika
uczestnik może nadal posiadać PDF z biletem w swojej skrzynce mailowej, jednak nie jest on już ważny,
podczas check-inu w dniu wydarzenia, aplikacja wyświetli komunikat, że bilet nie istnieje, dzięki czemu obsługa recepcji nie wpuści osoby posługującej się zwróconą wejściówką.
Równolegle dokonaj zwrotu pieniędzy uczestnikowi:
jeśli płatność była dokonana przelewem na podstawie proformy, zwrot realizowany jest przelewem zwrotnym;
jeśli płatność przeszła przez PayU / Autopay / Stripe, zwrot wykonujesz bezpośrednio z poziomu bramki płatności.
Jeśli uczestnik otrzymał fakturę VAT, należy również wystawić fakturę korygującą. Szczegóły dotyczące faktur wystawianych przez system znajdziesz W TYM ARTYKULE.
Udanego wydarzenia z Meeting Application!
