We realize how important a part of every event ticket sales are. Different types of tickets, changing price periods, discounts distribution, different registration for different groups of people. Organizer, we perfectly understand your needs and the variety of scenarios.
The Meeting Application platform is a tool that lets you freely configure and run ticket sales. From this article you’ll learn how to use its full potential and do the setup so that sales and check-in on the event day look exactly the way you need.

Do you sell add-ons to tickets? Awesome! Find out how to configure an add-on and a workshop from THIS ARTICLE.

If a ticket has already been sold, the system won’t let you make changes to the description, price or availability period. You can only make changes to a ticket until the first ticket is sold. We protect the interests of both Organizers (e.g. by taking care of legally compliant collection of personal data) and Event Participants (making sure that the scope of the ticket won’t be changed by the Organizer).
If the assumptions have changed and you want to continue sales on different terms – create a new ticket and hide the previous one using the toggle in the admin panel. Remember that a participant who bought a ticket with a specific scope has every right to use all the benefits they were entitled to on the day of purchase.
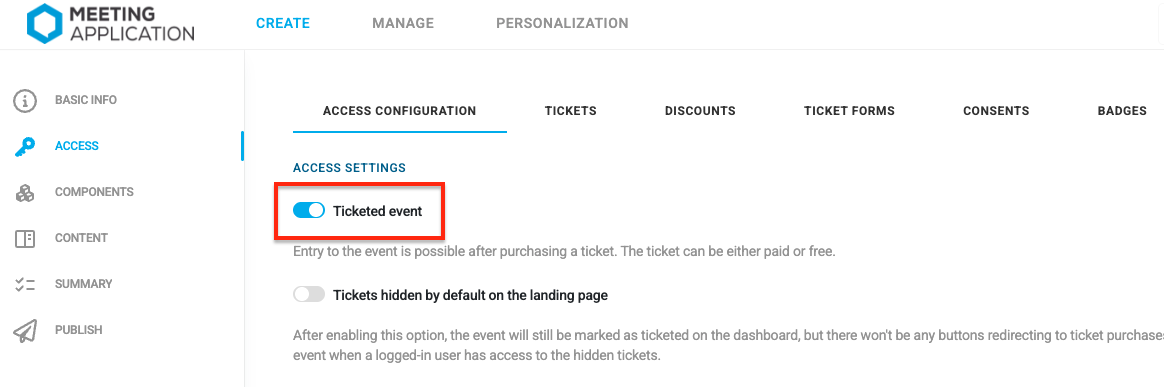
In the Admin Panel, in the CREATE → ACCESS tab, turn on the ticketed event options.
If your lawyer is still working hard, sweating over drafting the Ticket Sales Terms or the Privacy Policy – no worries! You can always come back to this step after you’ve already created ticket types, prices, or availability periods. Legal’s not a hare… 🐰 let’s keep going!
Be the Master of your Event and sell whatever you want, whenever you want, to whoever you want, for however much you want – basically exactly how you want! 😏Our platform is your ticket office, which you can configure completely on your own.
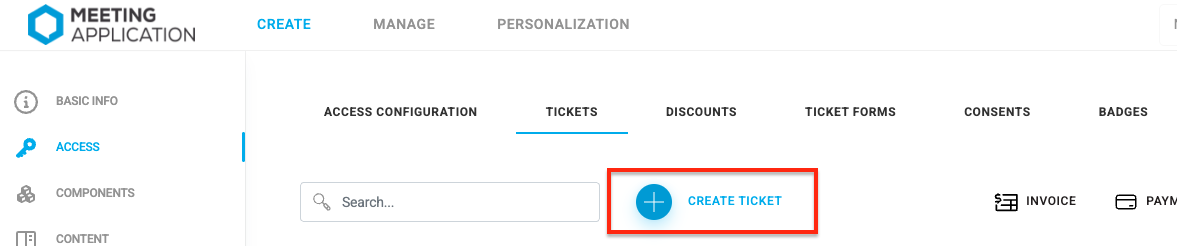
In the CREATE → ACCESS → TICKETS tab you’ll find a panel where you can freely configure sales on your own, according to your organizational assumptions.
We know that organizing some Events, apart from standard tickets or passes, requires an extra step of verifying applications from interested attendees. For these Events, a ticket office in reservation mode with a participation request will work great. You can learn how to set up this kind of sales option and how to manage participation requests in the article Rezerwacja biletów.
Oh! And did we already mention that the money always goes straight to your account? So here we are mentioning it: we never touch your money. And to make sure the funds land in your pocket without any issues, remember about:
Setting up payment methods and connecting a key to the selected gateway. You can read more in this article.
Configuring automatically issued invoices and proforma invoices. More about invoicing topics here.
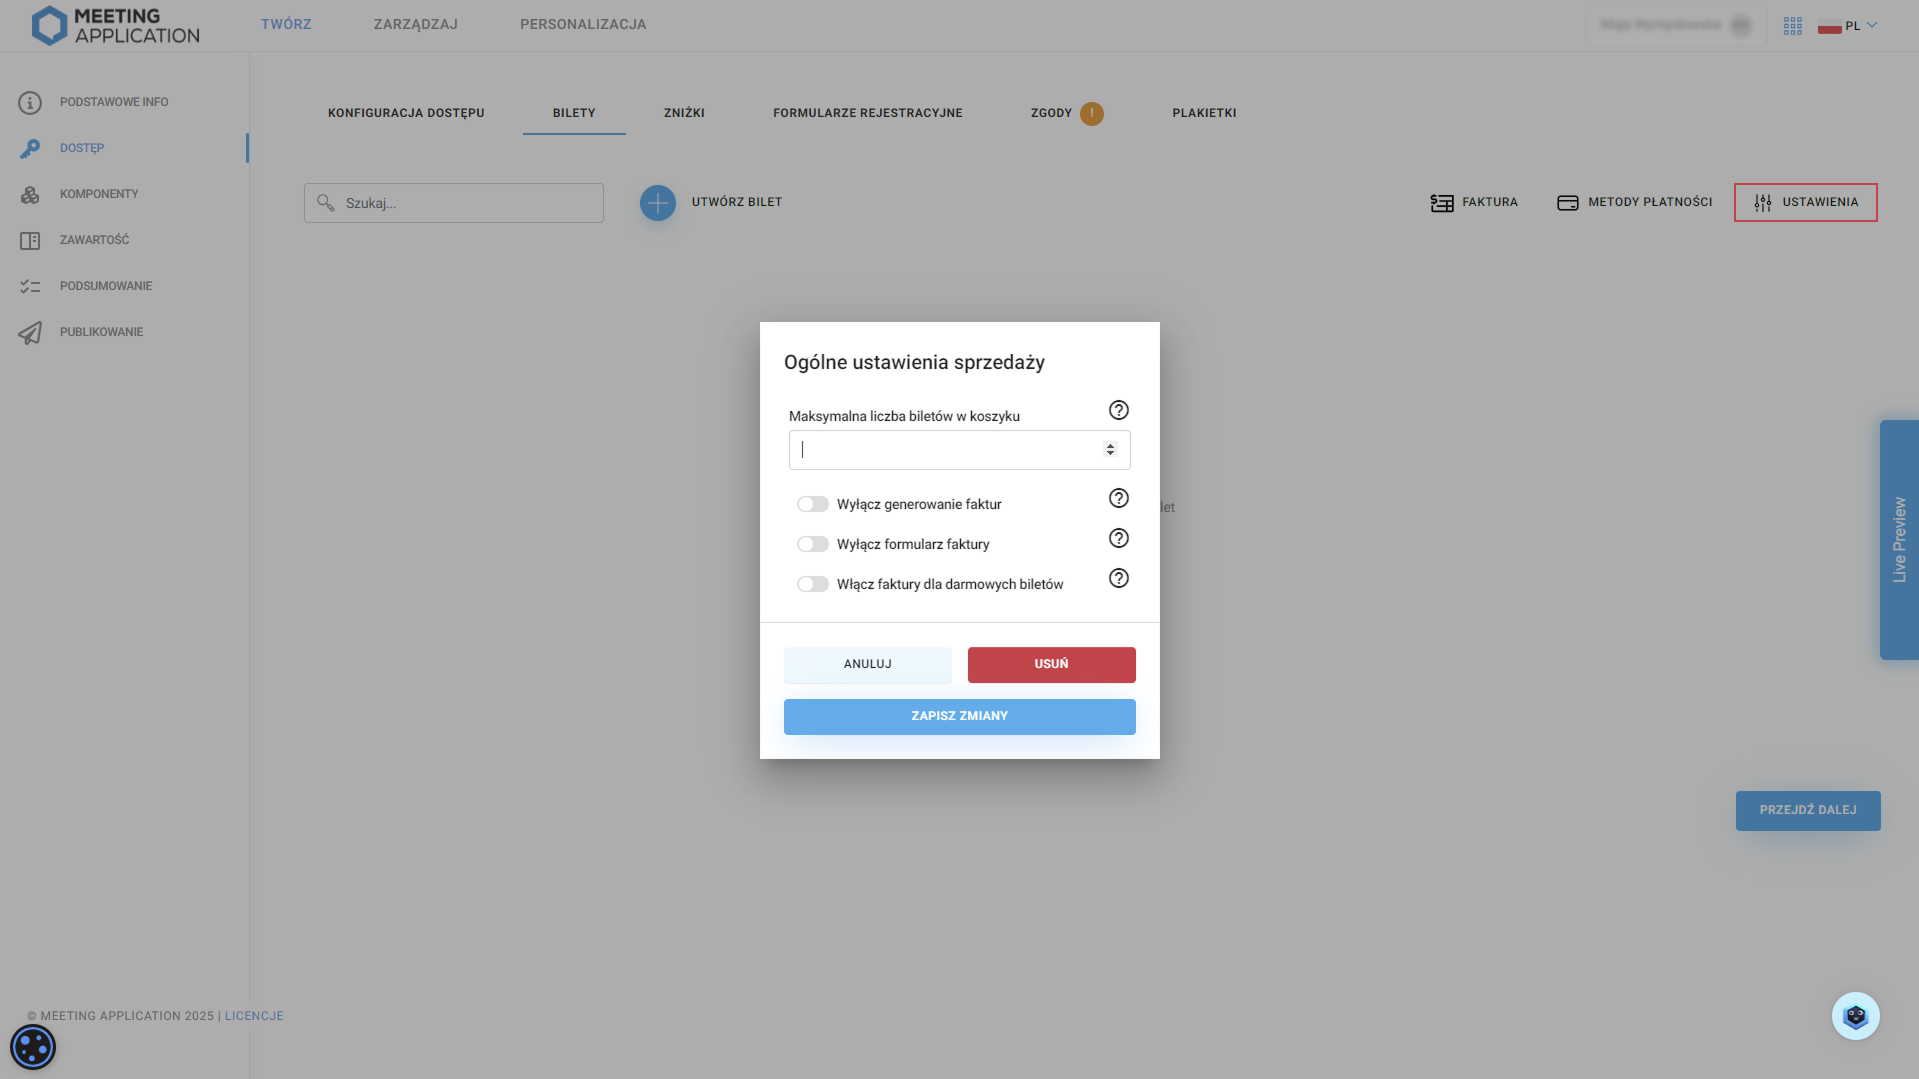
Additionally, in Settings you’ll find detailed sales configuration settings. How many tickets at once Participants will be able to buy is up to you, if you’re worried about reselling or competitors who don’t play fair. You also decide whether to enable/disable invoice generation, the form for collecting information for issuing an invoice, and sending invoices when distributing free tickets – it all depends on whether you want to use a separate tool for issuing invoices for sales and whether you even need to issue invoices when there are no financial transactions :) You’ll find these settings in the top right corner, next to Payment Methods.
Create the first ticket type by clicking ➕.
After creating a new ticket, first fill in the name and description, e.g.: Early bird or Standard.
Next, add the ticket description that will be displayed on the event page. Make sure it’s easy to read so that it not only encourages people to buy, but also explains what’s included.
You can create a continuous description or a bullet-point description – see what they might look like on your Landing Page:


In the next step, choose its type.
Bearer ticket is the one that authorizes the person who has it, holds it in their hand, to enter the event – regardless of whether it’s a printed PDF (we don’t recommend that) or an electronic ticket in the mobile app or in your email (the Planet is grateful to you! 🌎); it works like a cinema ticket: you have it? Then you get in!
In the Meeting Application the email address of the person buying the ticket always lands in your contact base. Thanks to that you can inform the buyer by email about the next edition of the event, send them a PUSH notification (if they downloaded the mobile App) in case of sudden changes, but most importantly – unlike with other ticketing platforms – you are the owner of the collected email addresses! 😎
The ticket is scanned using the check-in module in the App (available for event administrators), and the person admitted to the event is added to the quantitative statistics available to the Organizer.
Do you need to collect additional information in the registration form, such as T-shirt size or dietary preferences? This is only possible when selling named tickets.
Named ticket is one that has a specific first and last name on it, and that authorizes only that specific person to enter.
Selling named tickets makes it possible to:
creating registration forms.
assigning different forms for different types of tickets (e.g. one for exhibitors, another for attendees, another for speakers). You can find out more about what forms can do in this article.
verifying the Participant’s role at the event, tagging roles, granting access.
check-in with the option to print name labels for badges
controlled ticket transfers between participants
sending personalized email messages
identity control, which gives you more security on the day of the event at the reception stage
Choosing a named ticket requires attendees to provide their personal data at the ticket purchase stage – depending on the nature and scale of your event, take into account how choosing a bearer or named ticket will affect the check-in process and the setup of the reception.
This is the document without which selling tickets won’t be possible. Our system requires the Administrator to define the terms of ticket or add-on sales. Such regulations protect not only buyers but also the Organizers themselves.
Meeting Application lets you add different regulations to the system dedicated to specific sales, for example: Ticket Sales Regulations; Add-on Sales Regulations; Digital Services Sales Regulations. You just need to configure the consent texts to be shown at the purchase stage, and then choose the right document from the dropdown list.
You can learn more about the Sales Regulations and other consents in the article about Consents for Event Participants.
When selling tickets on the Meeting Application platform, you can create any number of registration forms dedicated to a given group of people or ticket type, so that you collect all the necessary information from participants already at this stage. Stay up to date with dietary preferences or T-shirt sizes long before the event. This way you’ll be able to properly plan production or the layout of % diets in the menu for the evening banquet.
From the dropdown list, choose the previously created form you want to assign to the ticket you’re configuring. You can read about how to configure registration forms and all the possibilities they offer, HERE.

Each participant of your event can have an assigned user group. Based on groups, you can set the visibility of the event content, e.g. a separate information channel for participants with the group tag “Speakers” or “Exhibitors”, or reveal components with premium features of your event only to “VIP” participants.
Here you can choose which group will be assigned to each participant after purchasing a given ticket. So when configuring e.g. “Standard Ticket” you can set that every participant who buys this ticket gets assigned to the “PARTICIPANT” group, and people who buy the “VIP Ticket” will get another one, e.g. “VIP”. Segmenting participants will let you create dedicated communication channels or views of specific components dedicated to a selected group of people.
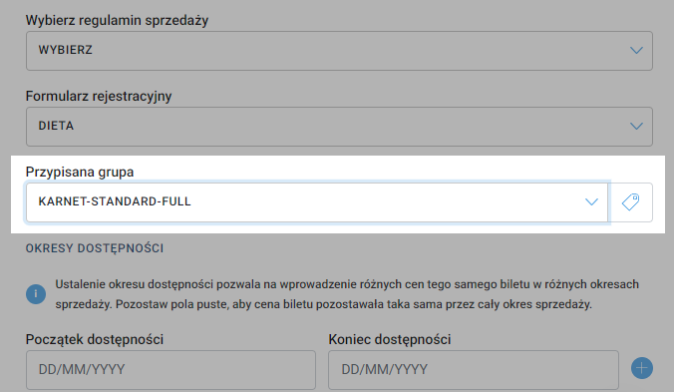
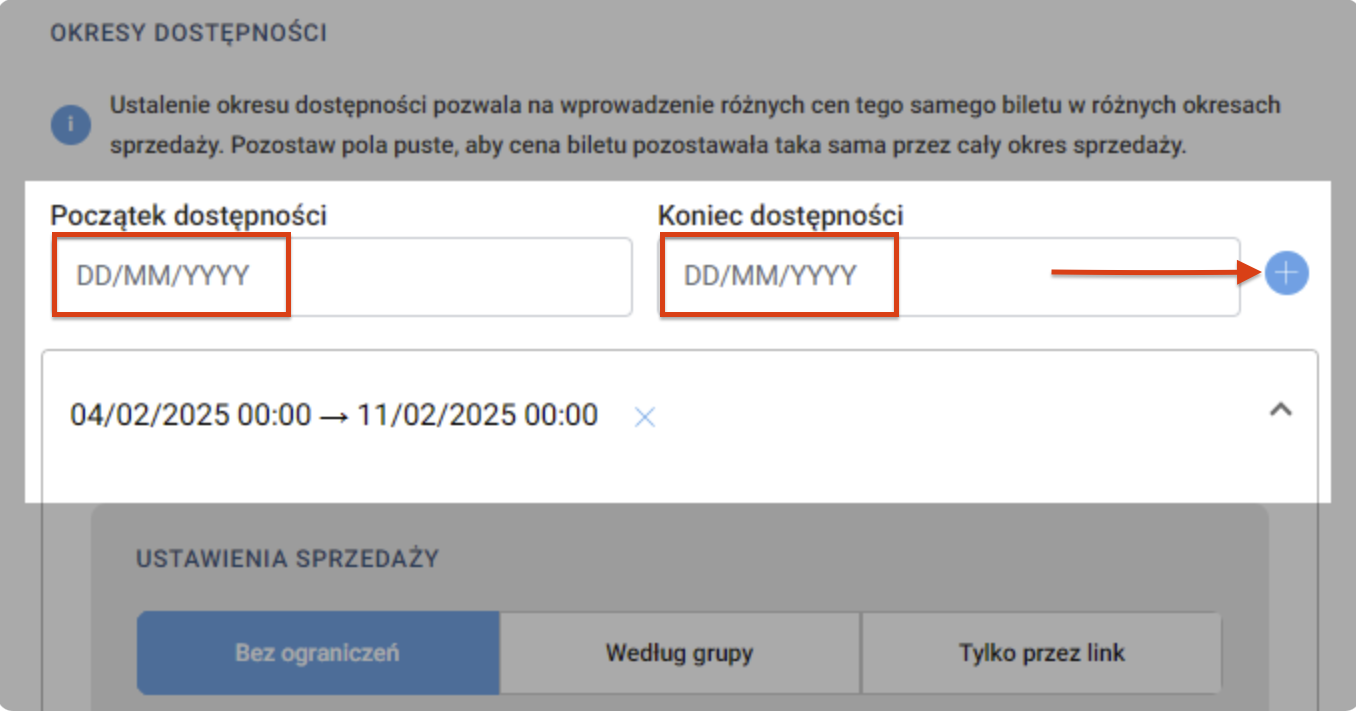
You no longer have to worry about configuring new tickets for each pool! Setting the sales availability period gives you full freedom and control over what price, which discounts, and which add-ons apply to sales in a given period of time.

By default, the availability period includes a start date and an end date, but our system lets you leave these fields empty if you’re not planning to differentiate prices or available add-ons for tickets available in different periods of time – in that case a ticket can, for example, have only a sales start date, only a date when ticket purchases end, or have neither a start nor an end – then they’re available all the time from the moment of publication until the end of the event or until you manually disable them from sale.
After filling in the sales start and end dates (or leaving one or both of these fields empty) click the blue plus next to the fields, to move on to further configuration.
We know there are situations when, as an Organizer, you’d like only a close group of people to get a certain type of ticket, without making this information visible to all event participants – for example, you’re organizing an evening banquet and you’d like only a few people to be able to get an invitation. That’s exactly what the ticket distribution method setting lets you do!
When you choose the “No limits” option, the ticket will be visible on the Landing Page for all users who have access to the Landing Page. The ticket will be available for public sale.

The By group option is the perfect solution if you already have a list of email addresses of people who should have access to a dedicated, closed pool of tickets (e.g. employees of a specific organization, partners, or invited guests for whom you’ve prepared tickets at a lower price).
How do you correctly set up this kind of sale? Step by step:
Create a ticket: Configure the ticket according to the previous steps in this article. In the Sales settings section, choose By group as the distribution method, and then select or create a new User Group (e.g. EMPLOYEES; STUDENTS).
Prepare the contact database: Create a file with a list of email addresses of people who are allowed to buy this ticket. Remember to use the template dedicated to your event, available for download in the MANAGE → USERS tab.
Import participants with an assigned group: Upload the file to the system in the MANAGE > USERS tab. Remember to assign exactly the same User Group in the appropriate column to the imported people as the one you’ve just set in the ticket. Learn more about USER IMPORT and USER GROUPS.
What does a participant need to do to get a ticket? A ticket assigned to a group is not publicly visible. For a participant to be able to see and buy it, they have to go to the event Landing Page and log in. It’s extremely important that they use exactly the same email address to log in as the one you imported into the system. After logging in, the ticket will automatically appear in their cart.
Importing users into the system enables automatic sending of invitation emails. Learn more about system emails from THIS ARTICLE. To make the ticket acquisition process clear and hassle-free for the participant, use two proven practices:
Update Welcome Emails: In the editor of Welcome email (New users) and Welcome email (Registered users) add a clear step-by-step instruction. Let participants know that tickets at their promotional price are hidden and will only appear on the Landing Page once they log in to the account linked to that email address.
Add a message via the iFrame module: On the main event page (Landing Page) you can place an iFrame module with a short info text, e.g.: "Are you a member of organization XYZ? Log in on the website with your email address to unlock access to tickets at promotional prices prepared especially for your group!".

The Link-only option is a perfect alternative when you don’t want to import your contact base into the system in advance, but you still want to share tickets only with a selected group of recipients. A ticket in this mode is completely invisible on the public list of tickets displayed on the Landing Page.
How can you use the ticket link?
Your own mailing paths: You copy the generated link from the panel and easily embed it in your own external newsletter tools or send it in a direct message to your guests.
Affiliate and partner collaboration: It’s a perfect way to involve your event partners in ticket sales. You can generate a separate, dedicated ticket hidden behind a link (if needed combined with a discount code) and pass it on to sponsors or subcontractors. Partners can then easily send this link directly to their customers and coworkers.
What does the participant see? The process here is designed to minimize the number of steps to complete. After clicking the shared link, the participant lands directly in the shopping cart on the event page (Landing Page). They immediately see a dedicated ticket (e.g. at a special price), marked as a “special ticket”, and can instantly finalize the registration or pay for the order – without having to look for the offer on the main page.

This field lets you set the maximum number of tickets available for sale. Sales of tickets with limited quantity work on a “first come, first served” basis and help avoid overbooking – we know how much responsibility Organizers have when it comes to sticking to limits on how many people can be in the venue or event area at the same time, so by adjusting the number of available tickets to the constraints of the space at the event, you’re also taking care of your participants’ safety.
Time for the most important part – prices! Our system immediately recalculates the net or gross price based on the VAT tax percentage you enter. All you need to fill in is the VAT and one of the prices: net or gross.
If you’re planning to sell tickets in several currencies, first make sure you’ve configured the right payment methods that allow sales in multiple currencies. Once everything is set up correctly, you’ll be able to add another currency using the “Set price for another currency” button.

In this field you can choose a discount code that participants will be able to use when buying a given ticket. If you haven’t configured them earlier, you can do it at this stage by clicking the blue plus icon. Each ticket can have an unlimited number of assigned discounts or discount groups.

A bulk discount is simply a discount on the entire cart when you buy several tickets, e.g. when you buy 3 tickets you get a 10% discount on each of them. Just like with discount codes, you can also create bulk discounts directly in the ticket configuration by clicking the blue plus sign.


The administrator has three ways to assign a ticket to a participant in the admin panel.
1. Import multiple users from a CSV file
Go to the MANAGE > USERS tab.
Click the Import users button.
Select the .CSV file with the list of participants with information and the ticket ID in the ticket_ids column. You’ll find ticket identifiers in the ACCESS > TICKETS tab.
Confirm the import and each user will get an email with the ticket assigned to the event.
You can learn more about preparing the file for import from THIS ARTICLE.
2. Adding a single user together with a ticket
Go to the MANAGE > USERS tab.
Click the icon to add a new user (little person with a “+”).
Fill in the participant’s basic details (first name, last name, email).
In the Ticket field, choose the right ticket type from the dropdown list.
Click Import – the user will be added to the event with the assigned ticket.
3. Assigning a ticket to a user who is already on the event’s user list
Go to the MANAGE > TICKETS tab.
Click the Issue ticket button.
From the dropdown list, choose a user who is already in the MANAGE > USERS tab.
Choose the ticket type and ticket language.
Click Import to assign the ticket to the selected person.
After a successful registration or purchase, the participant receives a ticket as a PDF file attached to a system email message. It’s generated automatically based on the data you entered in the admin panel.
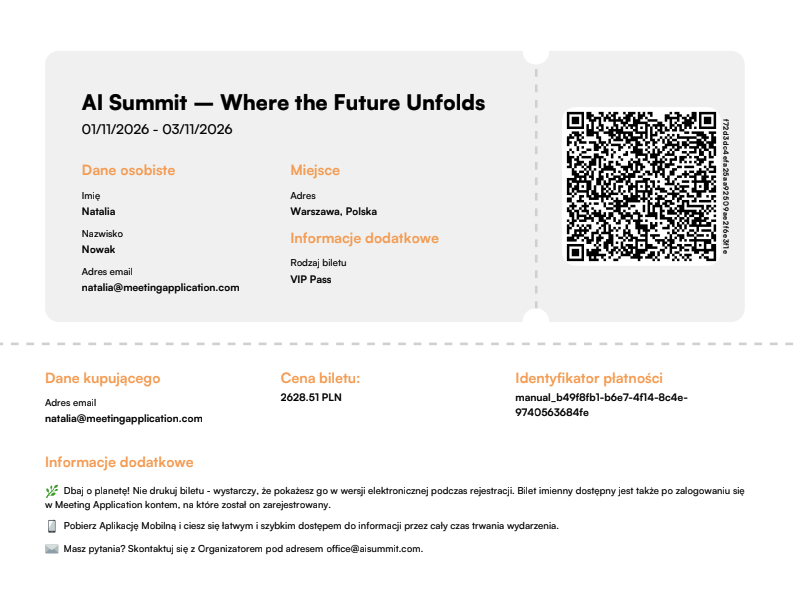
What exactly is on the PDF ticket?
Event name (e.g. AI Summit): Pulled automatically from the name entered in the Create → Basic info tab.
Event date: Start and end date, also pulled from the Create → Basic info tab.
Personal data: First name, last name and email address of the ticket holder (for personalised tickets).
Venue: Event location provided in Create → Basic info.
Ticket type (Additional information): The specific name of the ticket that the participant bought or received (e.g. VIP Pass), exactly as it was configured in Create → Access → Tickets tab.
Ticket price: The value of the ticket for which it was purchased.
Payment identifier: The transaction number taken directly from the payment gateway (e.g. PayU, Stripe, Autopay) or from the paid pro forma invoice.
Buyer details: Email address of the person who finalized the cart transaction (if the ticket was bought for someone else). If the ticket was assigned by an admin (e.g. via CSV import), this field will show the email of the organizer/admin who assigned the ticket.
QR code: The most important operational element! The same QR code will be available to the participant in the mobile app. After showing it at the reception desk, the staff can verify their identity (check-in) in a few seconds and optionally print a personalised badge.
👉 Want to know more about handling reception? Check out THIS ARTICLE.
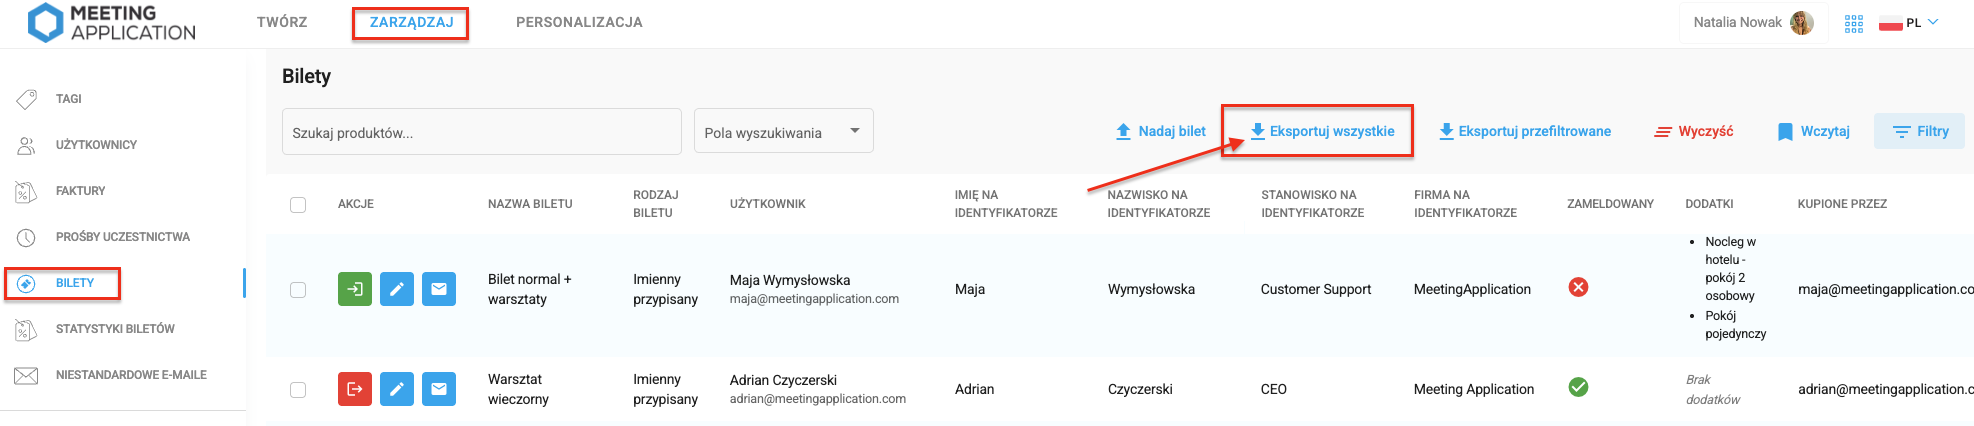
Want to check if a given person had their ticket checked and was at the event? Go to the MANAGE > TICKETS tab, find the attendee on the list, and then check the CHECKED IN column.
Want to download entry statistics and check the exact time an attendee entered the event area or filter entry stats? Click Export all, open the downloaded document, and check the information you’re interested in.
Ticket refunds are processed according to the rules set out in the Ticket Sales Terms and Conditions for the given event. If your sales terms allow ticket refunds, the attendee should follow the described refund procedure.
After the ticket refund request is accepted, the Organizer contacts our team via the chat available in the bottom right corner of the page.
In the message you need to provide the information available in the MANAGE → TICKETS tab, i.e.:
first and last name of the ticket holder,
email address,
transaction ID.
Based on this, we cancel the specified ticket in the system. What does this mean?
the ticket disappears from the “My tickets” section on the landing page and in the user's mobile app
the attendee may still have a PDF ticket in their inbox, but it’s no longer valid,
during check-in on the day of the event, the app will show a message that the ticket doesn’t exist, so the reception staff won’t let in a person using a returned ticket.
At the same time, refund the participant’s money:
if the payment was made by bank transfer based on a pro forma invoice, the refund is made via a return transfer;
if the payment went through PayU / Autopay / Stripe, you issue the refund directly from the payment gateway.
If the participant received a VAT invoice, you also need to issue a corrective invoice. You can find details about invoices issued by the system IN THIS ARTICLE.
Have a great event with Meeting Application!
